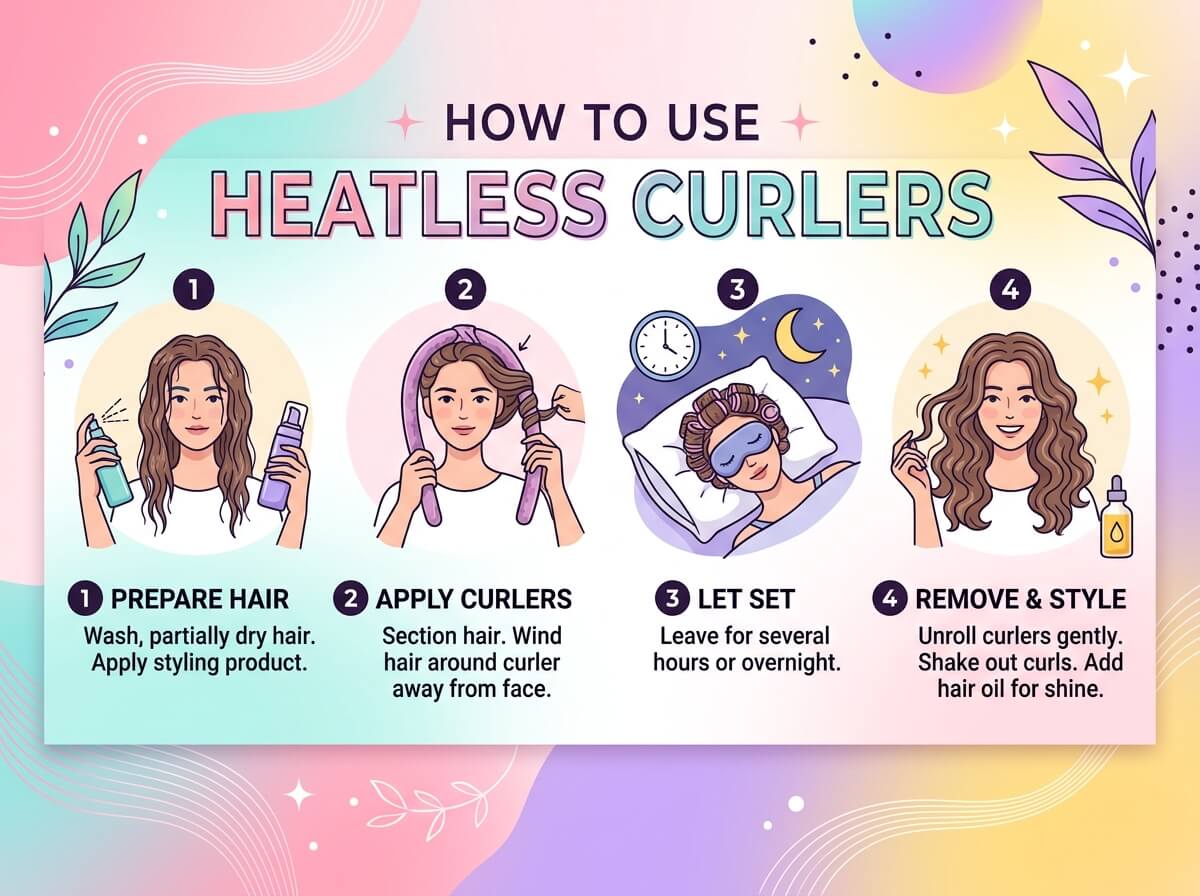
How to Use Heatless Curlers?
So you want bouncy, gorgeous curls — but without frying your hair with a curling iron? You’re in the right place.
Heatless curlers are one of the best-kept secrets in the hair care world. They give you soft, natural-looking waves and curls while you sleep, work, or just chill at home. No heat. No damage. No stress.
This guide walks you through everything you need to know. We’ll cover the types of heatless curlers, how to prep your hair, step-by-step instructions, tips for making curls last longer, and common mistakes to avoid.
Let’s get into it.
What Are Heatless Curlers?
Heatless curlers are tools that shape your hair into curls without using any heat at all. You wrap your damp or dry hair around them, leave them in for a few hours (or overnight), and take them out to reveal beautiful curls.
They come in many shapes and sizes. Some look like foam rods. Others are velvet ribbons. Some are silicone wraps. But they all work on the same basic idea — you wrap your hair around something, let it dry or set, and the curl holds.
These curlers are super popular right now for good reason. They protect your hair from heat damage, which is one of the biggest causes of breakage, dryness, and split ends. If you’ve been using a curling wand every day, your hair will thank you for switching to heatless methods.
Types of Heatless Curlers You Should Know
Before you pick up any old tool, it helps to know what’s out there. Each type gives a slightly different curl result.
Foam Rollers
These are the classic. Foam rollers have been around forever. You wrap small sections of hair around the foam cylinder and secure it by bending the ends or using a clip. They’re great for tight, defined curls. They’re also very affordable and easy to find.
Foam rollers work best on medium to long hair. If your hair is shorter, they can be tricky to use.
Flexi Rods
Flexi rods are flexible, bendable rods that come in different sizes. Thicker rods make looser waves. Thinner rods make tighter curls. You wrap your hair around the rod and bend the ends to hold it in place.
These are fantastic for creating a spiral curl look. They work on all hair types, including natural, curly, and relaxed hair.
Velvet or Silk Ribbon Curlers
This is the trendy one you’ve probably seen all over social media. It’s usually a long, soft ribbon — often velvet or silk — that you wrap sections of your hair around from root to tip. You sleep with it in overnight and wake up to gorgeous, voluminous waves.
It’s one of the easiest heatless curling methods to learn. Perfect for beginners.
Heatless Curling Rod (The Viral One)
This is a single, structured rod — often made of foam or silicone — that sits on top of your head. You wrap two large sections of hair around it, one on each side. It creates soft, flowing waves that look very natural.
This method went viral on social media and honestly, it lives up to the hype. It’s fast, easy, and very beginner-friendly.
Perm Rods
Perm rods are small, plastic rods with a rubber band attached. They give you tight, defined ringlets. They’re especially popular for natural hair. The smaller the rod, the tighter the curl.
Curlformers
Curlformers are mesh tubes that you hook your hair into using a special tool. They look a bit like slinky toys. They create very defined, uniform curls. They take a little practice but are worth it once you get the hang of them.
What You Need Before You Start
Getting good results starts with having the right stuff on hand. Here’s what you’ll need:
- Your chosen heatless curlers (pick one type to start with)
- A spray bottle filled with water (to dampen dry hair if needed)
- A lightweight curl-setting product — this could be a mousse, curl cream, or setting lotion
- A wide-tooth comb or detangling brush
- Hair clips or pins (to keep sections separated)
- A silk or satin scarf or bonnet (optional, but great for overnight curls)
How to Prep Your Hair for Heatless Curlers
Prep makes a huge difference. Don’t skip this part.
Step 1: Start With the Right Hair Texture
Heatless curlers work best on slightly damp hair. Not soaking wet, not completely dry — somewhere in between. Hair that’s about 80% dry holds the curl shape well and dries fully while you wear the curlers.
If your hair is already dry, lightly spritz it with water from a spray bottle until it feels slightly damp throughout.
Step 2: Detangle Your Hair
Work through any knots or tangles with a wide-tooth comb. Start from the ends and work your way up to the roots. This helps your hair wrap smoothly around the curlers and prevents breakage.
Step 3: Apply a Setting Product
This step is optional but highly recommended. A curl-setting mousse, light hold cream, or setting lotion helps the curl last much longer after you take the curlers out.
Apply the product evenly from roots to ends. Don’t use too much — a little goes a long way. Heavy products can weigh your curls down or leave them feeling stiff.
Step 4: Divide Your Hair Into Sections
Use clips to separate your hair into manageable sections. The number of sections depends on your method:
- For the viral heatless curling rod: just 2 sections
- For foam rollers or flexi rods: 8 to 12 sections (more sections = more curls)
- For ribbon curlers: 4 to 6 sections
Having your hair in sections makes the wrapping process much easier and more organized.
How to Use the Viral Heatless Curling Rod (Step-by-Step)
Let’s start with the most popular method — the viral heatless curling rod. It’s fast, beginner-friendly, and the results are stunning.
What you need: One heatless curling rod, two hair ties or scrunchies
Step 1: Place the Rod on Top of Your Head
Set the rod horizontally across the top of your head, right at the center. Think of it like a headband sitting on the very top of your head. Secure it lightly in place or just hold it while you work.
Step 2: Take a Small Section from the Front
Grab a small section of hair from the very front of one side. This section should be about 1 to 2 inches wide.
Step 3: Start Wrapping
Lay that section of hair over the rod, then wrap it down and under, then back up over the rod again. Keep wrapping the hair around the rod in a downward spiral motion as you move toward the back of your head.
Continue wrapping small sections of hair from that side as you go. The key is to keep the wraps smooth and tight.
Step 4: Secure the End
When you’ve wrapped all the hair from that side, tie the end with a scrunchie or hair tie to keep it in place.
Step 5: Repeat on the Other Side
Do the exact same thing on the other side of your head. Wrap sections of hair around the rod, moving from front to back, and secure the end with another scrunchie.
Step 6: Leave It In
Now just leave the rod in. You can leave it in for 3 to 4 hours during the day, or sleep with it in overnight for the best results. Sleeping with it overnight gives the curl more time to set, which means the curls will last longer.
A silk or satin scarf tied loosely over the rod keeps everything in place while you sleep and reduces frizz.
Step 7: Take It Out
Once your hair is fully dry and the curls have set, gently remove the scrunchies and slide the rod out of your hair.
Now comes the fun part. Slowly separate the curls with your fingers. Don’t use a brush or comb — this will create frizz and ruin the curl pattern. Use your fingers to gently pull the curls apart and fluff them for volume.
Finish with a light hold hairspray if you want the curls to last even longer.
How to Use Foam Rollers (Step-by-Step)
Foam rollers give you more defined, structured curls. Here’s how to use them.
Step 1: Section Your Hair
Clip your hair into 8 to 12 sections. The more sections you use, the more curls you’ll have.
Step 2: Take One Section and Comb It Through
Unclip one section and comb it smooth. Hold it straight up or away from your head.
Step 3: Place the Roller at the End of Your Hair
Hold the foam roller at the tip of the hair section. Place the very end of your hair against the roller.
Step 4: Roll Upward
Roll the foam roller upward, toward your scalp, while keeping the hair smooth and tight around it. Keep rolling until the roller sits right against your scalp.
Step 5: Secure the Roller
Bend the ends of the roller inward to lock it in place. Some rollers come with snap-close ends. Others just rely on the bend.
Step 6: Repeat
Do the same thing for every section of hair. It takes a little time, but once you get into the rhythm, it goes quickly.
Step 7: Wait and Remove
Leave the rollers in for at least 4 to 6 hours. Overnight is even better. When you remove them, unroll slowly and carefully. Separate the curls gently with your fingers.
How to Use Flexi Rods (Step-by-Step)
Flexi rods are great for spiral curls. Here’s how to use them.
Step 1: Section Your Hair
Divide your hair into small sections. The smaller the section, the tighter and more defined the curl.
Step 2: Apply Curl Cream or Mousse
Work a small amount of curl cream or mousse through each section before rolling. This helps the curl set and hold.
Step 3: Wrap Your Hair Around the Rod
Start at the tip of the hair and wrap it around the flexi rod. You can wrap it in a spiral, moving up toward the root, or you can roll it upward like a foam roller. The spiral wrap gives a more elongated curl.
Step 4: Bend the Ends of the Rod
Once your hair is fully wrapped, bend both ends of the rod toward each other to hold the hair in place.
Step 5: Let It Set and Remove
Leave the rods in until your hair is fully dry. Remove them by gently bending the rod open and carefully sliding it out. Separate and fluff with your fingers.
How to Use Ribbon or Velvet Curlers (Step-by-Step)
The ribbon method is super easy and works great for soft, romantic waves.
Step 1: Divide Your Hair Into 4 to 6 Sections
Clip your hair into sections.
Step 2: Take One Section and Hold the Ribbon at the Root
Hold the velvet ribbon at the root of one section. Place the ribbon flat against the hair section.
Step 3: Wrap the Hair and Ribbon Together
Wrap both the hair and the ribbon together as you twist downward toward the tip. Think of braiding them together, but in a simpler wrap motion. The ribbon acts as a structure that your hair wraps around.
Step 4: Tie the End
When you reach the tip, tie the ribbon in a loose knot or bow to secure it.
Step 5: Repeat and Sleep
Repeat for all sections. Sleep with the ribbons in overnight for best results.
Step 6: Unwrap and Style
In the morning, carefully untie and unwrap each ribbon. Separate the waves gently with your fingers and enjoy your gorgeous results.
Tips for Making Your Heatless Curls Last Longer
Getting the curl is one thing. Keeping it is another. Here are some tips to help your curls hold up throughout the day.
Use a setting product. A mousse, curl cream, or light styling gel before you put the curlers in makes a huge difference. It gives the curl something to hold onto.
Make sure your hair is fully dry before removing curlers. This is the most important tip. If your hair is still damp when you take the curlers out, the curl won’t hold. It will just fall flat within an hour. Be patient and wait until your hair is completely dry.
Don’t touch your curls right after removing the curlers. Let them cool and settle for a few minutes first. Then separate with your fingers.
Use hairspray after styling. A light hold hairspray seals the curl and adds lasting power.
Sleep on a silk or satin pillowcase. Regular cotton pillowcases create friction that breaks up curls and causes frizz. Satin or silk keeps your curls smooth overnight.
Refresh the next day with a curl refresher spray. Mix a little water with a small amount of conditioner in a spray bottle. Lightly mist your hair and scrunch gently to revive the curls.
Common Mistakes Beginners Make (And How to Fix Them)
Even with the best curlers, things can go wrong. Here’s what to watch out for.
Mistake 1: Hair is too wet when applying curlers. Hair that’s soaking wet takes forever to dry and may not curl properly. Squeeze out excess water and let your hair air-dry a bit before putting the curlers in.
Mistake 2: Wrapping the sections too loosely. If the hair isn’t wrapped tightly around the curler, the curl won’t form well. Keep the wrap firm and smooth as you go.
Mistake 3: Using sections that are too thick. Thick sections don’t get enough contact with the curler to form a good curl. Use smaller, thinner sections for better results.
Mistake 4: Removing curlers before hair is dry. We mentioned this already, but it’s worth repeating. Patience is everything here. Wait until your hair is fully, completely dry. Touch the hair — if it still feels cool or damp in spots, leave the curlers in longer.
Mistake 5: Brushing the curls out. Brushing ruins the curl pattern and creates a frizzy mess. Always use your fingers to separate and style heatless curls.
Mistake 6: Skipping the setting product. You can skip it and still get curls, but they won’t last as long. Even a tiny bit of mousse or curl cream makes a big difference in how long your style holds.
Best Hair Types for Heatless Curlers
Heatless curlers work on most hair types, but results can vary.
Fine, straight hair — Heatless curlers work well, but the curls may not hold as long. Use a good setting product and hairspray for longer-lasting results.
Medium, wavy hair — This is probably the best hair type for heatless curlers. The natural wave pattern helps the curl form and hold easily.
Thick, coarse hair — Heatless curlers work, but you may need to leave them in longer. Overnight is strongly recommended. Use a stronger-hold setting product.
Natural, curly, or coily hair — Flexi rods and perm rods are especially popular for natural hair. They enhance and define the natural curl pattern beautifully.
Color-treated or chemically processed hair — Heatless curlers are a great option here because they skip the heat that can further damage already-processed hair.
How Often Can You Use Heatless Curlers?
One of the best things about heatless curlers is that you can use them as often as you like. Since there’s no heat involved, there’s no damage to worry about from overuse.
Many people wear them overnight a few times a week and get consistently beautiful results. Some use them every day while their hair is in a protective style phase.
Just make sure you’re keeping your hair well moisturized and nourished. Even without heat, over-manipulating your hair or wrapping it too tightly all the time can cause stress on the strands. Give your hair rest days too, and keep up with regular deep conditioning treatments.
Quick Product Recommendations for Heatless Curlers
You don’t need to spend a lot of money to get great heatless curls. Here are some product types to look for:
- Curl-setting mousse — Lightweight, gives great hold without stiffness
- Curl cream — Adds moisture and definition, great for drier hair types
- Setting lotion — A classic choice that works well for foam rollers and flexi rods
- Light hold hairspray — For sealing in your curls after styling
- Satin or silk scarf — Protect your overnight set and reduce frizz
Start with what you already have at home. Many people get great results with just a little water and whatever light product they already own.
Final Thoughts
Heatless curlers are a game changer. Once you try them, it’s hard to go back to the daily heat styling routine.
Yes, they take a little practice at first. Your first attempt might not look perfect — and that’s totally okay. The technique gets easier every time. Within a few tries, you’ll have it down and you’ll be waking up to gorgeous curls with almost zero effort.
Start with one method, get comfortable with it, and then try others. The viral rod, foam rollers, and velvet ribbons are all great starting points for beginners.
Your hair will look beautiful, feel healthier, and you’ll never have to worry about heat damage again.
Now go grab your curlers and give it a try — your best hair days are just ahead.
Have questions about heatless curling? Drop them in the comments below. And if you found this guide helpful, share it with a friend who’s ready to ditch the heat too.