How to Use Dyson Airwrap?
So you just got a Dyson Airwrap. Or maybe you’ve had one for a while but feel like you’re not getting the most out of it. Either way, this guide is for you.
The Dyson Airwrap is one of the most talked-about hair tools out there. It dries, curls, waves, and smooths your hair — all without extreme heat. But it does take a little practice. Once you get the hang of it, it becomes your go-to tool every single day.
Let’s break it all down in plain, simple steps.
What Is the Dyson Airwrap, Exactly?
The Dyson Airwrap is a multi-styling hair tool. It uses a technology called the Coanda effect. This is basically a physics trick where fast-moving air wraps your hair around the barrel automatically.
You don’t have to manually wind your hair. The tool pulls it in by itself. That’s what makes it so different from a regular curling iron or wand.
It also uses lower heat than most traditional styling tools. Lower heat means less damage over time. That’s a big deal if you color your hair or have fine, fragile strands.
What Comes in the Box?
The Dyson Airwrap comes with several attachments. The exact ones depend on which set you bought — complete, long, or a more basic kit. But here’s what most sets include:
- Barrels — for curling and waving (usually comes in two sizes)
- Smoothing brushes — for a blowout look
- Round volumizing brush — adds body and lift
- Pre-styling dryer — works like a concentrator nozzle
- Firm smoothing brush — great for straighter styles
Each attachment clicks on and off easily. You just line it up and push it into the handle until it locks.
Keep your attachments somewhere clean and easy to reach. A little storage case or pouch works great.
Before You Start: Prep Your Hair Right
This is the step most people skip. But it matters more than you think.
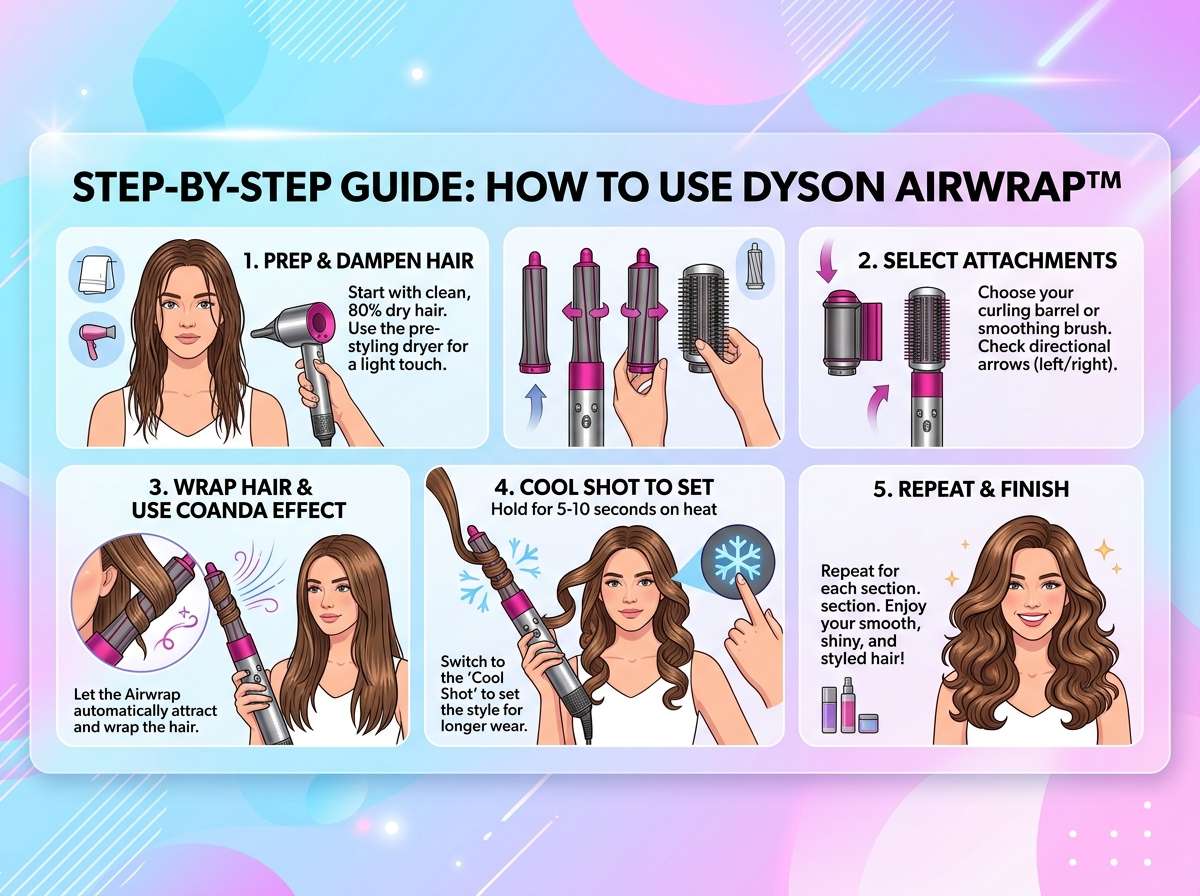
Start with damp, towel-dried hair. Not soaking wet. Not bone dry. The Airwrap works best when your hair has some moisture left in it — around 70 to 80 percent dry is the sweet spot.
If your hair is too wet, the curls won’t hold. If it’s too dry, the Coanda effect won’t work as well and you’ll end up chasing your hair around the barrel manually.
Here’s a quick prep routine:
- Wash your hair as normal.
- Squeeze out extra water with a microfiber towel.
- Run your fingers through to detangle.
- Apply a heat protectant spray or cream from roots to ends.
- Let it air dry for about 10 to 15 minutes.
That’s it. Now you’re ready.
How to Attach and Switch Between Attachments
Press the button at the base of the attachment to release it. Line up the next one with the slot on the handle. Push it in gently until it clicks.
That click tells you it’s locked in and safe to use.
Always let the tool cool slightly before swapping attachments. The barrels especially can get warm. A few seconds is all you need.
How to Use the Curl Barrels
This is the most iconic feature of the Dyson Airwrap. The auto-curling barrels.
Each barrel has two sides — one that curls toward your face, and one that curls away. The direction matters a lot for the final look.
Step 1: Section your hair. Use clips to divide your hair into sections. Work from the bottom up. Smaller sections give tighter, more defined curls. Larger sections give loose waves.
Step 2: Turn the tool on. Point the barrel downward at about a 45-degree angle. Set it to medium heat and medium airflow to start. You can always adjust once you get comfortable.
Step 3: Bring the barrel close to the root. Hold the barrel near the root of your section — but not touching your scalp. About an inch away is good.
Step 4: Let the hair wrap itself. Open your fingers and let the barrel pull the hair in. It sounds like magic, but it works. Hold the hair loosely at the end to guide it. Don’t grip tightly.
Step 5: Hold for 8 to 12 seconds. Keep the barrel in place. The warm air is setting the curl. You’ll feel it.
Step 6: Release slowly. Press the cool shot button as you pull the barrel away. This cool air locks the curl in place. It’s the same trick hairdressers use — heat sets the shape, cool air holds it.
Repeat all over your head. Alternate the curl direction as you go. Some sections curl toward your face, some curl away. This gives a more natural, lived-in look instead of a uniform set of ringlets.
How to Get Loose Waves Instead of Tight Curls
Same barrel, slightly different technique.
Use a bigger barrel size. Wrap larger sections of hair. Hold it for a shorter time — around 6 to 8 seconds instead of 12. Pull the barrel away before the cool shot.
The result is a beachy, relaxed wave rather than a defined curl.
How to Use the Smoothing Brushes
The smoothing brushes are perfect for a blowout look. Think of that bouncy, salon-smooth finish.
Pre-styling dryer first. Before using any brush, rough-dry your hair with the pre-styling dryer attachment. This gets your hair to about 80 to 90 percent dry. Think of it as the setup for everything else.
Then switch to a smoothing brush. Take a section of hair. Place the brush underneath the section, close to the root. Turn the tool on and slowly pull down toward your ends. Keep the brush moving — don’t stop in one spot for too long.
Repeat section by section. Work from the nape of your neck upward.
For the roots, angle the brush so it lifts the hair upward as you dry. This creates volume at the root instead of flat, lifeless hair.
How to Use the Round Volumizing Brush
This one is for adding body and bounce. It’s especially great for fine or limp hair.
Take a section of hair at the crown. Wrap the hair around the brush loosely. Aim the airflow at the roots. Slowly rotate the brush as you pull it toward the ends.
This lifts the hair as it dries, giving you that full, voluminous blowout shape.
Heat and Airflow Settings Explained
The Dyson Airwrap has different heat and speed settings. Here’s a quick cheat sheet:
High heat + high airflow — good for thick, coarse, or hard-to-style hair. Use this to rough-dry quickly with the pre-styling dryer.
Medium heat + medium airflow — the everyday sweet spot. Works for most hair types when curling or using brushes.
Low heat + low airflow — great for fine or color-damaged hair. Also good for the finishing stages when you want more control.
Cool shot (no heat) — always use this at the end of each section. It locks in your style and adds shine.
A good habit: always finish each section with the cool shot. Your curls will last longer and feel smoother.
Which Barrel Direction Creates Which Look?
This confuses a lot of people at first.
Curling away from the face — gives a more classic, polished look. Hair falls away from your cheeks. Good for a glam, red-carpet style.
Curling toward the face — more romantic and soft. Hair falls toward your face. Works well for a bohemian or vintage vibe.
Mixing both directions — the most natural and modern look. It mimics how hair actually moves, so it doesn’t look too “done.”
A simple trick: start at the front sections and curl away from the face. Move to the back sections and alternate directions randomly. The result looks effortless but intentional.
Common Mistakes and How to Fix Them
Hair isn’t wrapping onto the barrel. Your hair is probably too dry. Mist it lightly with water or a setting spray and try again.
Curls fall out quickly. You’re not using the cool shot. Or your hair was too wet to start. Always wait for that cool blast before moving on.
The tool feels too hot on your scalp. You’re holding it too close. Keep at least an inch of space between the barrel and your scalp.
Frizziness after styling. Apply a small amount of hair oil or serum before you start. This smooths the cuticle and helps the Airwrap glide through more easily.
One side of your head curls better than the other. Switch which barrel you’re using — one is designed to curl left, one curls right. Make sure you’re using the right direction for each side of your head.
Tips for Different Hair Types
Fine or thin hair: Use the low heat setting. Don’t hold the barrel too long — 6 to 8 seconds is plenty. Too much heat on fine hair leads to limpness, not curls.
Thick or coarse hair: Use medium to high heat. Hold the barrel a full 12 seconds or a little longer. Work in slightly smaller sections so the heat can reach all the way through.
Curly or wavy hair: The Airwrap is great for enhancing your natural texture. Use the barrels to refresh and define your curls. The smoothing brush can help stretch them out for a blowout look.
Color-treated or damaged hair: Stick to lower heat. Apply a good heat protectant every single time. The Dyson Airwrap’s lower heat ceiling is actually a reason many people with damaged hair love it.
How to Get Longer-Lasting Results
You want your style to last all day. Here’s how to make that happen.
Let curls cool completely before touching them. Once you remove the barrel, don’t brush or run your fingers through the curls right away. Give them a full minute or two to cool and set.
Use a light-hold hairspray. After your whole head is done, mist with a flexible hold spray from about 12 inches away. Don’t overdo it — you want movement, not a helmet.
Sleep on a silk or satin pillowcase. Seriously, this extends your style to day two with barely any touchups.
Use dry shampoo at the roots the next morning. A quick spritz refreshes the volume and helps the second-day style look intentional.
How to Clean and Maintain Your Airwrap
A clean tool works better and lasts longer.
Clean the filter regularly. The Airwrap has a filter at the base of the handle. Hair, dust, and product buildup clog it over time. Use the cleaning brush that came in the box to gently clean it. Aim for once a week if you use the tool daily.
Wipe down the barrels. After each use, let them cool, then wipe them with a slightly damp cloth. Product residue can bake onto the surface over time and affect performance.
Store it properly. The storage case or bag that came with it is there for a reason. It keeps the attachments organized and protects the tool from dust.
Is the Dyson Airwrap Worth It for Beginners?
Here’s an honest take.
It has a learning curve. The first few times you use it, the results might not be perfect. That’s normal. The Coanda effect feels weird at first. You might not get the barrel positioned right. The curls might not last as long as you hoped.
But by the third or fourth session, something clicks. You get a feel for the angle, the timing, the cool shot. And then it becomes the easiest hair tool you’ve ever used.
For people who want to cut down on heat damage, spend less time styling, and get salon-level results at home — it’s worth every penny.
Quick Step-by-Step Summary
For easy reference, here’s the full routine at a glance:
- Wash and towel-dry hair until about 70 to 80 percent dry.
- Apply heat protectant.
- Attach the pre-styling dryer and rough-dry the roots and lengths.
- Switch to your styling attachment (barrel or brush).
- Section hair and work from bottom to top.
- Hold the barrel or brush near the root and let the Coanda effect do its thing.
- Hold each section for 8 to 12 seconds.
- Press the cool shot before releasing.
- Let all curls fully cool before touching.
- Finish with a light mist of hairspray.
That’s the whole game.
Final Thoughts
The Dyson Airwrap isn’t just a hair dryer or a curling iron. It’s a whole styling system in one handle. Once you learn how it works and get comfortable with the attachments, your morning routine gets faster, your hair looks better, and you stop dreading styling altogether.
Start slow. Practice on a low-stakes day. Try one attachment at a time. And use that cool shot every single time — it really is the secret to making curls last.
You’ve got this.
Bonus: Dyson Airwrap Styling Ideas to Try
Once you’re comfortable with the basics, it’s fun to experiment. Here are a few easy styles you can create with your Airwrap.
The Classic Blowout Use the pre-styling dryer to get hair mostly dry. Then finish with the large smoothing brush, pulling from root to tip on each section. Lift the roots with the round brush for extra volume. The result is that sleek, bouncy salon blowout look — without the salon price tag.
Soft Hollywood Waves Use the larger barrel. Curl all sections away from your face. Let them cool fully. Then run your fingers gently through the waves and shake them out. Finish with a shine serum on the ends. This creates that glamorous, old-Hollywood wave pattern that looks effortless but stunning.
Messy Textured Curls Mix your barrel directions randomly. Some toward the face, some away, some straight down. Don’t overthink it. When they’re all set, use your fingers to tousle the curls apart. The messier, the better. Spritz with a texturizing spray to hold the casual, lived-in shape.
Voluminous Blowout for Fine Hair Focus the round volumizing brush at the crown of your head. Lift each section straight up as you dry it. This lifts the roots away from the scalp and creates big, bouncy volume that fine hair usually lacks. Finish with a light-hold spray to keep it lifted all day.
Frequently Asked Questions
Can you use the Dyson Airwrap on dry hair? It works best on damp hair. Dry hair doesn’t respond as well to the Coanda effect. If your hair is already dry, lightly mist it with water before styling.
How long does it take to style a full head of hair? Once you’re practiced, expect around 20 to 30 minutes for a full style. Beginners might take 40 to 50 minutes at first. It speeds up quickly as you get comfortable.
Can you use it on extensions or wigs? Yes, you can — but use the lowest heat setting. Extensions, especially synthetic ones, can be more heat-sensitive than natural hair.
Is it safe for chemically straightened hair? Yes. The lower heat settings make it a safer option than high-heat flat irons or traditional curling tools. Always use a heat protectant regardless.
Do you still need a hair dryer if you have an Airwrap? Not really. The pre-styling dryer attachment handles rough-drying well. Most people find the Airwrap replaces both their dryer and their curling iron entirely.
Why does my hair smell burning when I use it? This usually means product buildup on the barrel or that you’re holding it on one spot too long. Clean the barrels, use less product, and keep moving.
Accessories That Go Well with the Dyson Airwrap
You don’t need a lot of extras, but a few small things make the whole experience better.
Heat protectant spray — non-negotiable. Even with lower heat, protection matters.
Microfiber towel — absorbs water faster than a regular towel and causes less friction on your hair cuticle.
Sectioning clips — the bigger alligator-style clips work best. They hold thick sections out of the way while you work on the rest.
Texturizing spray — use this after styling for added grip and texture in the curls. It helps them last longer and look more defined.
Silk scrunchies — if you put your hair up between styling sessions to let it set, silk scrunchies won’t leave a crease or dent.
Hair oil — a tiny drop of lightweight hair oil on the ends after styling adds shine and tames any flyaways without weighing the hair down.
None of these break the bank. And all of them make your Airwrap results look even better.
How the Dyson Airwrap Compares to Other Styling Tools
People often ask how the Airwrap stacks up against regular curling irons, wands, or hair dryer brushes. Here’s the honest breakdown.
Vs. a curling iron or wand: Traditional curling tools use direct contact heat — meaning the hot barrel touches your hair directly. This is effective but can cause more damage over time. The Airwrap uses airflow to wrap and shape, which is gentler. The tradeoff is that curling irons give a faster, tighter curl. The Airwrap gives a more natural wave or curl with less damage risk.
Vs. a hair dryer brush: A dryer brush is simpler and usually cheaper. It dries and smooths in one step. But it doesn’t curl or wave. The Airwrap does all of that and more. If you only ever want a blowout look, a dryer brush is fine. If you want versatility, the Airwrap wins.
Vs. a regular blow dryer plus round brush: Many hairdressers swear by this classic combo. It gives amazing results but requires skill and two hands working together. The Airwrap simplifies this because the tool does most of the work for you. It’s easier for people who don’t have a professional background in styling.
The Airwrap isn’t the right tool for every single person. But for people who want one tool to handle drying, smoothing, and curling — it’s genuinely hard to beat.
How to Practice Without Pressure
If you’re brand new and a little intimidated, here’s a low-stakes way to practice.
Pick a day when you have nowhere important to be. Wash your hair and just experiment. Try one attachment at a time. See how the barrel pulls your hair in. Get comfortable with the cool shot button. Notice how different heat settings feel on different sections.
Don’t expect perfection on your first try. That’s not what practice is for.
By your fifth or sixth session, muscle memory kicks in. The angle of the barrel, the timing, the way you hold the hair — it starts to feel natural. And one day you’ll finish your whole head in under 20 minutes and wonder why you ever felt nervous about it.
The Dyson Airwrap rewards patience. Give it a few weeks of regular use. The results are worth it.
Mary is a fashion enthusiast and lifestyle writer who loves discovering stylish clothing, accessories, and everyday fashion essentials. She enjoys researching the latest trends, reviewing popular products, and sharing practical style tips to help readers dress with confidence. Through FashionSolve.com, Mary provides honest recommendations, fashion guides, and inspiration for building a wardrobe that is both stylish and affordable.