How to Curl Your Hair With a Flat Iron?
You’ve seen those gorgeous, bouncy curls on social media and wondered how to get them yourself. The secret? You don’t need a curling iron or a professional stylist. A flat iron can totally do the trick. Seriously. Your trusty flat iron sitting in your bathroom drawer right now can create beautiful waves and curls that last all day.
This guide walks you through every single step. We’ll cover everything from picking the right flat iron to troubleshooting common problems. By the end, you’ll be able to create salon-quality curls at home without any special skills or expensive tools.
Why a Flat Iron Works for Curling Hair
This might seem weird at first. How can a tool designed to straighten hair actually curl it? The answer is simple. A flat iron creates heat and pressure in a specific way that shapes your hair into curves. When you guide the flat iron through your hair while twisting it, you’re basically wrapping your strands around the heated plates. That twist and turn creates the curl.
The best part? Flat irons are way easier to control than curling irons. You have better grip. You can see exactly what you’re doing. And honestly, the learning curve is smaller. Many people find flat irons more forgiving when they’re just starting out.
What Type of Flat Iron Do You Need?
Not all flat irons are the same. Let’s talk about what works best for curling.
Plate Width Matters
Flat irons come in different sizes. Narrow plates (around one inch wide) work great for creating tight, defined curls. Wide plates (around two inches) give you bigger, looser waves. For beginners, a medium-width flat iron (between 1 to 1.5 inches) is perfect. It’s versatile enough for different curl types.
Plate Material
The plates touch your hair directly, so the material is important. Here are the main types:
Ceramic plates conduct heat evenly and are gentle on hair. They heat up quickly and stay at a steady temperature. This makes them great for beginners.
Titanium plates get hot fast and stay hot. They work well for thick or coarse hair. They’re durable too.
Tourmaline plates help reduce frizz because they emit negative ions. If frizz is your enemy, this could be your answer.
Ionic flat irons release negative ions that seal the hair cuticle. Your curls come out shinier and smoother.
Don’t stress too much about this choice. Any decent flat iron with even heat distribution will work. Just avoid super cheap ones that have hot spots or uneven heating.
Temperature Control
You want a flat iron with a temperature dial or digital display. Different hair types need different heat levels. Thick hair needs more heat. Fine or damaged hair needs less. Having control over the temperature helps you protect your hair while still getting great curls.
Most flat irons range from 200°F to 450°F. For curling, you typically use medium to high heat (around 350°F to 400°F), depending on your hair type.
Preparing Your Hair for the Best Curls
The work starts before you even pick up the flat iron.
Start With Clean Hair
Wash and dry your hair the day before or the morning of styling. Curls hold better on freshly cleaned hair. Clean hair also feels smoother and looks shinier.
Let your hair dry completely. Trying to curl wet or damp hair is frustrating and can cause heat damage. Your flat iron works best on dry hair anyway.
Use a Heat Protectant Spray
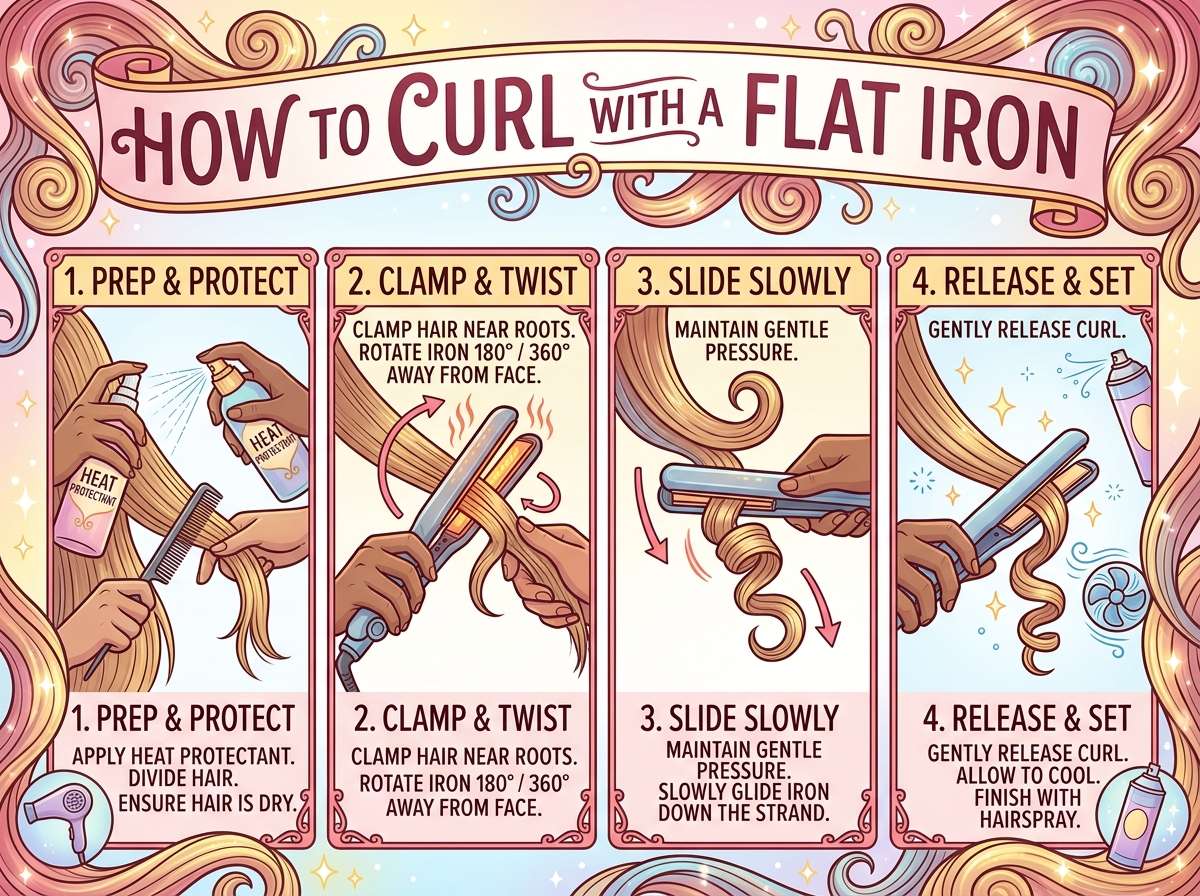
This is non-negotiable. A heat protectant spray creates a barrier between your hair and the heat from the flat iron. It reduces damage and helps your curls last longer.
Spray the protectant evenly throughout your damp hair before it fully dries. Let it dry before you start styling. Different products work differently, so follow the instructions on the bottle.
Apply a Curl-Enhancing Product
Now’s the time to use texturizing spray, curl cream, or sea salt spray. These products help your curls grip better and hold their shape for hours. They also add that beachy, lived-in texture that looks amazing.
Spray or apply the product to dry hair right before you start curling. Don’t overdo it though. You want texture, not crunchiness.
Brush Through Tangles
Take a few minutes to brush your hair and remove all the tangles. Smooth hair curls more evenly. Tangled hair creates messy, uneven waves. Use a paddle brush or wide-tooth comb to work through any knots.
Section Your Hair
Divide your hair into four sections. Start at the nape of your neck and make a horizontal line across the back of your head. That’s section one. Make another line at ear level across the top. That’s section two. The remaining hair on top is section three, and the sides are section four.
Clip up the sections you’re not working on. This keeps things organized and prevents you from re-curling hair that’s already done.
The Step-by-Step Curling Process
Now for the main event. Here’s how to actually curl your hair with a flat iron.
Step One: Heat Your Flat Iron
Turn on your flat iron and let it heat up completely. Most flat irons need 30 to 60 seconds to reach full temperature. Check the indicator light. Once it stops blinking or changes color, you’re ready to go.
Set the temperature based on your hair type. Fine hair: 300°F to 350°F. Medium hair: 350°F to 400°F. Thick hair: 400°F to 450°F.
Step Two: Take a Small Section of Hair
Take a thin section from the back, bottom portion of your hair. The section should be about one inch thick and two inches wide. Smaller sections give you tighter, more defined curls. Bigger sections create looser waves.
Hold this section with one hand, keeping it straight and smooth.
Step Three: Insert Your Hair Into the Flat Iron
Open the flat iron and place the section of hair near the roots, right between the two plates. Clamp down gently. You want firm pressure, not aggressive squeezing.
Step Four: Twist While You Glide
This is the magic step. Once your hair is clamped between the plates, twist the flat iron away from your face (or toward your face if you want curls going that direction). At the same time, glide the flat iron slowly down toward the ends of your hair.
Keep twisting as you move down. The twist wraps your hair around the plates, and the downward glide stretches that curl into shape. Think of it like corkscrewing the flat iron through your hair.
The whole movement should take about three to five seconds. Go slow. Rushing creates loose, undefined waves.
Step Five: Remove the Curl
When you reach the ends of your hair, you can either let the curl drop or gently catch it in your hand. If you catch it, hold the curl loosely for a few seconds. This helps it set while it’s still warm. Then release it.
The curl will feel warm and might look loose at first. Don’t panic. Curls tighten as they cool down.
Step Six: Repeat
Move to the next section and repeat the whole process. Work your way around your head from the back to the sides to the front.
Stay consistent with your twisting direction. If you twist away from your face on the back sections, twist the same direction on the front. This creates a polished, intentional look instead of random waves.
Tips for Different Hair Types and Lengths
Not all hair is the same, and the technique changes a little based on what you’re working with.
Curling Thick Hair
Thick hair needs more heat and more tension. Use a higher temperature setting. Take slightly larger sections so you can clamp down harder. Work slowly and deliberately. The extra heat and pressure help create curls that actually hold in thick strands.
Curling Fine Hair
Fine hair is delicate. Use a lower temperature to prevent damage and breakage. Take smaller, thinner sections. Use lighter pressure with your flat iron. Fine hair curls easily, so you don’t need aggressive heat or force.
Curling Short Hair
Short hair is actually easier to curl with a flat iron than long hair. The sections are smaller and easier to control. You can be more precise with your twisting motion. Just take one-inch sections and follow the same technique.
Curling Long Hair
Long hair requires patience. Each curl takes longer because you’re covering more length. Take smaller sections to avoid uneven heating. Go slower with your gliding motion to give the heat time to work through all the hair. Long curls look better when they’re more defined, so tighter twists work well.
Curling Wavy Hair
If your hair has natural waves, you’re starting ahead. You can use lower heat since waves are easier to curl than stick-straight hair. Work with your natural texture instead of against it. The curls will look more natural and last longer.
Curling Straight Hair
Straight hair sometimes holds curls less easily than wavy hair. You might need higher heat. You might need to hold curls in place longer after you create them. Consider using more curl-enhancing product on the roots where curls tend to fall faster.
Techniques That Professionals Use
Once you master the basic method, try these tricks to level up your curl game.
The Wave Technique
Instead of creating distinct curls, you can create waves. Place your hair between the plates but don’t twist. Simply glide the flat iron down in an S-shape pattern. The flat iron naturally bends the hair into wave shapes as you move it.
The Tight Wrap Method
For super defined curls, wrap your hair around the flat iron instead of just twisting. Place the section of hair in the flat iron and wrap it around the outside of the plates as you glide down. This creates spiral curls that look more voluminous.
The Reverse Direction
Curl the front sections of your hair in the opposite direction from the back. This creates a more dimensional look. Your hair gets more volume and movement because curls aren’t all facing the same way.
The Root Boost
For extra volume, focus your curling near the roots. When you create a curl right at the base of your hair, it gives that section a lift that lasts all day. This is especially useful if your hair falls flat easily.
The End Definition
For curls that look piecy and textured, make your twisting motion more pronounced at the very ends. A tighter twist at the ends creates definition. The curl looks more finished and styled.
Common Mistakes and How to Fix Them
Everyone messes up their first few tries. Here’s what to watch out for.
Loose, Falling Curls
If your curls drop within an hour, you’re not using enough heat or you’re working too fast. Crank up the temperature (within safe limits for your hair type) and move more slowly through each section. Let the heat do its work.
Crimped, Zigzag Curls
This means your flat iron isn’t gliding smoothly. You’re probably stopping and starting instead of making one continuous motion. Glide slowly and steadily from roots to ends without pausing.
Uneven, Messy Curls
You’re probably twisting inconsistently. Some sections get a tight twist, others get a loose one. Practice keeping your wrist motion steady and controlled. It takes a few tries to build muscle memory.
Burnt or Frizzy Ends
You’re using too much heat or holding the flat iron in one spot too long. Lower the temperature a bit. Move the flat iron more quickly through the ends (which are more fragile than the roots). Use more heat protectant spray.
Flat Curls on One Side
You’re pressing the flat iron plates together too hard on one side. Use even pressure on both sides of the hair. Loosen your grip slightly. The plates should clamp the hair gently but firmly, not aggressively.
Curls Only Staying Two Hours
Your hair might be too oily or smooth to hold curls. Use more texturizing product. Consider using dry shampoo at the roots before curling to create texture. You might also need to use slightly higher heat.
How Long Your Curls Will Last
With proper technique and products, your curls should last six to eight hours easily. Some people get curls that last all day.
Factors that affect how long curls stay:
Hair texture – Naturally wavy or curly hair holds curls longer. Straight hair sometimes needs extra help.
Hair thickness – Thick hair usually holds curls longer than fine hair.
Humidity – Humid days make curls drop faster. On dry days, curls last longer.
Products used – More and better products mean longer-lasting curls.
Your technique – Tighter, more defined curls last longer than loose waves.
Sleep – Sleeping on your curls will definitely mess them up. Wear a silk bonnet or braid your hair loosely before bed.
Protecting Your Hair While Curling
Let’s talk about hair health. You’re using heat, so protection matters.
Use Heat Protectant Products
This is your first line of defense. A good heat protectant spray creates a barrier that keeps your hair from getting fried. Use it every single time you use the flat iron.
Don’t Overdo It
You don’t need to curl your hair every single day. Give your hair rest days in between. Once or twice a week is plenty. Daily heat styling damages hair over time, no matter how careful you are.
Use a Lower Temperature When Possible
If your hair holds curls well at 350°F, don’t turn it up to 400°F. Always use the lowest temperature that still works. This is one of the best things you can do for long-term hair health.
Deep Condition Regularly
Heat-styled hair needs extra moisture. Use a deep conditioning mask once a week. Leave it on for the recommended time. Your hair will stay softer, shinier, and healthier.
Get Regular Trims
Split ends make hair look bad no matter how pretty your curls are. Trim your hair every six to eight weeks to keep it looking fresh and prevent damage from traveling up the hair shaft.
Consider Hair Oils
A light hair oil applied to the ends of your hair can help seal the cuticle and prevent moisture loss. This keeps your hair healthier and makes curls look shinier.
Styling Your Curls After They’re Done
Your curls are made, but the styling isn’t finished yet.
Cool Them Down
Let your curls cool completely before you do anything else. Curls set as they cool. If you move them around while they’re still warm, they’ll lose shape. Wait at least ten to fifteen minutes.
Flip Your Head
Flip your head upside down and gently shake. This adds volume to your curls and prevents them from lying flat against your head.
Separate the Curls
Using your fingers, gently separate the curls. Break them apart slightly so they’re not one solid bunch. This creates a more textured, natural look. You can also use a wide-tooth comb or a pick if you have one.
Add Finishing Spray
Once your curls are exactly how you want them, lock them in place with hairspray. A light mist works better than heavy spraying. You want your curls to move naturally, not be crunchy and stiff.
Smooth the Flyaways
Use a small smoothing serum or a tiny bit of hair oil on your fingers to tame flyaways. This gives your style a polished look without weighing down the curls.
Curling Different Sections for Different Looks
The direction you curl different parts of your head completely changes your final look.
The Romantic Wave
Curl all sections away from your face. This creates a soft, romantic look. It’s classic and flattering on almost everyone.
The Textured Look
Alternate the direction. Curl one section toward your face, the next away, the next toward again. This creates movement and dimension.
The Voluminous Look
Curl sections at the crown more tightly than sections lower down. Tighter curls at the top create lift and height. Your hair looks fuller and bouncier.
The Beachy Waves
Curl some sections loosely and others more tightly. Mix up the curl sizes. Use texturizing spray. This creates that effortless, just-came-from-the-beach vibe.
The Hollywood Curls
Curl everything consistently in the same direction, keep them tight and defined, and separate them carefully. This creates those glamorous, old-school curls that look super elegant and polished.
Troubleshooting Your Flat Iron Technique
Sometimes curls just don’t work out right. Here’s what might be going wrong.
Your Wrist Isn’t Twisting Enough
The twist is what creates the curl. If you’re not twisting much, you get barely-there waves. Really commit to the twist. Your wrist should rotate significantly as you move the flat iron down.
You’re Moving Too Fast
If you zoom through your hair, the heat doesn’t have time to set the curl. Slow down. Each section should take at least three to five seconds. Patience is your friend here.
Your Hair Is Too Wet
Even slightly damp hair won’t curl as well as completely dry hair. Make sure your hair is one hundred percent dry before you start. Damp hair causes frizz and weak curls.
You’re Clamping Too Hard
Aggressive pressure doesn’t create better curls. It actually flattens them. Use firm, steady pressure, not maximum strength. Your flat iron does the work, not your hand strength.
Your Sections Are Too Big
If you take huge sections, the heat can’t penetrate all the way through. You get a curled outside with a straight inside. Take smaller sections for more consistent results.
You’re Not Being Consistent
Changing your technique with each section creates an uneven look. Decide on your twist direction, your speed, your pressure, and your technique, then repeat exactly the same way for every section. Consistency is key.
Maintenance Between Styling Sessions
Your curls need care after you create them.
Use a Silk Pillowcase
Cotton pillowcases create friction that messes up your curls. Silk pillowcases let your hair glide smoothly. Your curls stay intact much longer overnight.
Refresh with Dry Shampoo
The next day, spray some dry shampoo on your roots. This adds texture and helps revive your curls. Spray, let it sit for a minute, then flip your head and shake.
Use a Curl Refresher Spray
These sprays breathe new life into curls that have been sitting overnight. Lightly spray your curls and scrunch them with your hands. They plump right back up.
Avoid Touching Them Too Much
The more you touch and play with your curls, the faster they fall. Resist the urge to adjust them constantly. Let them be.
Sleep Smart
If you’re sleeping with curls, either wear a silk bonnet or loosely braid your hair. This protects your curls while you sleep and they stay pretty decent when you wake up.
Practice Makes Perfect
The first time you curl your hair with a flat iron, it might not be perfect. That’s totally normal. Everyone’s first attempt is a little rough.
Do it a few times and you’ll get better. Your hands will learn the motion. You’ll figure out the right temperature for your hair. You’ll discover which technique you like best. Within a few tries, you’ll be creating beautiful curls every time.
Don’t get discouraged if your first curls are messy or loose or uneven. That’s just part of learning. Every expert started exactly where you are right now.
Conclusion
Curling your hair with a flat iron is an easy skill that anyone can learn. You don’t need expensive tools or special talents. Just a flat iron, some basic products, and a little practice. Before you know it, you’ll be creating gorgeous, bouncy curls that look like you just walked out of a salon.
The best part? Flat irons are so versatile. Use yours to straighten your hair on Monday, create waves on Wednesday, and do beach curls on Friday. One tool, unlimited styling possibilities.
Grab your flat iron, follow these steps, and start curling. Your friends will be asking you how you got your hair to look so good. Tell them it was all you, because it was. You’ve got this.
Mary is a fashion enthusiast and lifestyle writer who loves discovering stylish clothing, accessories, and everyday fashion essentials. She enjoys researching the latest trends, reviewing popular products, and sharing practical style tips to help readers dress with confidence. Through FashionSolve.com, Mary provides honest recommendations, fashion guides, and inspiration for building a wardrobe that is both stylish and affordable.