
How to Blow Dry Hair?
Blow drying your hair doesn’t have to be complicated or stressful. Whether you want a simple, smooth finish or you’re aiming for some volume and bounce, learning the right technique makes all the difference. In this guide, we’ll walk you through every step of the blow drying process so you can get salon-quality results at home.
Why Blow Drying Matters for Your Hair
Before we jump into the how-to, let’s talk about why blow drying is worth your time. When you blow dry your hair correctly, you’re not just speeding up the drying process. You’re actually shaping your hair the way you want it to look, adding shine, and reducing frizz.
Your hair has a cuticle layer that lies flat when it’s wet. As it dries, that cuticle can go in any direction. If you let it air dry, you might end up with frizz, flat spots, or a shape that doesn’t match what you wanted. A blow dryer helps you direct those cuticles in the right way, which means smoother, shinier hair.
Hot air from a blow dryer also helps seal that cuticle layer, which locks in moisture and reduces breakage. That’s why blow dried hair usually looks healthier and shinier than hair that’s left to dry on its own.
Getting the Right Tools for Blow Drying
You need the right equipment to blow dry your hair well. Let’s start with the most important tool: your blow dryer.
Picking Your Blow Dryer
Not all blow dryers are the same. Some are cheap and can damage your hair, while others are built to protect it. When you’re looking for a blow dryer, pay attention to wattage. A good blow dryer has between 1400 and 1800 watts. This power level dries your hair fast without making it too hot in any one spot.
Look for a blow dryer with heat settings. You want at least three options: low, medium, and high. Speed settings matter too. These let you control the air flow, which gives you more power over how your hair looks and feels.
Ionic blow dryers are worth the investment. They release negative ions that break up water molecules on your hair. This means your hair dries faster and gets less frizz. Your hair ends up looking smoother and shinier when you use an ionic blow dryer.
Ceramic or tourmaline blow dryers are also great choices. These materials heat up evenly, so you don’t get hot spots that can damage your hair. They hold heat better than basic metal, which means your hair stays protected.
Don’t cheap out on your blow dryer. A quality tool lasts longer and treats your hair better. You’ll use it several times a week, so spending a bit more now saves you from hair damage later.
Heat Protectant Spray Is Your New Best Friend
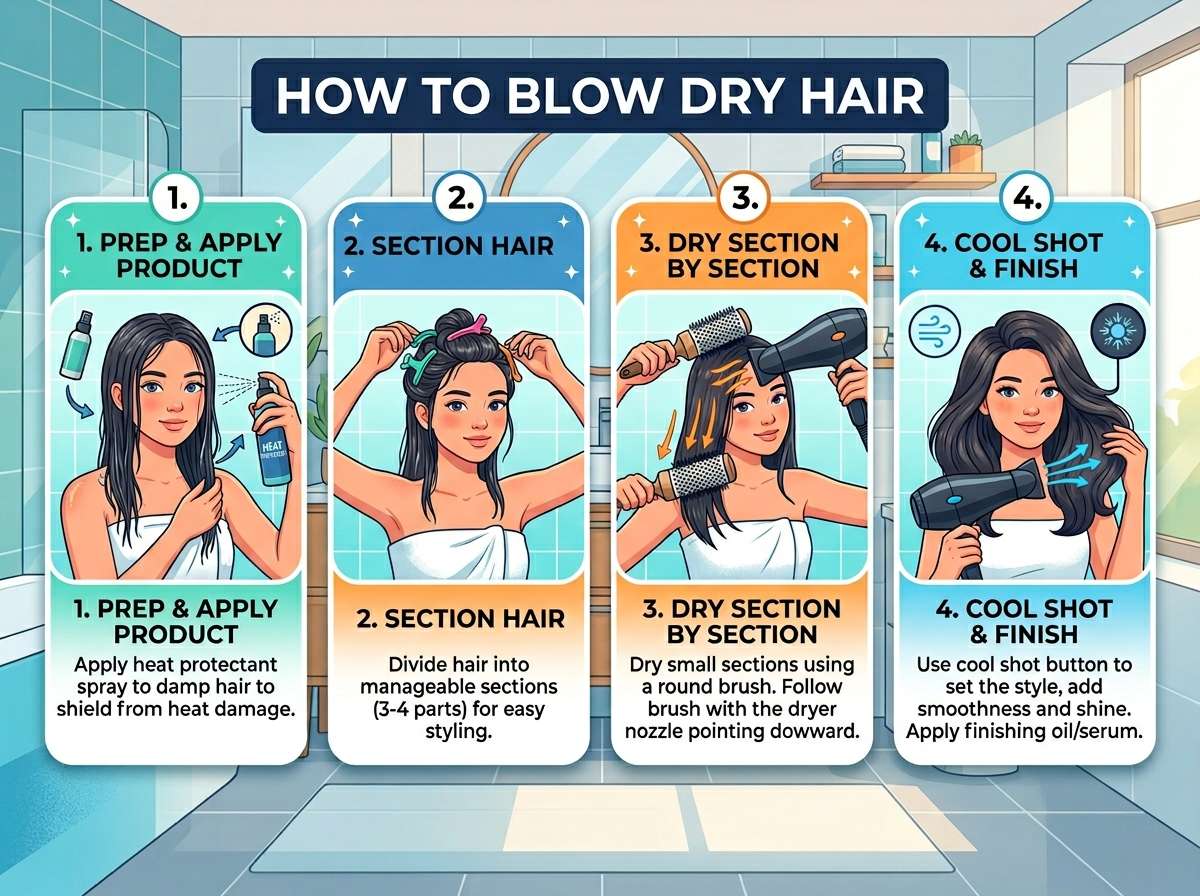
Before you even turn on your blow dryer, spray heat protectant on your damp hair. This product forms a barrier between your hair and the heat. It reduces damage and keeps your hair from getting dry and brittle.
Apply heat protectant spray to damp hair, not soaking wet hair. You want just enough product to coat your strands without making your hair feel heavy. Work it through from root to tip, making sure every section gets covered.
Gather Your Other Tools
You’ll also need some basic tools for blow drying:
A round brush works great for adding volume and creating waves. Paddle brushes help you dry and straighten hair at the same time. If you want a smooth blow out, use a round brush. If you like a more natural look, a paddle brush might be better.
Clips or hair ties hold back sections you’re not working on. This keeps your hair organized and makes the whole process faster.
A microfiber towel or t-shirt works better than regular towels. Regular towels create frizz because the fibers are rough and grab your hair. Microfiber towels are smooth and gentle.
Prep Work Before You Start
How you prepare your hair makes a huge difference in your blow dry results. Don’t skip these steps.
Wash and Condition Properly
Start with clean hair. Wash with a shampoo that works for your hair type. If you have dry hair, use a moisturizing shampoo. If your hair gets oily fast, try a clarifying shampoo. Condition your hair, but focus the conditioner on the ends, not the roots.
Rinse everything out with cool water if you can handle it. Cool water helps seal the cuticle layer, which reduces frizz and adds shine.
Squeeze Out Extra Water
Don’t wring your hair like you’re squeezing a dishcloth. This causes breakage and frizz. Instead, gently squeeze sections of hair in your hands to get rid of extra water.
Wrap your hair in a microfiber towel or t-shirt and let it sit for a few minutes. This removes water without the rough treatment that regular towels give you. Your hair should be damp, not soaking wet, when you start blow drying.
Section Your Hair
Divide your hair into sections. For most people, four to six sections works well. Use clips to keep sections apart. Start from the bottom and work your way up.
Sectioning sounds like extra work, but it actually saves you time. When you work on smaller sections, you dry them faster and more evenly. You also get better styling results because you can focus on each part.
The Blow Drying Technique That Works
Now for the main event. Here’s how to blow dry your hair step by step.
Start at the Roots
Begin with the roots. Roots dry slower than the rest of your hair, so they need extra time and attention. Use your fingers or a brush to lift your hair away from your scalp. Point your blow dryer so the air flow goes down your hair shaft.
Why does direction matter? Pointing the air down smooths the cuticle layer and reduces frizz. If you point it up, you’ll create frizz and flyaways. Always aim the nozzle downward.
Use medium heat and medium speed at first. This gives you enough power to dry your hair without cooking it. Once your roots are mostly dry, you can move to the rest of your hair.
Dry With a Brush
Grab your round brush or paddle brush. Wrap a section of damp hair around the brush. As you do this, turn on your blow dryer and aim it at the brush while you slowly move the brush down the hair shaft.
This technique dries your hair and shapes it at the same time. If you want volume, use a round brush and roll it away from your face. Keep the brush moving so you don’t cook one spot.
For the front sections, roll the brush under if you want an inward-facing wave. Roll it away from your face if you want an outward-facing wave. The choice is yours.
Don’t rush this step. Patience pays off. Move slowly through each section, making sure the whole thing is dry before you move on.
Focus on the Underneath Layers
Blow dry the underneath layers of your hair first. These layers take longer to dry because they’re against your head and get less air flow. Flip your head upside down and dry the back. This also adds volume to your roots.
Once the underneath is dry, work on the top layers. The top layers dry faster because they’re more exposed, so you don’t need to spend as much time on them.
Check Your Progress
Feel your hair as you go. If you grab a section and it feels cold to the touch, it still has moisture in it. Keep blow drying until it feels warm. Once you’ve done the whole head, you can move to the final step.
Fine-Tuning Your Blow Dry Style
You’re almost done. Now comes the part where you make your hair look exactly how you want it.
Use Cool Shot to Set Your Style
Most blow dryers have a cool shot button. This blows cool air onto your hair. Use it on each section after you’ve blow dried with warm air.
The cool air cools down the hair strands and seals the cuticle. This locks in your style and adds shine. It also makes your waves or curls last longer. Don’t skip this step.
Check for Wet Spots
Run your hands through your hair. If you find any damp areas, dry those sections with warm air again. Then use the cool shot to set it.
Pay special attention to the nape of your neck and behind your ears. These spots often trap moisture.
Style as Needed
Once your hair is completely dry, you can add waves, curls, or any other style you want. Use your blow dryer on low heat with a brush to smooth things out, or grab a curling tool to add curls.
If you want a sleek, straight style, use a paddle brush with your blow dryer to smooth everything down.
Blow Drying Different Hair Types
Your hair type affects how you should blow dry. Here’s what works best for different textures.
Straight Hair
Straight hair is easy to blow dry. Section it and use a round brush to add volume at the roots. Work from underneath first, then do the top layers.
For straight hair, you don’t need as much product. A light heat protectant spray is usually enough. Focus on smooth, downward motions to keep your hair from getting frizzy.
You can add some waves by twisting your round brush as you move it down the hair shaft. This creates gentle waves without extra tools.
Wavy Hair
Wavy hair needs a bit more care. Don’t fight your natural texture. Work with it instead.
Use a lower heat setting for wavy hair. High heat can damage waves and make them frizzy. Apply extra heat protectant because wavy hair is often drier.
Scrunch your hair as you blow dry to encourage your waves. Use a diffuser attachment if your blow dryer has one. A diffuser spreads out the air, so it’s gentler on waves.
Don’t brush wavy hair when it’s dry. This breaks up your waves. Instead, use your fingers to separate sections.
Curly Hair
Curly hair needs the gentlest approach. Always use a heat protectant and consider a lower heat setting.
A diffuser attachment is almost essential for curly hair. It spreads the air out so it doesn’t rough up your curls. Scrunch your curls up into the diffuser and let the air do the work.
Never brush curly hair when it’s wet or dry. This destroys your curl pattern. Use your fingers or a wide-tooth comb on soaking wet hair if you need to detangle.
Apply a curl cream or gel before you blow dry. This helps your curls stay defined and reduces frizz.
Thick Hair
Thick hair takes longer to dry, so don’t get discouraged. Use a higher wattage blow dryer, around 1800 watts.
Section your hair into more parts than you would for thin hair. Six to eight sections works well. Dry each section thoroughly before moving on.
A paddle brush works well for thick hair. It covers more area and helps you work faster. Make sure you get all the way to the roots where moisture hides.
Fine Hair
Fine hair is fragile, so use lower heat. A lower wattage blow dryer, around 1400 watts, works best.
Fine hair dries fast, so don’t spend too much time on any one section. You just need the cuticle to seal so your hair looks shiny.
Use a round brush to add volume. Fine hair benefits from height at the roots. Blow dry your roots with your head flipped upside down.
Common Blow Drying Mistakes to Avoid
Learning what not to do saves your hair from damage.
Using a Blow Dryer on Soaking Wet Hair
I know it’s tempting to just blast your hair with the blow dryer, but don’t. Squeeze out extra water first. When your hair is soaking wet, the heat has to work much harder, which damages your strands.
Damp hair, not soaking wet hair, is what you want. This lets your blow dryer work efficiently without cooking your hair.
Holding the Blow Dryer Too Close
Keep your blow dryer about six inches from your hair. Holding it too close concentrates heat in one spot, which burns and damages hair.
Move your blow dryer around constantly. Never let it sit on one section. Keep it moving in slow, steady motions.
Skipping the Cool Shot
Hot air opens up the cuticle. Cool air closes it. If you skip the cool shot, your hair’s cuticle stays open, which makes it frizzy and dull.
Always finish with a cool shot. This is one of the easiest ways to get a professional-looking result.
Not Using Heat Protectant
Heat damage is real. Heat protectant sprays aren’t just marketing hype. They actually shield your hair from damage.
Apply heat protectant every single time you blow dry. Make it part of your routine.
Blow Drying Dirty or Product-Filled Hair
Start with clean hair. Blow drying dirty hair or hair with tons of product built up makes it look flat and dull.
Wash your hair before you blow dry. If you’re blow drying on a second day, use dry shampoo to refresh your roots instead of skipping the wash.
Rushing Through the Process
Blow drying takes time. If you try to hurry, you’ll miss spots and get uneven results.
Give yourself enough time. Set aside 15 to 30 minutes depending on your hair length and thickness. Rushing leads to mistakes and damage.
Pro Tips for Better Blow Drying Results
Now that you know the basics, here are some tricks to level up your blow dry game.
Use a Concentrator Nozzle
Your blow dryer probably comes with a concentrator nozzle. This narrows the air flow and makes it more powerful. Use it for styling and smoothing sections.
A diffuser nozzle spreads the air out and is gentler. Use this for waves and curls, especially on curly hair.
Add Volume Without Teasing
You don’t have to tease your hair to get volume. Instead, blow dry your roots with your head upside down. This lifts your hair and creates natural volume that lasts.
Flip your head over when you’re done blow drying the underneath sections. Your roots will have tons of lift.
Work Faster With Two Hands
Use one hand to guide the brush and one hand to hold the blow dryer. This might feel awkward at first, but it speeds up the process.
Once you get comfortable, you’ll cut your blow dry time in half.
Blow Dry Your Hairbrush Too
After you finish blow drying your hair, use your blow dryer to dry off your brush. This prevents mildew and keeps your brush clean for next time.
Don’t Blow Dry Over Damp Shoulders
The water running down your shoulders keeps that area damp. This can damage your skin over time. Have a towel nearby and wrap it around your shoulders while you blow dry.
Refresh Your Blow Dry the Next Day
Your blow dry doesn’t have to last just one day. You can refresh it the next day with damp hands.
Wet your hands and run them through your hair. Then blow dry on low heat. This reactivates your style without the effort of a full blow dry.
Blow Drying for Different Styles
Blow drying isn’t just for a basic hair dry. You can create tons of looks with the right technique.
Sleek and Straight
For a sleek, straight style, use a paddle brush and point your blow dryer downward. Smooth your hair as you go. This seals the cuticle and creates shine.
Use your cool shot at the end. This locks everything in place.
Beachy Waves
For beachy waves, use a round brush and twist it as you move down each section. Wrap smaller sections around the brush and hold for a few seconds as you dry.
You can also use your fingers to create waves. Scrunch your hair with your fingers while you blow dry to get soft, natural-looking waves.
Voluminous Blowout
For a voluminous blow out, start by flipping your head upside down and drying your roots. This creates lift. Then blow dry the rest of your hair with a round brush, rolling it away from your face.
Use the cool shot to set everything. Your hair will have tons of body and bounce.
Textured Look
For a textured, piece-y look, use your blow dryer on medium heat and scrunch your hair with your hands. Let your hair dry with some movement.
You can also twist small sections around your fingers as they dry. This creates texture without looking stiff.
Taking Care of Your Blow Dryer
Your blow dryer needs care to keep working well.
Clean the Filter
Blow dryers have a filter that collects lint. Check it after each use. If it’s clogged with lint, your blow dryer won’t work as well.
Gently clean the filter with a soft brush or cloth. A clogged filter makes your blow dryer overheat, which damages it faster.
Don’t Wrap the Cord Tightly
Coiling the cord too tight damages the wires inside. Loosely loop your cord instead. This keeps it from breaking.
Store It Safely
Keep your blow dryer in a dry place. Don’t store it in a damp bathroom where humidity can get into the motor.
Let it cool down before you put it away. Storing a hot blow dryer in an enclosed space can cause problems.
Hair Health Beyond Blow Drying
Blow drying is just one part of keeping your hair healthy. A few other things matter too.
Get Regular Trims
Split ends get worse when you blow dry. Cut your hair every 6 to 8 weeks to get rid of them.
Regular trims keep your hair looking healthy and thick. They also make blow drying easier because you have less dead hair to work with.
Deep Condition Regularly
Blow drying removes some moisture from your hair. Deep conditioning treatments put that moisture back.
Use a deep conditioning mask once a week. Leave it on for at least 10 minutes, or even overnight if your hair is very dry.
Reduce Heat Styling Overall
The more you use heat on your hair, the more damage it takes. Try to limit heat styling to a few times a week if you can.
On other days, embrace your natural texture or try heat-free styling methods like braids and buns.
Use the Right Products
Not all hair products are the same. Find ones that work for your hair type.
Lightweight products work best for fine hair. Richer, thicker products work better for dry or thick hair.
Read the labels and find products made for your specific hair type and concerns.
Blow Drying Tips for Different Situations
You blow dry your hair for different reasons sometimes. Here are tips for specific situations.
Blow Drying After the Gym
You’ve sweated and your hair is a mess. Here’s how to fix it fast.
Use dry shampoo first. This soaks up sweat and oil. Then spray with heat protectant and blow dry on medium heat.
You don’t need a full blow dry. Just enough to get rid of the damp, sweaty feeling. Use your fingers to style rather than a brush.
Blow Drying When You’re Late
No time for a full blow dry routine? Do this instead.
Spray your roots with dry shampoo. Then flip your head upside down and blow dry just the roots on high heat. Flip back up and use the cool shot.
You’ll look way better than going out with wet hair, and it takes just five minutes.
Blow Drying Soaking Wet Hair (When You Have To)
Sometimes you’re stuck with soaking wet hair and no time to wait. Squeeze out as much water as you can first. This is crucial.
Use the highest heat and speed setting. Work fast through all sections. Yes, your hair will take a hit, but at least it will be dry.
Use extra heat protectant and plan to deep condition tonight. Your hair needs the TLC.
The Bottom Line on Blow Drying
Learning how to blow dry your hair well changes everything. You’ll save time, have healthier-looking hair, and feel more confident.
Start with good tools and a heat protectant. Section your hair, work from the roots down, and always finish with a cool shot. Pay attention to your hair type and adjust your technique as needed.
Blow drying isn’t complicated once you understand the basics. Practice makes perfect, so don’t stress if your first attempt isn’t salon-quality. Each time you blow dry, you’ll get better.
Your hair deserves good care. Invest in the right tools, use heat protectant, and take time to blow dry properly. Your hair will thank you with healthier, shinier, more beautiful results every single time.
Mary is a fashion enthusiast and lifestyle writer who loves discovering stylish clothing, accessories, and everyday fashion essentials. She enjoys researching the latest trends, reviewing popular products, and sharing practical style tips to help readers dress with confidence. Through FashionSolve.com, Mary provides honest recommendations, fashion guides, and inspiration for building a wardrobe that is both stylish and affordable.


One Comment