How to Apply Laura Geller Makeup Like a Pro?
If you’ve ever looked at Laura Geller products, you know they’re beautiful. They come in gorgeous packaging and promise to make your skin look amazing. But knowing how to use them properly is a whole different thing. That’s where this guide comes in. We’re going to walk through everything you need to know about applying Laura Geller makeup products, step by step.
What Makes Laura Geller Makeup Special
Laura Geller is a makeup brand known for creating products that work for everyone. The products focus on light, natural-looking coverage that lets your real skin shine through. Many people love her makeup because it doesn’t feel heavy on the face.
Her brand started with a focus on one thing: making makeup that looks good on all skin types. The formulas are often blendable and forgiving, which means they work great for beginners. If you’re just starting your makeup journey, Laura Geller is a smart choice.
The most popular products from this brand include bronzers, highlighters, eyeshadows, and foundations. Each product is made to work with your natural features rather than cover them up. This is why so many people swear by Laura Geller makeup.
Getting Your Skin Ready for Makeup
Before you apply any makeup, your skin needs to be prepared. This step matters more than most people think. Good skin prep makes everything that goes on top look better and last longer.
Start with a clean face. Use a gentle cleanser that works for your skin type. If you have oily skin, choose a formula that controls shine. If your skin is dry, pick something that hydrates. Wash your face with warm water and pat it dry gently.
Next, apply a moisturizer. This is important whether your skin is oily, dry, or combination. Use a moisturizer that matches your skin type. Give it a few minutes to sink in before moving to the next step.
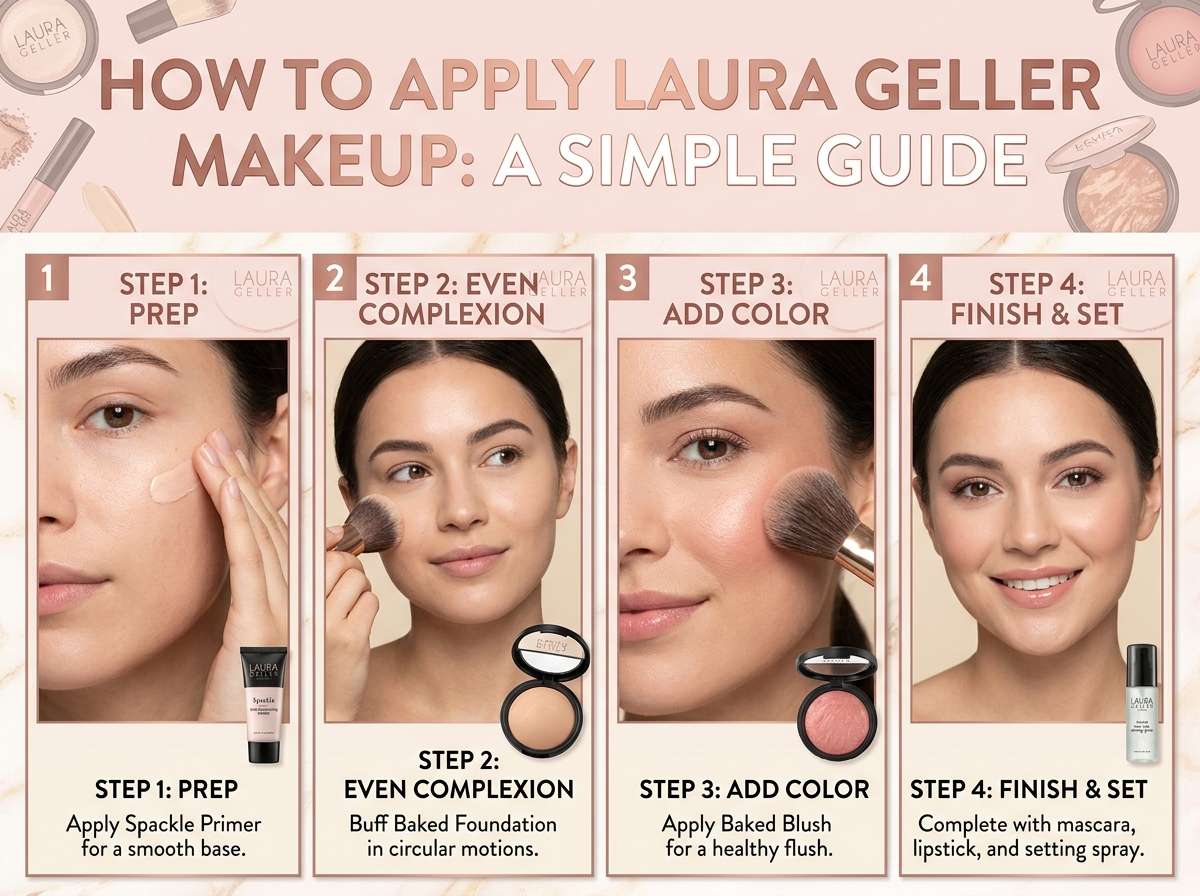
Now it’s time for primer. A primer creates a smooth base for your makeup to stick to. It helps your makeup last longer and prevents it from sliding around during the day. Apply primer all over your face using your fingers or a brush. Use light taps rather than rubbing motions.
Wait about one to two minutes for the primer to set. You should feel your skin get a bit smoother and more even. This is the perfect base for Laura Geller makeup.
Choosing the Right Foundation Shade
Finding the right shade is crucial for any makeup look. If your foundation is too light or too dark, nothing else will look quite right.
The best way to find your shade is to test it on your jawline where your face meets your neck. Your jawline color is usually the truest representation of your skin tone. Don’t test foundation on your hand or wrist. Those areas are often different shades than your face.
Apply a small amount of foundation to your jawline and blend it out. If it disappears into your skin, you found your match. If it looks different from your neck, try another shade.
Laura Geller offers several foundation options. Some are more full coverage, while others are lighter and more natural. Think about what kind of look you want. If you like sheer coverage, choose a lighter formula. If you want more coverage, pick something with more pigment.
Apply foundation with a beauty sponge, brush, or your fingers. Many people find sponges give the most natural finish. Damp sponges work best because they blend the foundation seamlessly into your skin.
Start with a small amount. You can always add more. Apply foundation to your forehead, cheeks, nose, and chin first. Then blend it outward and downward toward your jawline and neck.
Concealing Problem Areas
Concealer helps cover spots, dark circles, and any areas where your foundation might not be quite enough. The key to good concealing is using the right shade and blending properly.
For under-eye area, use a concealer that’s one shade lighter than your foundation. This helps brighten the area and makes it look more awake. Apply it gently with a small brush or your pinky finger. Tap it in rather than rubbing. The skin under your eyes is delicate.
For blemishes or spots, match your concealer to your foundation shade. Apply directly to the blemish and blend the edges. Don’t blend the whole thing away or it won’t cover the spot.
Some people use Laura Geller’s concealer products under their eyes, while others use a different brand. The important thing is finding a product that matches your skin tone and blends smoothly.
Finish with a light dusting of translucent powder to set your concealer. This keeps it in place all day.
Bronzing and Contouring
Bronzer adds warmth and dimension to your face. It creates the look of natural sun-kissed skin. Laura Geller is famous for her bronzer products, so this step is important.
Choose a bronzer shade that’s close to your natural skin tone. You want it to look like a subtle tan, not orange or muddy. Apply bronzer to the areas where the sun would naturally hit your face: along your cheekbones, jawline, temples, and the bridge of your nose.
Use a large, fluffy brush to apply bronzer. This helps you blend it smoothly and avoid harsh lines. Tap your brush in the product, shake off the excess, and apply with light sweeping motions.
The idea is that your skin looks glowing and warm, not like you’re wearing a heavy layer of makeup. Build up the color gradually. It’s easier to add more bronzer than to take it away.
Many people confuse bronzer with contour. They’re different. Bronzer adds warmth and glow. Contour uses darker shades to create shadows and definition. Some Laura Geller bronzers can do both jobs, but the technique is slightly different.
For contouring, apply product in the hollows of your cheeks, along the sides of your nose, and along your jawline. Blend well so it looks like a natural shadow, not a stripe of color.
Adding Highlight for Glow
Highlighter makes your skin glow from within. It’s not just for special occasions. A subtle highlight looks good every day. Laura Geller has gorgeous highlighter products that come in many shades.
Apply highlighter to the high points of your face. This includes the tops of your cheekbones, brow bones, bridge of your nose, and cupid’s bow. These areas naturally catch light, so highlighting them makes them pop.
Use a smaller brush for highlighter than you use for bronzer. You want it concentrated on specific areas, not spread all over. Apply with light tapping motions.
Don’t go overboard with highlighter. A little goes a long way. You want to look dewy, not like you’re covered in glitter. Build up the glow gradually.
If you make a mistake and use too much, go back with a brush and foundation to tone it down. You can fix it easily.
Eyeshadow Application Basics
Laura Geller eyeshadows are beautiful and come in lots of colors. Learning to apply them properly opens up endless possibilities for eye looks.
Start with an eyeshadow primer on your lids. This stops eyeshadow from creasing and helps colors stay true all day. Apply a small amount to your eyelid and blend it out evenly.
Think about what look you want to create. A simple look uses one or two shades. A more complex look uses three or more shades, each in different areas of the lid.
For a basic one-shadow look, apply a light shade all over your lid. Use a flat brush and press the color on rather than swipe it on. This gives better color payoff.
For a two-shade look, apply a light shade all over your lid. Then use a darker shade in the crease of your eye. Your crease is the line you see when you look straight ahead. Apply the darker shade with a fluffy brush in windshield wiper motions to blend it in.
For a three-shade look, you typically have a light shade on the lid, a medium shade in the crease, and a darker shade on the outer corner. Apply each shade with appropriate brushes, and blend where the shades meet so there are no harsh lines.
Blend, blend, and blend some more. This is the secret to professional-looking eyeshadow. Use a clean fluffy brush to blend the edges where different shades meet.
Applying Eyeliner
Eyeliner defines your eyes and makes them stand out. You can use Laura Geller eyeliner or another brand you prefer. The technique is what matters.
For beginners, liquid or pen eyeliner is often easier than pencil. These products give you more control and more precision. Start with a thin line and build up if you want something bolder.
Apply eyeliner along your upper lash line. Start from the inner corner and work toward the outer corner. Keep the line as close to your lash line as possible. This looks most natural.
You can make the line flick up at the outer corner for a winged look. Or you can keep it straight for a simpler look. The choice is yours.
For lower lash line eyeliner, use a pencil or powder rather than liquid. Pencils and powders are easier to blend. Apply along the lower lash line, either on the waterline or just above your lower lashes.
Take your time with eyeliner. If you mess up, you can clean up mistakes with a cotton swab and a bit of makeup remover.
Mascara Magic
Mascara makes your lashes look fuller and darker, which opens up your eyes. It’s often the last step of eyeshadow and eyeliner. Laura Geller makes mascara products, but you can use any brand you like.
Choose a mascara formula that works for your lashes. If your lashes are thin, pick a volumizing formula. If your lashes are long, you might prefer a lengthening formula.
Apply mascara by wiggling the wand through your lashes from root to tip. Start at the roots and work your way out. This coats all your lashes.
Apply one or two coats, depending on how much drama you want. Let the first coat dry before applying the second. This helps the mascara look thicker and more defined.
Don’t forget your lower lashes. Use the tip of the mascara wand to apply a thin coat to your lower lashes.
Blush for a Flush of Color
Blush adds color to your cheeks and makes you look healthy and awake. Laura Geller blush products come in many shades for different skin tones.
Find the apples of your cheeks by smiling. These are the fullest parts of your cheeks. Apply blush here using a medium-sized fluffy brush.
Swirl or stipple the blush onto your cheeks, blending as you go. You want a soft, diffused flush, not a stripe of color. Apply light, and build up gradually.
Think about the overall look you’re creating. If you’ve used warm-toned bronzer, pair it with a warm-toned blush. If your bronze is cool-toned, use a cool-toned blush.
The amount of blush matters. A light flush looks natural and modern. Heavy blush can look dated and overdone. Start with a small amount and add more if you need it.
Lip Color Options
Lips are the finishing touch to your makeup look. Laura Geller offers lipsticks, lip glosses, and lip liners in many shades.
Lips look better when they’re hydrated and smooth. Apply a lip balm a few minutes before doing your lips to make sure they’re ready for color.
If you’re using a lip liner, apply it first. Lip liner defines your lips and prevents color from feathering. Draw along your lip line, following your natural shape. You can go slightly outside your natural lip line to make lips look fuller.
Apply lip color with a brush for precision or straight from the product if you prefer. Start in the center of your lips and work outward.
Blot your lips with a tissue to remove excess product. This helps your lip color last longer. Apply another layer for more opacity if you want.
If you’re using a liquid lipstick, let it dry completely before doing anything else. Dried liquid lipsticks don’t transfer onto your teeth or clothes.
Setting Your Makeup
After you’ve applied all your makeup, you need to set it so it lasts. Setting spray and powder are your best friends.
Translucent powder helps set your base makeup. Use a fluffy brush and apply powder lightly to your entire face. Focus on areas that get oily, like your T-zone. Use a light hand. Too much powder looks cakey.
Setting spray locks everything in place and keeps your makeup looking fresh all day. Hold the bottle about an arm’s length away and mist over your entire face. Let it dry naturally.
Many people use powder for shine control and setting spray for staying power. You can use both or just one, depending on your needs and your skin type.
Makeup Brushes and Tools
Good brushes make applying makeup easier and faster. You don’t need a huge collection, but a few key brushes help.
For foundation, you need either a damp sponge or a foundation brush. Both work well. Find what feels comfortable to you.
For powder, use a large fluffy brush. This lets you apply powder evenly without packing it on.
For blush, use a medium fluffy brush. This helps you apply color where you want it without overdoing it.
For eyeshadow, you need a few brushes. A flat shader brush applies color to your lid. A fluffy crease brush blends color in your crease. A small pencil brush applies color to your outer corner or lower lash line.
For contour and bronzer, larger fluffy brushes work best. These let you blend everything smoothly.
Clean your brushes regularly. Dirty brushes can cause breakouts and don’t apply makeup as well. Wash them once a week with gentle soap and warm water.
Troubleshooting Common Problems
Even with good technique, things sometimes go wrong. Here’s how to fix common makeup problems.
If your foundation looks patchy, you might not be blending enough. Go back with a damp sponge and blend the foundation more thoroughly. Or your moisturizer might not be setting. Wait a bit longer before applying foundation.
If your eyeshadow creases, use an eyeshadow primer. This keeps color in place all day. Or your eyeshadow might be too wet. Let it dry completely before touching it.
If your blush looks too dark, blend it more. Go back with a blending brush and soften the edges. Or reduce the amount you’re using next time.
If your mascara clumps, your lashes might have too much product. Apply fewer coats or try wiping the wand on a tissue before applying.
If your makeup looks too heavy or overdone, you might be using too much product overall. Use less of everything and build up gradually. This helps you control the final result.
Laura Geller Makeup Best Sellers
Some Laura Geller products are fan favorites for good reason. If you’re starting out, these are great choices.
Her bronzers are legendary. They give a natural sun-kissed glow without looking orange. Many people buy multiple shades.
Her highlight products make skin look luminous and dewy. They blend beautifully and come in shades for all skin tones.
Her eyeshadow palettes offer lots of colors for creating different looks. The formulas blend easily and last all day.
Her foundation provides good coverage while still looking natural. It works well for many skin types.
Starting with these products gives you a solid foundation for a makeup collection.
Tips for Different Skin Types
Your skin type affects how you apply makeup and which products work best.
For oily skin, use a pore-minimizing primer. Set your makeup with powder to control shine. Focus on areas that get oiliest. Choose matte formulas for foundation.
For dry skin, use a hydrating primer. Skip heavy powders that emphasize dry patches. Choose dewy formulas for foundation and highlighter. Set with spray rather than powder.
For combination skin, use a balancing primer. Apply matte products to oily areas and dewy products to dry areas. Powder just your T-zone if needed.
For sensitive skin, test products on a small area first. Look for products without fragrance. Use less product overall and blend gently.
Your skin changes with the seasons. Your routine might need adjusting. Pay attention to how your skin reacts and adjust as needed.
Creating Different Makeup Looks
Once you know the basics, you can create different looks for different occasions.
For an everyday look, use one or two eyeshadow shades, a swipe of eyeliner, and mascara. Skip heavy contouring and just use blush and bronzer lightly. This takes less time and looks natural.
For a work look, follow the everyday look but add a lip color. Choose neutral tones that look professional.
For an evening look, use darker eyeshadow shades and more dramatic eyeliner. Add more shine with highlighter. Use a bolder lip color if you want.
For a special event, layer eyeshadow more carefully and use more elaborate eyeliner. Add more bronzer and highlight for more drama overall. This is where you can have fun and be more experimental.
The basics stay the same. You’re just adjusting the intensity and colors based on the occasion.
Practice Makes Perfect
The first time you apply makeup, it might not be perfect. That’s totally normal. Everyone needs practice.
Take your time. Don’t rush. Sit in good lighting where you can see what you’re doing.
Take photos in natural light. This helps you see the real result rather than what looks good under bathroom lights.
Watch yourself from different angles. Makeup should look good from all sides, not just straight on.
Keep practicing the same look until you get comfortable. Then try new techniques. Build your skills gradually.
You’ll get faster with practice. Eventually, applying makeup becomes second nature.
Removing Makeup Properly
Taking off your makeup is just as important as putting it on. Sleeping in makeup can cause breakouts and damage your skin.
Use a makeup remover or cleansing oil. Apply it to your face and gently massage. This breaks down your makeup so it washes off easily.
Rinse with warm water. Use a gentle cleanser to remove any remaining makeup and the remover itself.
Pat your face dry and apply your skincare routine.
Taking off makeup doesn’t take long, but it protects your skin for the long term.
Makeup Storage and Shelf Life
Store your Laura Geller makeup in a cool, dry place. Heat and humidity break down products and can cause them to go bad faster.
Keep products away from direct sunlight. Sunlight can change colors and break down formulas.
Replace products when they’re empty or go bad. Makeup typically lasts about a year, though some products last longer. Mascara should be replaced every three months because it can harbor bacteria.
Keep brushes and sponges clean. Dirty tools transfer bacteria to your products.
Taking care of your makeup keeps it looking good and helps it last longer.
Common Mistakes to Avoid
Knowing what not to do helps you apply makeup better.
Don’t skip primer. It makes everything better.
Don’t use too much product. Build gradually instead.
Don’t blend too hard. Gentle blending gives better results.
Don’t use dirty brushes. Clean tools apply makeup better.
Don’t skip sunscreen under makeup. Your skin needs protection.
Don’t sleep in makeup. It damages your skin.
Don’t expect perfect results the first time. Practice makes perfect.
Getting Started with Laura Geller
If you’re new to this brand, start with basics. You don’t need everything at once.
Pick up a foundation that matches your skin. Then get a bronzer or highlighter. Add an eyeshadow palette. Build from there as you discover what you love.
Watch tutorials online. Seeing other people apply products helps you learn techniques.
Read reviews from other customers. They can tell you which products work best for different skin types.
Visit a store if possible. Trying products on your own skin helps you find shades that work for you.
Take your time building your collection. This helps you discover what you really love and what works for your unique features.
Final Thoughts on Laura Geller Makeup Application
Applying Laura Geller makeup comes down to understanding the basics and practicing regularly. Start with good skin prep, apply products in the right order, and blend everything well. Build your skills gradually and don’t expect perfection right away.
The beauty of Laura Geller products is that they’re forgiving and work well for many people. Even simple makeup looks fantastic with good techniques and quality products.
Remember that makeup is supposed to be fun. Experiment with different shades and looks. Find what makes you feel confident and beautiful. Your unique features are your best asset. Makeup just helps them shine.
Start with the fundamentals covered in this guide. Practice regularly. Soon you’ll be applying Laura Geller makeup like a pro, creating looks that make you feel amazing.
Mary is a fashion enthusiast and lifestyle writer who loves discovering stylish clothing, accessories, and everyday fashion essentials. She enjoys researching the latest trends, reviewing popular products, and sharing practical style tips to help readers dress with confidence. Through FashionSolve.com, Mary provides honest recommendations, fashion guides, and inspiration for building a wardrobe that is both stylish and affordable.