How to Clean Leather Bag?
Your leather bag is a treasure. It holds your stuff, looks stylish, and grows more beautiful as it ages. But dust, spills, and daily wear can leave it looking tired and worn. The good news? Cleaning your leather bag isn’t complicated or expensive. You can do it at home with basic supplies and a little know-how.
This guide walks you through everything you need to know about cleaning a leather bag. You’ll learn what tools to use, how to tackle different types of stains, and the best ways to keep your leather looking fresh and healthy. Let’s get started.
Why You Need to Clean Your Leather Bag
Before we jump into the cleaning process, let’s talk about why this matters. Leather is a natural material that breathes and develops character over time. When you neglect to clean it, dirt and grime build up on the surface. This dirt sits in the pores of the leather and makes it look dull and aged.
Regular cleaning does more than improve how your bag looks. It actually protects the leather from damage. Dirt particles can scratch the surface when you rub against things. Salt and moisture from sweat can damage the leather fibers. Keeping your leather bag clean helps it last longer and age gracefully.
A clean leather bag also smells better, feels nicer to touch, and keeps whatever you put inside from getting dirty. Your phone, wallet, and keys stay cleaner when your bag is clean. So cleaning your leather bag isn’t just about looks—it’s about maintaining your investment.
What You Need to Get Started
You don’t need a ton of supplies to clean your leather bag. In fact, most people already have what they need sitting around the house. Here’s what to grab:
The Basic Cleaning Kit
A soft brush or cloth is your first essential tool. You want something that won’t scratch the leather. Microfiber cloths work great because they’re soft and grab dust easily. An old soft toothbrush is perfect for getting into tight corners and textured areas. You can also use a soft-bristled shoe brush if you have one.
Next, you need a cleaning solution. You can buy leather cleaner at a store, but a simple homemade cleaner works just as well. Mix one part white vinegar with three parts water. This creates a gentle solution that cuts through grime without damaging leather. You can also mix a few drops of dish soap with warm water for a different cleaning option.
Gather some paper towels or clean rags. You’ll use these to apply your cleaning solution and wipe away dirty water. Get several so you have fresh ones as you work.
For stubborn stains, you might want saddle soap, leather cleaner spray, or even a magic eraser sponge. Keep these on hand for tough spots, but start simple with your vinegar or soap solution first.
Don’t forget to have a bowl of clean water nearby. You’ll use this for rinsing your cloth between scrubs. Change the water as it gets dirty so you’re not spreading grime around.
Optional but Helpful Items
Leather conditioner helps keep your bag soft and supple after cleaning. This is optional, but it makes a big difference in how your leather feels. You can buy leather conditioner or make your own with coconut oil or beeswax.
Newspaper or an old towel protects your work surface from drips and spills. Lay this down before you start so you don’t stain your table or counter.
A leather protectant spray creates an invisible barrier that helps repel water and stains. This is great as a final step after cleaning. It’s not essential, but many people love it for keeping their bags cleaner longer.
Step-by-Step Guide to Cleaning Your Leather Bag
Now let’s get into the actual cleaning. These steps work for almost any leather bag, from purses to backpacks to travel bags.
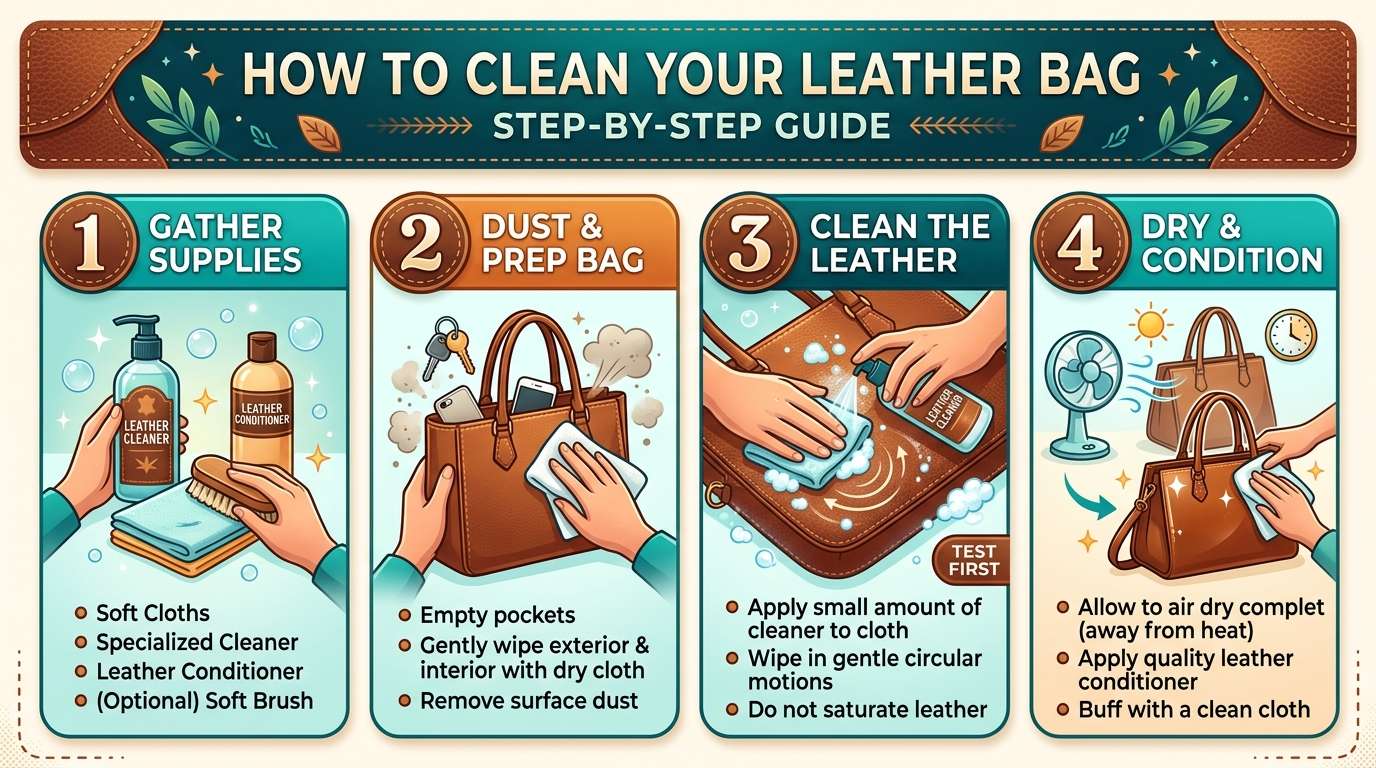
Step One: Empty Your Bag Completely
Start by taking everything out of your bag. Check all the pockets, including the inside zippered compartments. You’ll be surprised what you find. Once it’s completely empty, turn your bag over a trash can and shake it gently. This gets out loose dust, crumbs, and debris that’s settled at the bottom.
Step Two: Brush Away Surface Dust
Use your soft brush or cloth to brush the outside of your bag. Start at the top and work your way down. Use gentle circular motions rather than hard scrubbing. Pay special attention to creases, corners, and textured areas where dust likes to hide.
For those textured or detailed spots, use your soft toothbrush to gently brush into the crevices. This brings out trapped dust without damaging the leather. Brush both the outside and inside of your bag.
The inside of leather bags gets grimy too. Use your brush to clean the interior pockets and walls. This makes a huge difference in how fresh your bag feels.
Step Three: Make or Prepare Your Cleaning Solution
If you’re going the DIY route, mix your vinegar and water solution now. Use one part white vinegar and three parts water. Stir it well. If you prefer a soapy solution, add a tiny drop of mild dish soap to warm water. You want just enough soap to clean, not enough to make lots of bubbles.
If you bought a commercial leather cleaner, follow the instructions on the bottle. Most of the time you’ll spray or apply it directly to a cloth rather than dipping your cloth into it.
Step Four: Test Your Cleaning Solution
This step is important. Before you clean your entire bag, test your solution on a hidden spot. Try the inside of a pocket or the bottom of the bag where no one will see it. Apply a bit of your solution to your cloth and rub it on the leather. Wait a few minutes and check the results.
Does the leather still look good? Is there any discoloration or damage? If yes, you’re safe to proceed. If something looks off, try a weaker solution or a different approach.
Step Five: Clean the Exterior
Dip your soft cloth into your cleaning solution. Wring it out well so it’s damp but not dripping wet. Too much water damages leather. You want just enough moisture to clean without soaking the material.
Wipe down the outside of your bag with gentle circular motions. Work in small sections. When your cloth gets dirty, rinse it in your bowl of clean water, wring it out, and continue. Keep going until the whole exterior is clean.
For stubborn stains or scuffs, press your damp cloth on the spot for a few seconds to soften the marks. Then gently rub the area. Don’t scrub hard or you might damage the leather finish.
Step Six: Clean the Interior
The inside of your bag needs cleaning too. Wipe down the interior walls, pockets, and bottom with your damp cloth. The inside usually gets less visible wear, but it definitely gets dirty from items rubbing against it.
Pay attention to the corners where dust accumulates. If your cloth is too large to fit into small pockets, use your soft toothbrush with a bit of cleaning solution. This gets into tight spaces easily.
Step Seven: Rinse with Clean Water
Once you’ve cleaned the whole bag, do a final rinse. Dip a clean cloth in plain water, wring it out completely, and wipe down the entire bag. This removes any soap residue or vinegar smell that might linger. Make sure to rinse both the outside and inside.
This rinse step is really important. Any cleaning solution left on the leather can dry it out or leave marks.
Step Eight: Dry Your Bag Properly
Never put your wet leather bag in the sun or near a heat source like a radiator or hair dryer. Heat damages leather and can cause it to crack or shrink. Instead, use a soft, clean cloth to pat your bag dry.
Stuff your bag with newspaper or paper towels to help it keep its shape as it dries. Change out the paper towels every few hours as they absorb moisture. This prevents water marks and keeps your bag looking good.
Let your bag air dry in a cool, shaded spot. This usually takes a few hours. Once it’s completely dry, remove the paper towels and let it sit for another hour before using it.
How to Handle Specific Stains on Leather
Different stains need different treatments. Here’s what to do about the most common ones.
Oil and Grease Stains
Oil stains look dark and slick. The first step is to let the leather dry completely. Don’t try to clean an oily stain when it’s fresh because that spreads the oil around. Wait a few hours or overnight.
Once the leather is dry, sprinkle baking soda or talcum powder directly on the stain. This powder absorbs oil. Let it sit for a few hours, then brush it off with a soft cloth. The oil should have transferred to the powder.
If the stain is still visible, repeat the process. Most oil stains need multiple treatments before they disappear completely.
Water Stains and Rings
Water spots and rings happen when moisture dries unevenly on leather. Use a cloth dampened with your vinegar and water solution. Instead of just treating the stain, wipe a larger area around it. This helps blend the wet spot into the surrounding leather.
Let the leather dry naturally. Sometimes you need to do this a couple of times before the water mark completely fades.
Ink and Pen Marks
Ink stains are tough, but you can often fade them. Start with your regular vinegar and water solution. Dab the spot gently with a cloth. Don’t rub hard or you’ll spread the ink deeper into the leather.
If that doesn’t work, try rubbing alcohol. Apply a tiny amount to a cotton swab and dab the stain. Test this on a hidden area first because rubbing alcohol is stronger than your regular cleaner.
For stubborn ink marks, a magic eraser sponge can work. Dampen it slightly and gently rub the stain. These sponges are mildly abrasive, so don’t scrub hard.
Dirt and Mud
Let mud dry completely before trying to clean it. Scraping wet mud into leather damages the surface. Once it’s dry, brush away the dried mud with your soft brush. Then use your regular cleaning solution to remove any remaining marks.
If the mud is really caked on, you can soak a cloth in your cleaning solution and press it on the spot for a minute to soften the mud. Then gently rub it away.
Salt Stains
Salt stains appear after wearing your bag in snowy or salty conditions. They look like white or gray marks on the leather. Use a cloth dampened with equal parts vinegar and water. Wipe the stained area and let it dry.
Salt stains can be stubborn, so you might need to repeat this process several times. Once the stain is gone, apply leather conditioner to restore softness.
Conditioning and Protecting Your Leather
After cleaning, conditioning is the next important step. Cleaning removes oils from the leather, which can make it dry and stiff. Conditioning puts moisture back in.
You can buy leather conditioner, or you can make your own. Mix equal parts beeswax and coconut oil. Melt them together gently, then let the mixture cool slightly. This homemade conditioner smells great and works well.
Apply conditioner with a soft cloth using circular motions. Use a thin layer—you don’t want the leather to feel greasy. Let it soak in for a few hours. Buff away any excess with a clean cloth.
Conditioning is especially important for bags that are out in the sun or cold regularly. It keeps the leather from drying out and cracking.
You can also use leather protectant spray as a final step. This creates a barrier that helps repel water and stains. Spray it lightly on a cloth and wipe it onto your bag. Let it dry completely before using your bag.
How Often Should You Clean Your Leather Bag
The answer depends on how much you use your bag and where you use it. A daily bag that travels everywhere needs cleaning more often than a special occasion purse that sits in a closet.
For a heavily used bag, a quick dust and wipe every two weeks is good. Use a dry cloth to brush away dust and a slightly damp cloth for any visible marks.
A deep clean with your vinegar or soap solution makes sense every three to four months. This keeps your bag fresh and prevents dirt from building up.
For bags used less often, a gentle cleaning every six months keeps them in great shape. Even if your bag looks clean, dust still settles into the leather over time.
After your bag gets exposed to salt, mud, or water, clean it as soon as it’s dry. These things can damage leather if left sitting on it.
Tips for Keeping Your Leather Bag Clean
The best way to deal with dirt is to prevent it in the first place. These tips help keep your leather bag cleaner longer.
Use a Leather Protectant
As mentioned earlier, applying protectant spray after cleaning creates a barrier against stains and water. This isn’t essential, but it definitely helps. Water and light stains bead up on the surface instead of soaking into the leather.
Be Careful Inside Your Bag
The inside of your bag gets dirty from items stored in it. Keep things in small pouches or bags so they don’t rub directly against the leather. This is especially important for things like makeup, snacks, or anything with loose particles.
Store Your Bag Properly
How you store your bag affects how clean it stays. Never store it in a damp place because moisture encourages mold and mildew. Keep it in a cool, dry spot.
Stuff your bag with paper towels when you’re storing it for long periods. This helps it keep its shape and prevents creases and wrinkles.
Address Spills Immediately
If something spills on your bag, blot it right away with a clean cloth. Don’t rub—blot. This soaks up the spill without spreading it around. Once you’ve removed the excess, let it air dry naturally.
Avoid Extreme Conditions
Keep your leather bag out of direct sunlight as much as possible. Sun fades leather and dries it out. Also avoid leaving your bag in hot cars or near heaters. Extreme heat damages leather fast.
Common Mistakes to Avoid
As you clean your leather bag, watch out for these common errors that cause damage.
Don’t Use Too Much Water
Water is the enemy of leather. Too much moisture can cause stains, water rings, and damage to the material itself. Always use damp cloths, never wet ones. Wring out your cloth thoroughly before every wipe.
Skip Harsh Chemicals
Bleach, acetone, and other harsh chemicals strip the finish and damage leather. Stick to gentle solutions like vinegar and water or mild soap. If you buy a commercial cleaner, choose one made specifically for leather.
Don’t Scrub Hard
Leather has a finish that can be damaged by aggressive scrubbing. Always use gentle circular motions and light pressure. Let your cleaning solution do the work. If a stain doesn’t come out, try again later rather than scrubbing harder.
Avoid Heat When Drying
Hair dryers, radiators, and direct sun might seem like quick ways to dry your bag, but they cause cracking and shrinking. Always air dry your leather bag in a cool, shaded spot.
Don’t Ignore the Inside
People often clean the outside of their bag and forget about the inside. The interior gets just as dirty and needs attention too. Clean both sides every time.
Skip Conditioning
Some people clean their bag and call it done. Skipping the conditioning step leaves your leather dry and dull. Always follow cleaning with light conditioning to restore moisture and shine.
What About Different Types of Leather
Leather comes in different finishes, and each one cleans a bit differently.
Smooth Leather
This is the most common type. It has a finished surface that’s easy to clean. Your standard vinegar and water solution works great. These bags handle cleaning well and rarely have problems.
Suede Leather
Suede is softer and more delicate. Use a soft suede brush instead of a cloth. Brush gently in one direction. For stains, use a special suede eraser or a very soft cloth dampened with barely-damp water. Avoid soaking suede because water can leave permanent marks.
Nubuck Leather
Nubuck is similar to suede but smoother. Use the same gentle approach as suede. A nubuck brush works better than a cloth for general cleaning.
Distressed Leather
Distressed leather has intentional marks and scuffs. These bags are easier to clean because small marks don’t show as much. Use your regular cleaning solution without worry—the distressed finish hides imperfections well.
Patent Leather
This shiny finish is durable and easy to clean. Use a slightly damp cloth to wipe it down. For stubborn marks, you can use a slightly stronger cleaning solution. Patent leather rarely has problems with stains.
Final Thoughts on Leather Bag Care
Your leather bag is an investment. It holds your stuff, looks great, and can last for many years with proper care. Cleaning might seem like a chore, but it’s really just a few simple steps that take maybe thirty minutes.
The key is doing it regularly. Quick cleanings every couple of weeks combined with deep cleaning every few months keep your bag looking new. Use gentle solutions, be patient with stains, and always condition after cleaning.
With the methods in this guide, you can keep your leather bag beautiful and functional for years to come. Your bag will age gracefully, developing patina and character instead of just looking old and worn. Take care of it, and it will take care of you.
Now you have everything you need to clean and maintain your leather bag like a pro. Grab your supplies, follow these steps, and enjoy a bag that looks as good as the day you got it. Your leather bag will thank you.

Mary is a fashion enthusiast and lifestyle writer who loves discovering stylish clothing, accessories, and everyday fashion essentials. She enjoys researching the latest trends, reviewing popular products, and sharing practical style tips to help readers dress with confidence. Through FashionSolve.com, Mary provides honest recommendations, fashion guides, and inspiration for building a wardrobe that is both stylish and affordable.