How to Put On Blush?
Blush is one of the easiest ways to add color to your face and make yourself look fresh and healthy in seconds. If you’ve ever stood in front of the mirror unsure how to get started, you’re not alone. This guide will walk you through everything you need to know about applying blush like a pro.
What Is Blush and Why Should You Use It?
Blush is a cosmetic product that adds color to your cheeks. Think of it as the makeup version of the natural flush you get when you exercise or feel excited. When you apply blush, you instantly look more awake, healthier, and more vibrant.
Your face naturally has shadows and light areas. Cheeks are one part of your face that can look flat and pale, especially if you have fair skin. Blush brings out your cheekbones and makes your face look more sculpted and defined. It also ties your whole makeup look together.
Whether you’re getting ready for work, a date, or just want to feel more confident, blush is your friend. The best part? You don’t need to be an expert to use it. With just a few simple steps, anyone can master the art of applying cheek color.
Types of Blush Products
Before you start applying, let’s talk about the different kinds of blush on the market. Each type works a little differently, so it helps to know what you’re working with.
Powder Blush
Powder blush is the most common type. It comes in a compact with a soft, pressed powder formula. You apply it with a fluffy brush. Powder blush is easy to control, blends smoothly, and works well for most skin types. It’s also budget-friendly and lasts a long time.
Liquid Blush
Liquid blush comes in a bottle or tube. You apply it with your fingers or a brush. Liquid formulas tend to last longer on your skin and give a more natural, dewy finish. They’re great if you want a fresh, glowing look. The downside is that liquid blush can be tricky to blend if you’re new to makeup.
Cream Blush
Cream blush is thick and creamy. You apply it with your fingers and blend it out. Cream formulas give you a very natural finish and work well for dry skin. They can feel heavy, so use less product than you would with powder.
Gel Blush
Gel blush is thin and watery. A little goes a long way. Gel formulas dry down and don’t move around, so they’re long-lasting. They work best on oily or combination skin.
For beginners, powder blush is the easiest to start with. It’s hard to make mistakes with, and you can always add more if you need to.
Choosing the Right Brush
Your brush matters just as much as your blush. A good brush helps you apply color evenly and blend it out smoothly.
Fluffy Powder Brush
This brush has soft, dense bristles. It’s perfect for applying powder blush to your cheeks. The fluffy shape lets you pick up the right amount of product and blend it out without harsh lines.
Kabuki Brush
A kabuki brush is smaller and more compact. It’s great if you want a more concentrated flush of color. It works well for cream and gel blushes too.
Stippling Brush
This brush has shorter, denser bristles. It’s good for precise application. You tap it on your cheeks to build color gradually.
Natural vs. Synthetic Bristles
Natural bristles (usually made from animal hair) pick up powder products better. Synthetic bristles work well with cream and liquid products. For powder blush, natural bristles tend to give you better results.
The size of your brush matters too. If your brush is too small, you’ll waste time trying to cover your cheeks. If it’s too big, you’ll pick up too much product and end up with patches of heavy color.
Finding Your Blush Shade
The color you pick should make your skin look healthy and natural. Your skin tone matters, but your undertone matters even more.
Understanding Your Undertone
Your undertone is the color beneath the surface of your skin. Most people fall into one of three groups: warm, cool, or neutral.
Warm undertones have golden or peachy hues. If you have warm undertones, blush colors with warm notes like peach, warm pink, coral, and terracotta will look best on you.
Cool undertones have pink or red hues. If you have cool undertones, blush shades with cool notes like rose, mauve, berry, and icy pink will suit you.
Neutral undertones are a mix of both. If you have neutral undertones, you can rock most blush colors, though warm and cool pinks work especially well.
Testing Blush at Home
Before you buy a blush, test it on your cheeks in natural light. Drugstore blush is often cheap, so you can buy a few shades and see what works. Or, ask for a sample at the makeup counter.
The right shade should match the natural flush in your cheeks when you pinch them. If it looks grey, muddy, or way too dark, keep looking.
Blush Shades for Different Skin Tones
Fair skin looks great with pale pink, rose, peach, and light coral. These shades won’t look overdone.
Medium skin tones look beautiful with warm pink, peach, terracotta, and coral. These shades add brightness without looking harsh.
Deep skin tones pop with berry, wine, deep coral, warm bronze, and rich terracotta. Darker shades show up better on deep skin, so don’t be shy with color.
Preparing Your Face for Blush
Your blush will apply better and last longer if your face is ready. Take a few simple steps before you touch your blush.
Clean and Moisturize
Start with a clean face. Wash your face with your normal cleanser to get rid of dirt and oil. Pat your skin dry gently. Blush applies better on a clean canvas.
Next, apply your moisturizer. Wait a minute or two for it to sink in. Your skin should feel hydrated but not greasy.
Apply Primer
A primer goes on after your moisturizer and before your foundation. It creates a smooth base and helps your makeup last all day. A good primer fills in pores and fine lines so your blush looks flawless.
You don’t need a lot of primer. A little dab goes a long way. Blend it in with your fingers and let it set for a minute.
Foundation and Concealer
Apply your foundation and concealer next. Let them set for a minute. Your face should look even-toned and ready for blush.
The Blush Application Process
Now comes the fun part. These steps will help you apply blush the right way.
Step One: Load Your Brush
Tap your brush into your blush. For powder blush, tap gently a few times. For cream or gel blush, use less product—a tiny bit goes a long way.
Tap off any excess product on the edge of the pan or your hand. You don’t want too much product on your brush because it will be hard to blend.
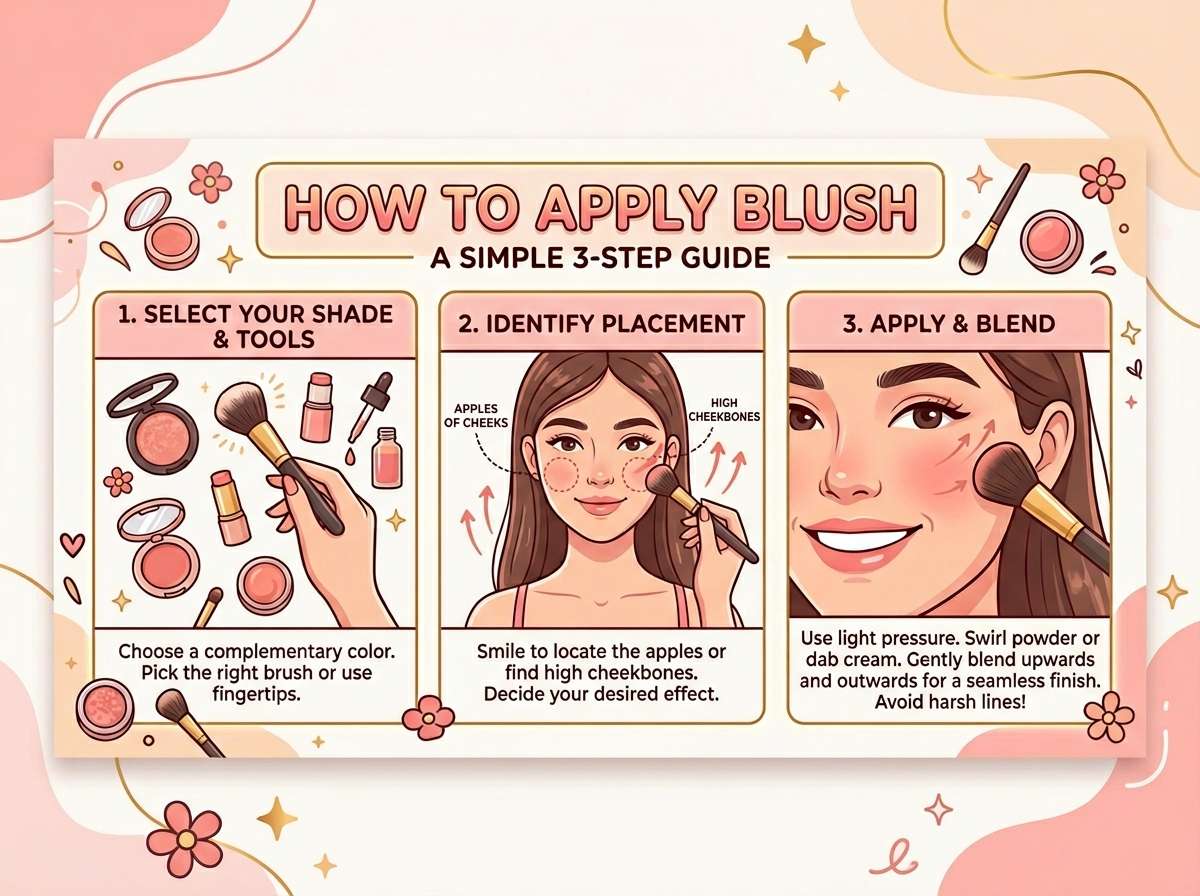
Step Two: Find Your Apples
Smile big. Feel your cheeks puff out? Those puffy areas are your apples. Your apples are the fullest part of your cheeks when you smile. This is where you want to apply the most color.
Press your blush onto your apples. Use a gentle tapping or stippling motion rather than dragging your brush. Tap the blush on in small sections to build color evenly.
Step Three: Blend Out
Once you’ve applied color to your apples, blend it out. Use a light, circular motion to blend the blush up toward your temples and back toward your ears. This creates a gradient effect that looks natural.
Don’t blend too much or you’ll lose the color. You want to see a soft gradient, not a harsh line of color.
Step Four: Check in the Mirror
Step back and look at your cheeks. Does the color match both sides? Is it blended evenly? Do you want more or less?
If you need more color, repeat the process on the areas that need it. You can always add more blush, but you can’t take it off easily once it’s on.
If you applied too much, take a clean, fluffy brush and gently blend the edges. This helps soften the color.
Common Blush Application Mistakes
Even beginners can learn quickly by knowing what not to do.
Applying Blush Too Low
Your blush should go on the apples of your cheeks, not on your jaw. If you place blush too low, you can accidentally make your face look longer or droop downward. Stay in the middle and upper part of your cheeks.
Using Too Much Product
A little blush goes a long way. Many people use too much and end up looking clownish. Start with a tiny amount. You can build color slowly, and it’s easier than trying to fix too much blush.
Not Blending
If you don’t blend your blush, you’ll have a stripe of color across your cheeks. Always blend from the apples outward toward your temples. Blending takes thirty seconds and makes a huge difference.
Using the Wrong Shade for Your Skin Tone
A shade that looks perfect in the pan might look grey or muddy on your skin. Test before you buy. Ask friends what shades suit you. Don’t buy a blush just because it looks good on someone else.
Forgetting to Consider Your Undertone
Your undertone is more important than your skin tone. If you have a cool undertone, a warm orange blush will look off no matter how fair your skin is.
Matching Blush to Your Eyeshadow
Your blush and eyeshadow don’t have to match, but they should work together. If you’re wearing cool pink eyeshadow, avoid warm orange blush. A simple rule is to keep your shades in the same color family.
Making Your Blush Last All Day
You want your blush to stick around, right? These tips help keep your color looking fresh.
Use a Good Primer
A quality primer under your makeup is one of the best ways to make everything last longer. It creates a base that holds onto your products.
Apply Blush After Foundation
Always apply blush after your foundation but before your setting spray. If you put blush on first, your foundation will cover it up.
Use a Setting Spray
A setting spray locks everything in place. Spray it all over your face once you’ve finished your makeup. Let it dry, and your blush will stay put all day.
Powder Can Help
A tiny bit of powder over your blush can help set it. Use a light hand—too much powder makes your skin look cakey.
Keep Blush in Your Bag
Bring a mini blush with you so you can touch up during the day. A quick swipe of blush before an afternoon meeting keeps you looking fresh.
Blush Placement for Different Face Shapes
The way you place your blush can change how your face looks. Here’s how to play with placement based on your face shape.
Round Face Shapes
If you have a round face, place blush higher up on your cheeks and blend it back toward your temples. This lifts your face and makes it look less round. Avoid applying blush directly to the center of your cheeks.
Square Face Shapes
If you have a square face, place blush on the apples of your cheeks and blend upward toward your temples. This creates softness and balances out angular features.
Heart Face Shapes
If you have a heart-shaped face, place blush on the apples and blend slightly back. Focus on the center of your cheeks rather than going all the way to your temples. This balances your wider forehead.
Oblong Face Shapes
If you have an oblong face, place blush on the apples but don’t blend it back too far. Keep it more centered. This adds width and makes your face look less long.
Diamond Face Shapes
If you have a diamond-shaped face, place blush on the center of your cheeks and blend upward. This brings attention to your cheekbones without emphasizing your narrow cheeks.
Blush Techniques for Different Looks
Once you master the basic application, try these techniques to create different effects.
The Natural Flush
For a natural-looking flush, use a shade close to your skin tone. Apply it just to the apples and blend it out softly. Less is more with this look.
The Statement Blush
For a bolder look, use a deeper or brighter shade. Apply it with a bit more intensity, but still blend the edges. A statement blush still needs to look polished, not patchy.
The Lifted Look
To make your face look lifted, place blush higher on your cheeks toward your temples. Blend it upward. This makes your face look more sculpted and younger.
The Sculpted Look
To create definition, use a shade slightly darker than your skin tone. Place it on the apples and blend it toward your hairline. This makes your cheekbones look more prominent.
The Monochrome Look
For a cohesive look, use blush in the same color family as your eyeshadow and lip color. Everything should match. This looks put-together and intentional.
Fixing Blush Mistakes
Even pros make mistakes sometimes. Here’s how to fix them.
Too Much Blush
If you applied too much, don’t panic. Use a clean, fluffy brush to gently blend the edges. You can also lightly dust your cheeks with setting powder to tone it down. In a pinch, a tissue pressed gently on your cheeks can remove some color.
Uneven Blush
If one side has more color than the other, use a clean brush to blend the darker side out more. You can also add a tiny bit more to the lighter side to even it out.
Blush That Looks Muddy
If your blush looks grey or off, it might be the wrong shade for your undertone. For your next purchase, test the shade in natural light before you buy. For now, wear it around the house and learn from it.
Blush That Doesn’t Show Up
If you can barely see your blush, you picked a shade too close to your skin tone. Apply a bit more product, or use a slightly deeper shade next time. Don’t be afraid of color!
Blush and Skin Concerns
If you have specific skin concerns, blush can still work for you.
Blush for Oily Skin
Powder and gel blush work best for oily skin. Avoid cream and liquid blushes, which can move around and smudge. Use a mattifying primer to keep oil at bay.
Blush for Dry Skin
Cream and liquid blush work beautifully on dry skin. They don’t draw moisture out of your skin. Powder blush can look patchy, so use a hydrating primer first.
Blush for Sensitive Skin
If you have sensitive skin, pick blush made for sensitive skin if possible. Test any new shade on a small area first. Avoid shades with lots of glitter or shimmer, as they can irritate skin.
Blush for Combination Skin
You have options! Use powder blush where you’re oily (usually the T-zone and center of face). Use cream blush where you’re dry. Your cheeks might need different products than your forehead.
Blush for Acne-Prone Skin
Use a primer to smooth over acne and scars. Powder blush works best because it won’t sit heavy on pimples. Avoid touching your face too much while applying blush.
Blush for Different Skin Tones
Let’s talk about specific shade recommendations based on your skin tone.
Fair and Light Skin
Fair skin looks radiant with soft, pale colors. Try shades like blush pink, rose, light peach, and pale coral. These shades won’t overwhelm your complexion.
Medium Skin
Medium skin tones have so many options. Try warm pink, peachy tones, coral, warm terracotta, and berry. You can play with both warm and cool shades.
Tan and Deep Skin
Deep skin tones look stunning with bold colors that actually show up. Try berry, wine, rich coral, warm bronze, rust, and deep peach. Don’t be shy with color—deeper shades look beautiful on deeper skin.
Olive Skin
Olive undertones pair well with warm peachy tones, warm pinks, and terracotta. Avoid cool, icy pinks, which can clash with your green undertone.
Building a Blush Collection
Once you get comfortable with blush, you might want to build a collection. Here’s how to pick shades that work together.
Start with One Shade
Pick one shade that makes you feel good. Wear it for two weeks. Get comfortable with the application.
Add a Second Shade
Pick a shade slightly different from your first. If your first shade is warm pink, try peachy or coral. This gives you variety.
Add a Bold Shade
Once you have basics down, try a bold shade. A berry or wine shade lets you play with different looks.
Add a Neutral Shade
A neutral, barely-there blush is great for days when you want to look fresh but not made up. It’s also useful over a bold shade if you go too heavy.
Don’t Go Overboard
You don’t need twenty blushes. Three to five shades that work with your skin tone are enough. Quality beats quantity.
Professional Tips from Makeup Artists
Here’s what the pros know about applying blush.
Invest in Good Brushes
A good brush makes a huge difference. You don’t need expensive brushes, but they should be soft, well-made, and the right size.
Tap, Don’t Swipe
Always tap blush onto your cheeks rather than swiping. Tapping gives you better control and more even application.
Use Your Fingers for Cream Blush
Your fingers are the best tool for cream and liquid blush. They warm up the product and help you blend it out smoothly.
Match Your Blush to Your Lips
Your blush and lip color should work together. They don’t have to be the same, but they should be in the same color family.
Don’t Skip the Neck
If you apply foundation to your neck, apply blush lightly to your neck too. This creates a cohesive look.
Blend, Blend, Blend
Blending is everything. A well-blended blush always looks better than a perfectly placed harsh line of color.
Use a Lightweight Formula in Summer
In warm months, cream and liquid blush might feel heavy. Switch to a lightweight powder formula.
Blush Application for Special Occasions
For events, you might want to try something different.
For Photographs
For photos, use a shade slightly deeper than you’d wear every day. Cameras sometimes wash out color. A deeper shade shows up better.
For Events with Warm Lighting
Warm lighting makes your skin look warmer. Use a shade slightly cooler than you normally would. A rose or mauve shade works well.
For Events with Cool Lighting
Cool lighting makes your skin look cooler. Use a shade slightly warmer than you normally would. A peach or warm pink shade works well.
For Night Events
For evening, you can go bolder with blush. A deeper or more saturated shade looks elegant and intentional.
For Daytime Events
For daytime, keep blush subtle and natural. A soft, blended shade looks polished and fresh.
Troubleshooting Your Blush Routine
Got a problem? Here’s how to solve it.
Blush Feathers onto Your Temples
Your blush is moving around too much. Use a lighter hand and a better blending technique. Blend in circular motions rather than dragging your brush.
Blush Settles into Your Pores
This happens with powder blush on large-pored skin. Use a primer to fill pores first. Apply blush lightly and blend well.
Blush Doesn’t Blend
You might be using too much product. Use less and blend more. Or, your brush might not be fluffy enough. Invest in a better blush brush.
Blush Looks Patchy
You’re probably using an uneven application. Take your time. Build color gradually with light layers rather than one heavy application.
You Can’t Tell Where Your Apples Are
Smile and feel your cheeks. The puffy parts are your apples. Mark them with your finger before you apply blush if you need to.
Removing Blush at the End of the Day
Taking off your blush is as important as putting it on.
Use a Makeup Remover
A makeup remover cleanses your skin and removes all traces of blush. Use a remover made for your skin type.
Follow with a Cleanser
After remover, use your regular face cleanser. This makes sure all makeup comes off.
Moisturize
After cleansing, apply moisturizer. Your skin needs hydration, especially if you wear makeup daily.
Don’t Sleep in Makeup
Never go to bed with blush on. Your skin needs to breathe and repair itself while you sleep. Sleeping in makeup can cause breakouts and clogged pores.
Blush FAQs
Can I Wear Blush Every Day?
Yes! Blush is safe to wear every day as long as you remove it thoroughly before bed and keep your skin clean and moisturized.
Can I Use Blush as Eyeshadow?
Some blushes work as eyeshadow, but not all. Blush formulas are different from eyeshadow formulas. If you want to experiment, test it on a small area first.
Can I Mix Different Blush Shades?
Absolutely! Mixing two shades can create a custom color that works perfectly for you. Blend them together on the pan or on your cheeks.
How Much Blush Should I Use?
Use a small amount and build up gradually. Most people use way too much blush. Start light and add more if needed.
What if I Have No Blush at All?
In a pinch, you can pinch your cheeks to bring blood to the surface and create a natural flush. You can also use a tiny bit of lip color on your cheeks and blend it out.
Can Blush Go Bad?
Powder blush lasts for years. Cream and liquid blush last about six months to a year. If blush smells off or looks separated, throw it away.
Final Thoughts
Learning to apply blush is easier than you think. Start with the basics: find your apples, apply color, and blend. Once you’re comfortable, experiment with shades, placements, and techniques. Blush is forgiving. If you make a mistake, you can always blend it out or start over.
The most important thing is to have fun with it. Blush should make you feel good about how you look. Whether you’re going for natural or bold, subtle or saturated, the right blush applied with confidence is always beautiful.
Practice your application a few times and soon you’ll be applying blush like you’ve been doing it for years. Before you know it, you won’t even think about it—it’ll become part of your routine. And every day, you’ll get to enjoy that fresh, healthy, glowing feeling that only blush can give you.
Mary is a fashion enthusiast and lifestyle writer who loves discovering stylish clothing, accessories, and everyday fashion essentials. She enjoys researching the latest trends, reviewing popular products, and sharing practical style tips to help readers dress with confidence. Through FashionSolve.com, Mary provides honest recommendations, fashion guides, and inspiration for building a wardrobe that is both stylish and affordable.