How to Dye Hair at Home?
Want to change your hair color without spending a fortune at a salon? Dyeing your hair at home is totally doable. You just need the right knowledge, tools, and a little patience. This guide walks you through everything you need to know about coloring your own hair.
Why Dye Your Hair at Home?
Let’s be honest. Hair dye costs a lot when you go to a professional salon. A single color treatment can run you anywhere from fifty to three hundred dollars, depending on where you live and the type of service you need. When you dye hair at home, you spend way less money. A box dye costs between five and twenty dollars.
You also save time. No appointment needed. No waiting around. You dip into the store, grab a box, and do it yourself whenever you want. Maybe it’s a Sunday afternoon or late at night. You control the schedule.
Home hair coloring gives you privacy too. You’re not sitting in a chair for hours with other people around. Some folks feel more relaxed coloring their own hair in their bathroom.
The color selection is huge. Stores stock hundreds of shades and brands. You can find bright reds, cool blondes, dark brunettes, or fun fashion colors like purple and blue.
What You Need Before You Start
Hair Dye Products
The box dyes you find at drugstores are the most budget-friendly option. Each box comes with everything in one package. You get the dye, developer, and sometimes a mixing bowl and gloves. These work great for basic color jobs like going darker or trying a new shade.
Salon-quality dyes cost more but sometimes give better results. You buy the color and developer separately. These tend to last longer and give you more control over the final shade.
If you want brightness and vibrancy, semi-permanent hair dye is your friend. This type doesn’t have peroxide. It sits on top of your hair and fades out over time. Semi-permanent dyes are perfect for testing out wild colors without commitment.
Demi-permanent dyes are the middle ground. They have a small amount of peroxide. They last longer than semi-permanent but don’t lift color like permanent dyes do.
Tools and Supplies
You’ll need some items sitting around your home or a quick trip to grab them.
A mixing bowl is crucial. Use something that’s not metal. Glass, plastic, or ceramic work fine. Metal bowls react badly with the chemicals in hair dye.
Application brushes help you get the dye where it needs to go. Some boxes come with one. If not, grab a cheap brush from a beauty store. An old toothbrush also works for small spots.
Get yourself some gloves. Your hands will stain. Most boxes include gloves, but have extra ones on hand just in case.
Petroleum jelly is a lifesaver. Rub it along your hairline, ears, and neck before you start. The dye won’t stain your skin as easily.
A towel you don’t care about will protect your shoulders. Dye stains like crazy, so use something old.
Clips or hair ties keep sections of hair out of the way. Bobby pins help with smaller sections.
An old t-shirt protects your clothes. Seriously, wear something you don’t mind ruining.
Newspaper or a plastic shower curtain goes on the floor. Dye splatters happen.
Preparing Your Hair for Dyeing
Your hair needs some prep work before you go color crazy.
Do a Patch Test
This is not optional. Many people skip it and regret it. A patch test tells you if you’re allergic to the dye. Mix a tiny bit of dye with developer. Apply it behind your ear or on your inner arm. Wait twenty-four hours. If you get a rash, itching, or swelling, do not put that dye on your head.
Wait Between Treatments
If you recently got a perm, relaxer, or colored your hair, give it time. Your hair is delicate. Doing multiple chemical treatments close together damages your strands. Wait at least two weeks between treatments.
Check Your Hair Health
Run your fingers through your hair. Does it feel dry? Rough? Brittle? This matters. Damaged hair takes dye differently. It might grab color unevenly or break more easily.
If your hair is damaged, do some deep conditioning treatments first. Use a hair mask. Leave it on for thirty minutes. This helps your hair absorb moisture and prepares it better for color.
Don’t Wash Right Before
Hold off on washing your hair for a day or two before dyeing. Your scalp makes natural oils. These oils protect your scalp during the dyeing process. If you wash right before, you strip these oils away.
Detangle Your Strands
Brush or comb through your hair. Get rid of knots. This makes application easier and more even.
Understanding Hair Color Science
You don’t need a degree in chemistry, but knowing the basics helps.
Hair color levels go from one to ten. One is black. Ten is the palest blonde. Your natural hair is at a certain level. If you want to go darker, you pick a lower number. If you want to go lighter, you pick a higher number.
Semi-permanent dyes don’t lift color. They can’t make light hair lighter. They only add color on top of what’s there.
Permanent dyes have peroxide. The peroxide opens your hair shaft and removes existing color. Then the new color gets deposited. This is why permanent dye can take hair from brown to blonde, but it takes longer and needs stronger formula.
If you have dark hair and want a light color, this gets tricky. You might need to bleach first. Bleaching is harsh. It strips all color out. Some people do one or two bleach sessions before applying a light blonde shade.
Red and warm tones fade fastest. Cool tones like ash and platinum last longer. This matters when you pick your shade.
Steps to Dye Your Hair at Home
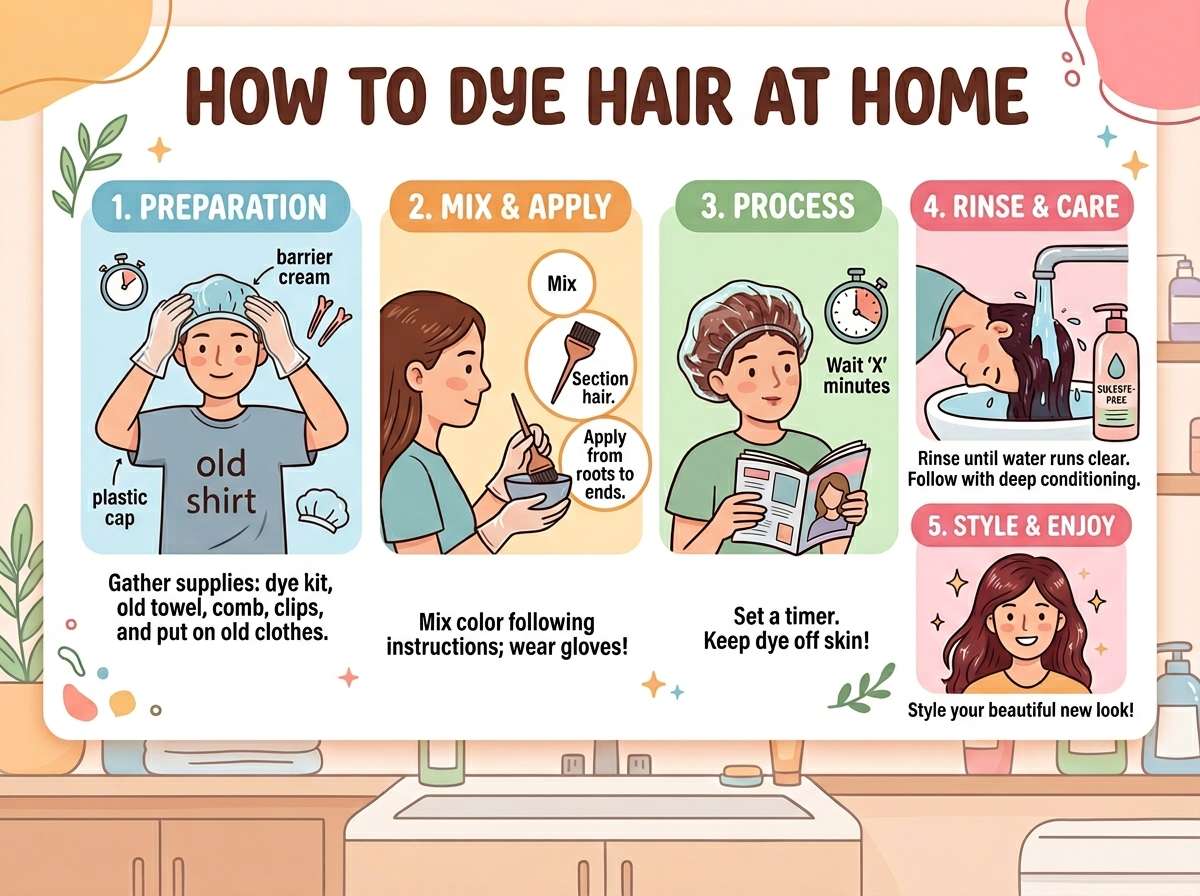
Step One: Gather Everything
Before you start, have every single item within arm’s reach. You don’t want to be halfway through with wet dye-covered hair looking for scissors or a clip.
Set up your space. Lay down newspaper or plastic. Put your towel where you’ll sit. Get your dye kit, tools, bowl, gloves, and petroleum jelly ready.
Step Two: Apply Petroleum Jelly
Rub petroleum jelly all along your hairline. Get the edges around your face. Do your ears. Cover your neck. This creates a barrier. Any dye drips will wipe right off instead of staining your skin.
Step Three: Section Your Hair
Divide your hair into four or more sections. Start by creating a line from the middle of your forehead straight back to the nape of your neck. Then create another line from ear to ear across the top of your head. Clip each section.
More sections mean easier, more even application. If you have thick hair, do six or eight sections.
Step Four: Mix the Dye
Follow the instructions in your box exactly. Mix the dye with the developer in your bowl. The ratio matters. Too much dye and it gets too strong. Too much developer and the color gets weak.
Stir it well. Get rid of lumps. The mixture should be smooth and easy to apply.
Work quickly. Mixed dye doesn’t last forever. Some formulas need to be used within thirty minutes.
Step Five: Do a Second Patch Test
I know, I know. You already did this. But do a tiny test on an inconspicuous spot anyway. Apply a small amount to the back of your hair behind the ear. Wait a few minutes. This confirms the color is what you expected and your hair reacts okay to this particular dye batch.
Step Six: Start Applying Dye
Release one section. Start at the roots. This is where the color develops fastest because it’s closest to your scalp warmth. Use your brush to saturate the roots really well.
Work the dye through the middle lengths of that section. Then move to the ends.
Make sure every strand gets covered. Gaps show up later. Grab a mirror if you need to check the back of your head.
Move to the next section. Repeat.
Work fast but carefully. You want thorough coverage, not sloppy application.
Step Seven: Check the Time
Set a timer. How long you leave the dye in depends on what you’re using. Box dyes usually need twenty to forty-five minutes. Check your instructions.
Don’t leave it on way longer than directed. Your hair can only hold so much color. Extra time doesn’t mean better color. It just means more damage.
Step Eight: Do the Strand Test
About five minutes before your timer goes off, do a strand test. Take a paper towel. Wipe a small section of dye from your hair. Rinse it. Look at the color. Is it where you want it? If not, leave the dye on a few minutes more.
Step Nine: Rinse Thoroughly
When time’s up, rinse your hair. Get to a sink or shower. Use cool to lukewarm water. Hot water opens the hair shaft and lets color leak out. Cold water keeps the color locked in better.
Rinse until the water runs clear. This takes longer than you think. Keep rinsing. Color particles should disappear from the water.
Step Ten: Use Conditioner
Apply conditioner right away. Most dye boxes include conditioner. Use it. Conditioner closes the hair shaft. It helps seal in the color. Leave the conditioner on for the recommended time. Rinse it out.
Your hair might feel weird right after coloring. That’s normal. The conditioner helps with this.
Tips for Better Results
Match Your Undertone
Your skin has undertones. You’re either warm, cool, or neutral. If you have warm undertones, warm hair colors look better on you. Think golden blondes, warm reds, and rich chocolates.
Cool undertones pair well with ash blondes, cool reds, and jewel-tone colors.
Look at veins on your wrist. Greenish veins mean warm undertones. Bluish veins mean cool undertones.
Consider Your Starting Color
Going from dark to light is harder than going from light to dark. Dark hair contains lots of pigment. Lightening it takes time and sometimes bleach.
Going dark to light works great. Dark dyes cover previous colors well.
Do a Strand Test First
Mix up a tiny batch of dye. Apply it to a hidden section of hair. You get a preview of the final color on your specific hair. Dye takes differently on everyone’s hair.
Use Quality Products
Cheap dyes sometimes have bad formulas. They might not cover well or might damage your hair. Spending a few extra dollars on a better brand pays off.
Don’t Dye Wet Hair
Make sure your hair is dry before you start. Wet hair absorbs dye unevenly.
Keep the Dye Off Your Scalp
If the dye sits directly on your scalp the whole time, your scalp gets irritated. Apply dye to roots last, near the end of the time window. Your scalp’s heat helps the roots process color faster anyway.
Use a Heat Cap
A shower cap over dyed hair keeps heat in. This helps color develop better. You can buy cheap shower caps, or use plastic wrap.
Common Mistakes to Avoid
Forgetting the Patch Test
Allergic reactions are real. Your face swells up. You get hives. You feel itchy. Don’t skip the patch test to save time.
Not Reading Instructions
Every dye is different. Box A might need twenty minutes. Box B might need forty-five. Read your specific instructions.
Dyeing Hair That’s Already Damaged
If your hair is breaking off or feels like straw, fix that first. Deep condition. Wait. Then dye.
Using Old Dye
Old dye doesn’t work the same way. If you have dye from a long time ago, buy new stuff.
Not Sectioning Hair
Trying to dye your whole head without sections leads to spotty, uneven color. Sections make the job easier.
Leaving Dye On Too Long
More time doesn’t equal better color. Stick to the recommended time.
Using Hot Water
Hot water fades color fast. Use cool water.
Not Conditioning After
Your hair needs moisture after dyeing. Skip the conditioner and your hair dries out.
Caring for Dyed Hair
After you dye your hair, take care of it. Color fades without proper maintenance.
Wash With Cold Water
I can’t say this enough. Cold water keeps color in. Hot water opens the hair shaft and lets color molecules escape.
Use Color-Safe Shampoo
Regular shampoo strips color out. Color-safe shampoos are gentler. They don’t strip your color as fast.
Condition More Often
Dyed hair needs extra moisture. Use conditioner every time you wash. Do deep conditioning treatments once a week.
Limit Heat Styling
Blow dryers, flat irons, and curling irons damage dyed hair. If you use them, use a heat protectant spray first.
Skip Sulfates
Sulfates are harsh cleaning agents. They strip color fast. Look for sulfate-free shampoos.
Avoid Chlorine
Chlorine turns blonde hair green and damages colored hair. Wear a swim cap if you go in a pool.
Get Trims Regularly
Dyed hair gets dry at the ends. Trim off split ends every six to eight weeks. This keeps your color looking fresh.
Protect From Sun
Sun fades hair color. Wear a hat outside if possible. Use UV protection spray designed for hair.
When to Go Back for Touch-Ups
Hair grows about half an inch each month. As new hair grows in, you see your roots. How long you can go between touch-ups depends on your color choice.
Darker roots show up more obviously on lighter hair. Lighter roots blend in better on darker hair. Reds and warm tones fade fastest. Cool tones last longer.
Most people touch up roots every four to eight weeks.
You don’t have to dye your whole head each time. Just dye the roots.
Different Hair Types and Dye
Your hair type affects how dye works.
Fine, thin hair takes color fast. Be careful. Check your strand test constantly.
Thick, coarse hair takes color slower. It might need a longer processing time.
Curly hair is delicate. It already tends to be drier. Deep condition before dyeing. Use a color-safe moisturizing shampoo after.
Straight hair usually takes dye evenly. No special tricks needed.
Previously colored hair might be porous. It grabs dye quickly and deeply. You might end up with darker color than expected.
Fixing Color Mistakes
Mistakes happen. You’re not alone.
Color Is Too Dark
Rinse your hair immediately with hot water. This can lighten it slightly. Use clarifying shampoo. Wash several times. This helps fade the color faster.
Color-removing products exist. They’re gentler than bleach but still strip color. Try one if washing doesn’t help.
Color Is Too Light or Didn’t Take
Wait a few days. Sometimes color develops more as it oxidizes. If it’s still too light, apply more dye.
Make sure you used the right volume developer. Lower volumes process slower and lighter.
Color Is Patchy or Uneven
You can reapply dye to problem areas. Let your hair rest a few days first. Then apply dye just to the light spots.
You Got the Wrong Shade
If you hate the color, you have options. You can go darker over it. You can use a color depositing conditioner to adjust the tone. You can wait for it to fade and try again.
Special Cases
Going From Dark to Light
This is the hardest color change. You need to bleach first usually. One bleach session might not be enough. Two or three sessions with breaks in between give better results.
Bleach is harsh. Each session weakens your hair. Deep condition between sessions. Go slow.
Going Gray or Silver
Gray and silver hair is totally achievable at home. You’ll likely need to bleach first unless you’re starting from very light hair. Then apply a cool-toned blonde or ash dye.
Color-depositing conditioners help maintain gray and silver tones. Use them once a week.
Using Fashion Colors
Bright pinks, blues, purples, and greens are fun. These usually work best on bleached or very light hair.
Semi-permanent dyes are great for fashion colors. They fade out, so you’re not stuck with it.
Have fun. These colors show personality.
What If You’re Not Ready Yet
Nervous about permanent dye? Try temporary options first.
Hair chalk washes out in one shampoo. Perfect for testing colors.
Temporary dyes last two to three washes. Great for commitment-phobes.
Semi-permanent dyes last four to eight weeks. You get to try a color without forever commitment.
These options let you practice application too. Get comfortable before you go permanent.
FAQs About Home Hair Dyeing
Can I dye my hair every week? No. Your hair needs breaks. Wait at least two weeks between dye applications.
Does box dye damage hair? It can if you don’t take care of your hair. Proper conditioning and maintenance keeps damage minimal.
Can I dye gray roots on previously colored hair? Yes, but be careful. Previously colored hair is often porous. Test on a strand first.
What if I have an allergic reaction? Rinse immediately. Wash your hair and scalp thoroughly. Take an antihistamine. See a doctor if swelling or difficulty breathing happens. Never dye again if you have a reaction.
How long does home dye last? Semi-permanent lasts four to eight weeks. Demi-permanent lasts eight to twenty-four weeks. Permanent lasts until new hair grows in, but the color fades over time.
Can I dye my hair right after getting a haircut? Yes. Wait a day or two at most. Cutting your hair doesn’t affect dyeing.
Does clarifying shampoo fade color? Yes. Use it before you dye to remove buildup, but don’t use it regularly after coloring.
Can I mix two different dyes? No. The chemical composition is different. You don’t know what will happen. Buy the shade you want instead.
Will dye damage my scalp? If you’re not allergic, dye shouldn’t damage your scalp. Don’t leave it on for excessive time. If your scalp hurts during dyeing, rinse immediately.
Can I dye really short hair at home? Yes. Actually, short hair is easier. Less hair to cover. Less dye needed.
Final Thoughts
Dyeing your hair at home saves money and gives you control over your look. Follow the steps carefully. Read your instructions. Take care of your hair after. You’ll get great results.
Your first time might be nerve-wracking. That’s normal. You’ll get better with practice.
Start with a shade close to your natural color if you’re nervous. This gives you room for error.
Remember that hair grows. If you hate the color, it will eventually fade and grow out. You can always try something new next time.
Have fun with it. Hair is supposed to be enjoyable. Changing your color is a great way to switch up your style without commitment. You’ve got this. Now go grab that dye and start your color transformation.
Mary is a fashion enthusiast and lifestyle writer who loves discovering stylish clothing, accessories, and everyday fashion essentials. She enjoys researching the latest trends, reviewing popular products, and sharing practical style tips to help readers dress with confidence. Through FashionSolve.com, Mary provides honest recommendations, fashion guides, and inspiration for building a wardrobe that is both stylish and affordable.