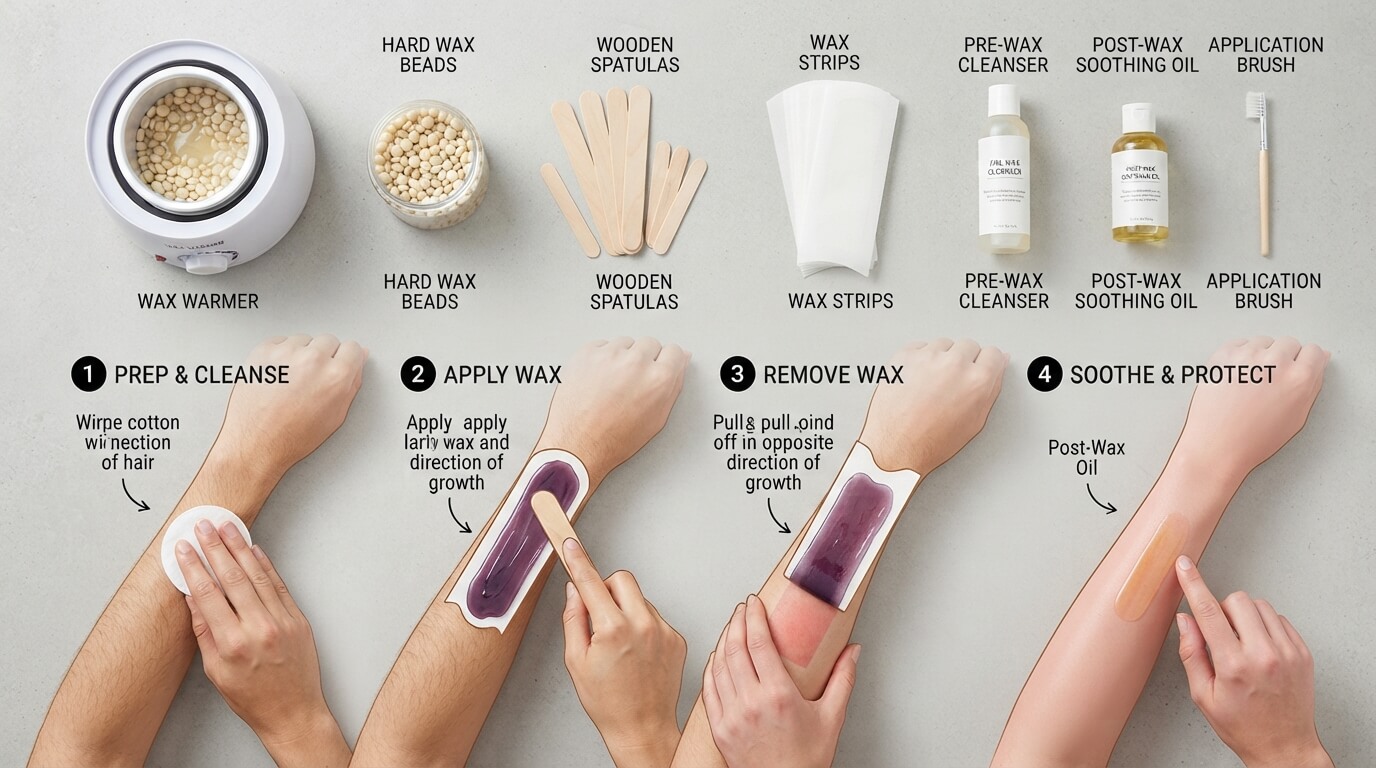
How To Wax Yourself At Home?
Waxing at home can feel scary the first time you try it. You watch a video online, the person makes it look so easy, and then you try it yourself and the wax sticks to your fingers instead of your skin. Sound familiar? Don’t worry. Once you learn the right steps, home waxing gets much easier, and it can save you a lot of money over time.
This guide walks you through everything step by step. From the tools you need to the exact way to apply and remove wax, we cover it all in plain, simple words. By the end, you’ll feel ready to give it a go with confidence.
Why People Choose To Wax At Home
Salon waxing is great, but it costs money and takes up time. Doing it yourself at home means you can wax whenever it suits your schedule, in your own space, without booking an appointment or driving anywhere.
Here are some reasons people switch to home waxing:
- It saves cash over time since salon visits add up fast.
- You control the process from start to finish.
- There’s no waiting room, no rush, no small talk with a stranger.
- You can pause and take breaks whenever you need to.
- Results last longer than shaving, often three to five weeks.
Waxing also removes hair from the root, so regrowth feels softer and thinner over time. Shaving cuts hair at the surface, which leaves a blunt edge that grows back coarse and stubbly. That’s a big reason so many people move away from razors and try wax instead.
Types Of Wax You Can Use At Home
Before you start, it helps to know your options. Not all wax works the same way, and some types suit certain body parts better than others.
Hard Wax
Hard wax hardens as it cools and gets pulled off without strips. It grips hair well and tends to hurt less than strip wax, since it doesn’t stick much to the skin itself. This type works great for sensitive spots like the underarms, bikini line, and face.
Soft Wax (Strip Wax)
Soft wax stays sticky and needs cloth or paper strips to remove it. It covers large areas fast, so it’s a solid pick for legs and arms. It does stick to skin more than hard wax, so it can feel a bit rougher during removal.
Sugar Wax
Sugar wax is a natural mix made from sugar, lemon juice, and water. It rinses off with plain water, unlike traditional wax that often needs oil to clean up. Many people with sensitive skin lean toward sugar wax since it has fewer added chemicals.
Wax Strips (Pre-Made)
These come ready to use, no heating needed. Just warm them between your palms, apply, and pull. They’re handy for quick touch-ups or for beginners who don’t want to deal with melting wax on a stove or in a warmer.
Tools And Supplies You’ll Need
Gather your supplies before you begin so you’re not scrambling mid-session with sticky hands. Here’s a simple checklist:
- Wax of your choice (hard, soft, or sugar)
- A wax warmer or microwave-safe bowl, depending on the type
- Wooden applicator sticks (spatulas)
- Cloth or paper strips, if using soft wax
- Baby powder or cornstarch to prep skin
- Pre-wax cleanser or rubbing alcohol wipes
- Post-wax oil or soothing lotion
- Tweezers for any stray hairs
- A mirror, for areas like the face or bikini line
- Old clothes or a towel to protect surfaces
Having everything laid out ahead of time makes the whole process smoother and less stressful.
Getting Your Skin Ready
Skin prep matters a lot. Good prep means less pain, cleaner removal, and fewer ingrown hairs later.
Check hair length. Hair should be about a quarter inch long, roughly the size of a grain of rice. Too short and the wax can’t grip it. Too long and it hurts more and gets messy. If your hair is too long, trim it with small scissors first.
Exfoliate a day before. Gently scrub the area with a body scrub or a soft brush the day before your session. This lifts dead skin cells and helps hair pull out more freely. Skip this step directly before waxing though, since freshly scrubbed skin can feel too sensitive.
Clean the area. Right before you start, wash the skin with mild soap and warm water. Dry it fully. Any lotion, sweat, or oil on the skin stops wax from sticking the way it should.
Apply powder. Dust a light layer of baby powder or cornstarch over the area. This soaks up extra moisture and oil, so the wax grabs the hair instead of the skin.
Test the wax temperature. Always test a small drop of wax on your wrist before applying it to a bigger area. It should feel warm, not hot. Burnt skin is no fun, so take this step seriously every single time.
Step-By-Step: How To Wax Yourself
Now for the main part. Follow these steps in order, and take your time, especially during your first few tries.
Step 1: Heat The Wax
If you’re using hard or soft wax, heat it in a warmer until it turns into a smooth, honey-like texture. Stir it now and then so it heats evenly. Sugar wax usually comes ready-made and just needs a quick warm-up in the microwave for a few seconds, or a gentle knead with your hands if it’s a paste.
Step 2: Apply The Wax
Use your wooden stick to spread a thin layer of wax in the same direction your hair grows. Keep the layer even, not too thick and not too thin. A patch about two to three inches long works well for most spots.
Step 3: Add The Strip (If Needed)
For soft wax, press a cloth or paper strip over the wax right away, smoothing it down in the direction of hair growth. Leave a small edge at one end so you have something to grip when it’s time to pull.
For hard wax, skip this step. Just let the wax sit until it turns matte and slightly firm to the touch, usually within a minute or so.
Step 4: Pull It Off Fast
This part scares people the most, but here’s the trick: speed matters more than force. Hold your skin taut with one hand, and with the other hand, pull the strip (or the hardened wax) off in one quick motion, going against the direction of hair growth. Pull close to the skin, almost parallel to it, rather than straight up. A fast pull hurts far less than a slow one.
Step 5: Press To Ease Pain
Right after pulling, press your palm firmly on the area for a few seconds. This calms the nerves and cuts down on the sting. Many people skip this step and regret it, so don’t rush past it.
Step 6: Repeat As Needed
Move to the next patch of skin and repeat the process. Go section by section, working across the whole area you want done. If some hairs get left behind, don’t go over the same spot with wax more than twice, since that can irritate the skin. Instead, grab tweezers and pluck any stragglers by hand.
Step 7: Clean Up
Once you’re done, use a bit of baby oil, coconut oil, or a wax-specific cleanser to wipe away any sticky leftover residue. Warm water alone won’t cut through wax easily, so oil-based products work best for cleanup.
Area-By-Area Tips
Different parts of the body need slightly different approaches. Here’s a quick breakdown.
Legs
Legs are the easiest place to start since the skin is fairly tough and the area is large and flat. Work in sections from ankle to knee, then knee to thigh. Sit on a towel and keep a mirror nearby for the back of your legs, or ask someone to help with spots you can’t see well.
Arms
Arm skin is thinner than leg skin, so use a bit less pressure. Hair also grows in different directions on the arm, so pay close attention and pull in the correct direction for each small patch.
Underarms
This spot is sensitive and the skin folds a lot, so go slow. Pull your arm up and stretch the skin tight before applying wax. Hard wax tends to work best here since it grips hair firmly without sticking too much to delicate skin.
Bikini Area
Take your time in this zone and use a small mirror if needed. Apply wax in small patches, no bigger than an inch or two, and always pull against the direction of growth. Hard wax is the safer pick here too, since soft wax can pull on delicate skin more roughly.
Face (Upper Lip, Chin, Eyebrows)
Facial skin is thin, so only ever use wax made specifically for the face. Apply very small amounts and pull gently but quickly. If you’re new to this, start with your upper lip since it’s a small, forgiving area to practice on.
Aftercare: What To Do Once You’re Finished
Aftercare is just as important as the waxing itself. Skipping it can lead to bumps, redness, or ingrown hairs.
- Avoid hot water for a few hours. Hot showers or baths right after waxing can irritate freshly opened pores. Stick to lukewarm water instead.
- Skip the gym for the rest of the day. Sweat and friction from tight workout clothes can clog pores and cause breakouts on freshly waxed skin.
- Stay out of direct sun. Sun exposure on freshly waxed skin can cause dark spots. Cover the area or apply sunscreen if you’re heading outside.
- Don’t use scented lotions right away. Fragrance-heavy products can sting and irritate sensitive skin. Reach for something gentle and fragrance-free instead.
- Moisturize daily. Once the first day passes, keep the area hydrated with a light, soothing lotion to keep skin soft and calm.
- Exfoliate a few days later. Starting two or three days after your session, gently exfoliate every couple of days to prevent ingrown hairs and keep skin smooth.
Common Mistakes To Avoid
Even careful beginners slip up sometimes. Here are a few things to watch out for:
Applying wax on wet skin. Wax won’t stick properly if skin is damp, so always dry the area fully first.
Pulling straight up instead of sideways. This causes more pain and can bruise the skin. Always pull close and flat, almost parallel to your body.
Going over the same spot again and again. This irritates skin and can cause bruising or broken capillaries. Two passes max, then switch to tweezers for leftover hairs.
Using wax that’s too hot. Always test the temperature first. Burns are painful and take a while to heal.
Waxing over broken or sunburned skin. Skip waxing entirely if your skin is irritated, sunburned, or has any open cuts. Wait until it heals fully.
Skipping the patch test. If you’re trying a new wax brand or type for the first time, test a tiny bit on your inner arm a day ahead. This helps you catch any allergic reaction before it spreads to a bigger area.
Tips To Reduce Pain
Nobody loves the sting of waxing, but a few tricks can make it more bearable.
- Wax in the afternoon rather than right before bed or right after waking, since skin tends to be less sensitive during midday hours.
- Take a mild pain reliever about half an hour before your session if you know you’re extra sensitive.
- Breathe out slowly as you pull the strip, since holding your breath tends to tense muscles and increase pain.
- Keep the area taut with your free hand at all times. Loose skin makes pulling hurt more and can cause bruising.
- Try not to wax right before your period, since skin tends to feel more sensitive during that time.
- Play music or a show in the background to distract your mind while you work.
How Long Do Results Last?
Most people see smooth skin for three to five weeks after waxing. This varies based on hair type, hormones, and how fast your body naturally grows hair. Over time, with regular waxing, many people notice hair grows back finer, sparser, and softer, since pulling from the root weakens the follicle bit by bit.
To keep results consistent, try to stick to a routine. Waxing too early, before hair reaches the right length, means the wax won’t grip well and you’ll waste product without good results.
Dealing With Ingrown Hairs
Ingrown hairs happen when a hair curls back into the skin instead of growing outward. They show up as small red bumps, sometimes with a bit of pus. Here’s how to prevent and treat them:
- Exfoliate two to three times a week using a gentle scrub or a soft brush.
- Moisturize daily to keep skin flexible, which lets hair grow out more easily.
- Avoid tight clothing right after waxing, since friction can trap hairs under the skin.
- If a bump shows up, avoid picking at it. Instead, apply a warm compress to help it release naturally.
- Products with salicylic acid or tea tree oil can help calm irritated follicles.
Frequently Asked Questions
Does home waxing hurt more than salon waxing? Not really. Pain depends more on technique than on who’s doing it. With practice, home waxing can feel just as smooth as a salon visit.
How often should I wax? Every three to five weeks works for most people, once hair has grown back to the right length for the wax to grip.
Can I wax if I’m using retinol or acne treatments? It’s best to pause strong skincare treatments like retinol for a few days before and after waxing, since they can make skin extra sensitive and prone to tearing.
Is sugar wax better than regular wax? It depends on your skin. Sugar wax tends to be gentler and easier to clean up, but regular wax can grip coarse hair a bit better. Try both and see which one your skin prefers.
What if I mess up and wax the wrong direction? Don’t panic. Apply a little more wax over the same spot once, let it set, and pull it off in the correct direction this time.
Can men use these same steps? Yes, the steps apply to anyone. Just adjust the area and amount of wax based on hair thickness, which tends to be coarser in some spots for men.
Final Thoughts
Waxing at home takes a little patience at first, but once you get the hang of it, the whole process becomes quick and simple. Start with an easy area like your legs before moving on to trickier spots like the bikini line or face. Keep your tools ready, prep your skin well, and always pull fast and close to the skin for the best results with the least amount of pain.
Give yourself grace during your first few tries. Even people who’ve waxed for years still get the occasional patch that doesn’t pull cleanly. With practice, you’ll build your own rhythm and find the routine that works best for your skin and your schedule. Soon enough, home waxing will feel like second nature, and you’ll wonder why you didn’t start sooner.

Mary is a fashion enthusiast and lifestyle writer who loves discovering stylish clothing, accessories, and everyday fashion essentials. She enjoys researching the latest trends, reviewing popular products, and sharing practical style tips to help readers dress with confidence. Through FashionSolve.com, Mary provides honest recommendations, fashion guides, and inspiration for building a wardrobe that is both stylish and affordable.