How to Cover a Bruise?
We’ve all been there. You walk into a meeting, head to the gym, or plan a night out with friends, and boom—there’s a bruise staring back at you in the mirror. Whether it’s from a bump against the doorframe, a fall, or just an accident, bruises can feel like unwanted guests that show up at the worst times. The good news? You don’t have to let them ruin your day or your plans. Covering a bruise is totally doable, and you have way more options than you might think.
This guide walks you through everything you need to know about hiding bruises effectively. We’ll talk about why bruises form, when you should actually be concerned, and then dive into the practical steps to conceal bruises using makeup, clothing, and other clever methods.
Why Bruises Show Up in the First Place
Before we jump into concealing bruises, let’s talk about what causes them. A bruise forms when you hit your skin hard enough to damage the tiny blood vessels underneath. These broken vessels leak blood into the surrounding tissue, which creates that discolored area you see. This type of injury is also called a contusion or blunt force trauma.
The color of your bruise tells you something about how fresh it is. New bruises look red or purplish-red because the blood is still pooling under your skin. After a day or two, bruises turn blue or purple. Then they gradually shift to green, yellow, and finally brown before fading away completely. This color progression is totally normal and happens to everyone.
The size of your bruise depends on how hard you got hit. A small bump might leave just a tiny mark, while a bigger impact creates a larger discolored area that’s harder to hide. Fortunately, the method you choose depends on the size, location, and color of your bruise, not just your skill level.
When Should You Worry About a Bruise?
Most bruises are harmless and heal on their own without any special treatment. However, some bruises signal that something more serious happened. If your bruise is huge, extremely painful, or came from a significant impact or fall, you should talk to a doctor. Same goes if you notice bruising that shows up without remembering what caused it—that can sometimes point to an underlying health issue.
Also pay attention if the bruised area feels numb, tingly, or if you can’t move a limb properly. These signs could mean there’s swelling that’s putting pressure on nerves or blood vessels. A doctor can tell you if the injury needs more than just basic care.
For most everyday bruises, though, you can safely use the hiding methods in this guide. Just make sure the area doesn’t feel like there’s broken skin or anything that needs medical attention first.
Step One: Clean and Prepare Your Skin
Before you even think about covering your bruise, take care of your skin. Start by washing the area gently with soap and water. Use cool water, not hot, because heat can make bruising worse. Pat the area dry with a soft towel—don’t rub hard.
If you’re using makeup to conceal your bruise, wait until the skin is completely dry before starting. Applying makeup to damp skin makes everything look splotchy and the coverage won’t last as long. Also, if the bruised area has any cuts or scrapes, put a bandage on those spots first before covering them up.
Once your skin is clean and dry, you can apply a light moisturizer if you want. This creates a smooth surface for makeup application. This step helps foundation and concealer blend better and look more natural against your skin. Let the moisturizer soak in for a minute or two before moving forward.
Method One: Using Makeup to Hide Bruises
Makeup is probably the most popular way to conceal bruises because you can target the exact area and build coverage gradually. The key is using the right products in the right order.
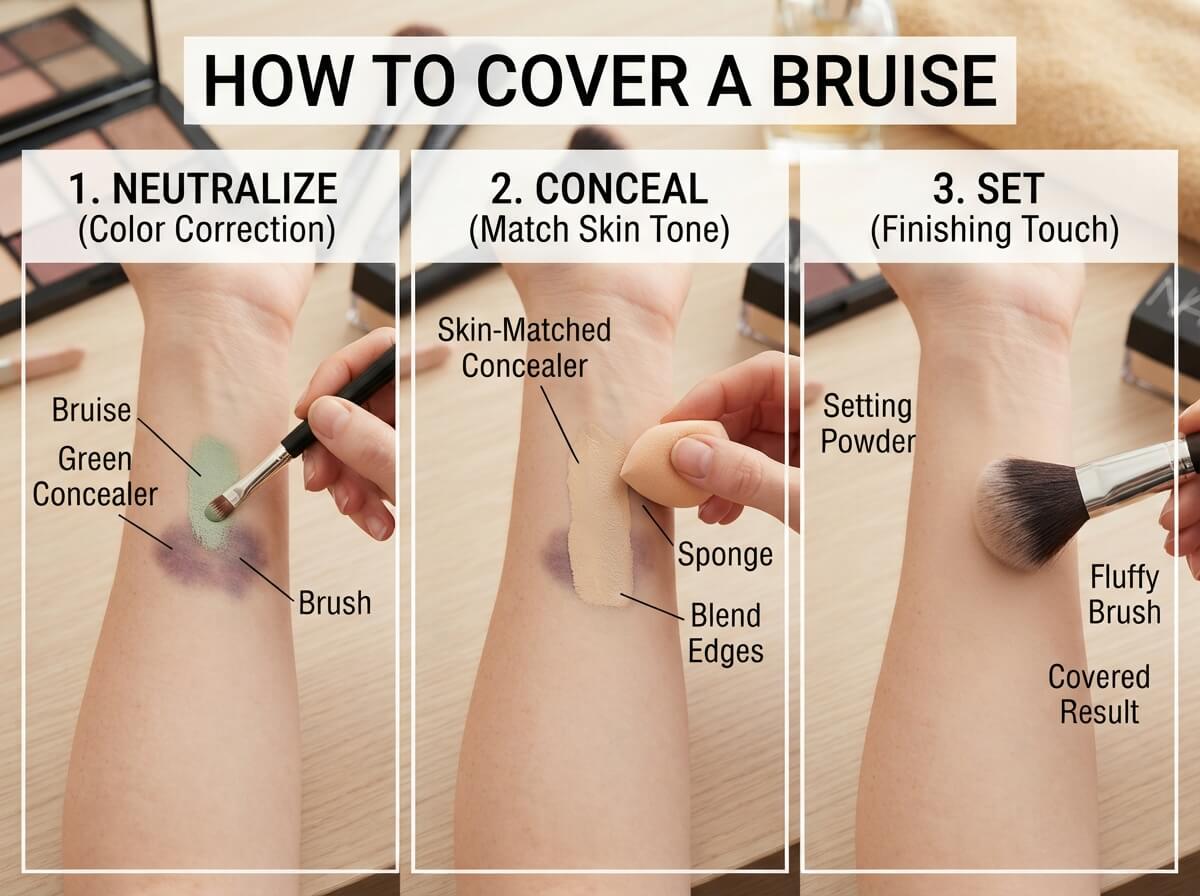
Start with Color Correction
Color correctors are your secret weapon for hiding bruises. These tinted products neutralize discolored skin by using opposite colors on the color wheel. Here’s how it works:
For a purple or blue bruise, use a yellow or yellow-toned corrector. The yellow cancels out the purple tones beautifully. For a greenish bruise, go for a red or pink corrector. For yellow bruises in their final stages, a purple corrector works best.
Apply your corrector directly to the bruise using a small brush or your fingertip. Tap it in gently—don’t rub. You only need a thin layer. Let it set for a minute, and you’ll notice the bruise already looks much less noticeable.
Layer on Foundation
Once your corrector is set, apply foundation over it. Choose a foundation that matches your skin tone exactly. If it’s too light or too dark, you’ll create a weird outline that makes the bruise more obvious, not less.
Use a brush, beauty sponge, or your fingertip to apply foundation. Pat it on rather than rubbing—this helps it blend smoothly with your surrounding skin. Build coverage in thin layers. One thick layer looks obvious. Two or three thin layers look natural.
Make sure you blend the edges of your foundation into the surrounding skin so there’s no visible line. This is where patience pays off. Take your time and use a damp beauty sponge to blur any harsh edges.
Add Concealer for Extra Coverage
After your foundation sets, apply concealer to any spots that still show through. A good concealer is thicker and more pigmented than foundation, so it gives you extra coverage where you need it most.
Apply concealer in small dots around the bruised area and then blend it in with your brush or sponge. Once again, tap and blend rather than rubbing. You want the coverage to look like part of your skin, not like you’re wearing makeup.
Set It All in Place
Use a translucent powder or a powder that matches your skin tone to set your makeup. This keeps everything in place and prevents your hard work from smudging or rubbing off during the day. Apply the powder with a fluffy brush using a light hand—you don’t need much.
If you want extra security, spray a bit of setting spray over everything. This locks your coverage in place and makes it last longer, even if you’re sweating or moving around a lot.
Method Two: Using Clothing to Cover Bruises
Sometimes the easiest way to hide a bruise is to just cover it with clothes. This works great if your bruise is on an area that clothes normally cover anyway, like your arms, legs, or torso.
Long Sleeves and Pants
If your bruise is on your arm or leg, long sleeves and pants do the job perfectly. Wear whatever style you normally like—the goal is just to cover the discolored skin underneath. This method requires zero skill and takes zero time, which makes it ideal for days when you’re in a rush.
Just make sure your clothes are actually covering the bruise. A long-sleeved shirt should cover your entire arm, including up to your wrist or your hand, depending on where the bruise is.
Scarves and Accessories
Bruises on your neck, chest, or upper shoulder area respond well to scarves. A lightweight scarf in any color works, and it actually adds style to your outfit at the same time. You get function and fashion together.
Cardigans and jackets also work well for bruises on your shoulders, upper back, or upper arms. Layer one on top of your regular clothes and you’ve successfully hidden the bruise.
Strategic Layering
Layering isn’t just for warmth—it’s also a great way to hide bruises. A tank top with a loose button-up shirt over it, a tee shirt with an open cardigan, or a sleeveless dress with a jacket all give you coverage while still looking put-together and intentional.
Method Three: Using Bandages and Tape
Bandages and athletic tape can work for small bruises, though this method is less about hiding the bruise and more about protecting it from further injury. Wrapping also creates subtle pressure that can help reduce swelling.
If you go this route, use a clean, sterile bandage or athletic tape. Wrap it snugly but not so tight that it cuts off blood flow. You should be able to slip a finger under the wrap comfortably. Change the bandage daily to keep the area clean.
This method works best on fingers, hands, or areas where covering with makeup or clothes isn’t possible.
Method Four: Using Waterproof Products
If you’re planning to swim, shower, or do anything involving water, waterproof products are your best friend. Waterproof makeup and waterproof setting sprays keep your bruise coverage intact even when wet.
Waterproof foundations, concealers, and color correctors all exist and work just as well as regular makeup. They just have a formula designed to resist water. Apply them the same way you would apply regular makeup—the main difference is that they last way longer in wet conditions.
For extra water resistance, look for products labeled “sweat-proof” or “moisture-proof” as well. These handle humidity and water exposure better than standard formulas.
Tips for Making Your Coverage Last All Day
Once you’ve covered your bruise, you want it to stay covered, right? Here are some habits that keep your work looking fresh from morning to night.
Avoid touching your face or the covered area if you can. Every time you touch it, you risk smudging the makeup or moving it around. If you must touch the area, use clean hands or a clean tissue.
Bring blotting papers with you if you’ll be out for a long time. These absorbent sheets pick up excess oil without disturbing your makeup. Just press them gently over the area—don’t rub.
If you know you’ll be sweating or in warm conditions, use a setting spray before you leave the house. Reapply it midday if you need to. A bit of extra spray keeps everything locked in place.
Also avoid heavy-handed movements in the bruised area. Don’t lean on that arm if it’s bruised, and don’t sleep on that side if the bruise is in that spot. Pressure can cause the makeup to crease or shift.
How Long Does It Take for a Bruise to Fade Completely?
Most bruises fade away on their own within one to three weeks, depending on how bad they are. Small bruises might be gone in just a few days. Larger bruises can take longer.
While you’re waiting for your bruise to heal, keep taking care of it. Ice the area for the first day or two if it’s swollen. After that, gentle heat can help increase blood flow and speed up healing. Elevation and rest also help—if your bruised arm or leg is high and rested, it heals faster.
As the bruise gets older and lighter, you’ll need less coverage makeup to hide it. Eventually, you probably won’t need any coverage at all.
Simple Ways to Prevent Bruises
While you can’t avoid every accident, you can reduce your bruise risk by being more careful in your daily life.
Wear protective gear when playing sports or doing activities where falls are likely. Padding on your elbows, knees, wrists, or shins really does prevent bruises. Athletes wear this stuff for a reason.
Move slowly and carefully in spaces where you might bump into things. Hurrying causes most household accidents. When you slow down, you have time to notice obstacles.
Keep your home organized and clutter-free. The fewer things lying around on the floor, the less likely you are to trip. Same goes for keeping stairs clear and well-lit.
Build stronger muscles through exercise. Strong muscles provide more protection for the bones and tissues underneath, which means impacts cause less damage and fewer bruises.
Eat foods rich in vitamin C and iron. These nutrients support healthy skin and faster healing. Citrus fruits, berries, leafy greens, and lean meats all help your body repair itself faster.
Bottom Line: Bruises Don’t Have to Ruin Your Day
A bruise is annoying, but it’s absolutely not the end of the world. You have multiple ways to hide it while it heals—from makeup concealment to strategic clothing to simple bandaging.
The makeup method gives you the most control and precision, especially for visible bruises on your face or neck. Using clothes works great when your bruise is somewhere that clothes naturally cover. And sometimes, a combination of methods works best.
Remember that most bruises fade on their own within a couple of weeks. Until then, use the methods in this guide to cover the discolored skin and carry on with your life. You’ll be back to bruise-free living before you know it.
The key is choosing the method that works best for your situation and your bruise location. Experiment with different approaches and find what makes you feel confident and comfortable. Once you’ve covered it successfully once, you’ll know exactly how to do it again if needed.
Mary is a fashion enthusiast and lifestyle writer who loves discovering stylish clothing, accessories, and everyday fashion essentials. She enjoys researching the latest trends, reviewing popular products, and sharing practical style tips to help readers dress with confidence. Through FashionSolve.com, Mary provides honest recommendations, fashion guides, and inspiration for building a wardrobe that is both stylish and affordable.