How to Remove Shellac Nail Polish?
Shellac nails look gorgeous and last way longer than regular polish, but getting them off can feel like a real challenge. If you’ve ever sat in a salon chair watching the nail tech soak your nails for what feels like forever, you know the struggle is real. The good news is that you don’t always need to visit a professional to remove shellac nail polish. You can do it at home with basic supplies and a little patience. This guide will walk you through everything you need to know about taking off your gel-like shellac polish without damaging your natural nails.
What Exactly Is Shellac Nail Polish
Before we dive into the removal process, let’s talk about what shellac actually is. Shellac is a type of hybrid nail polish that sits somewhere between regular nail polish and full gel polish. It was created by the company CND and has become super popular because it combines the easy application of regular polish with the durability of gel nails.
Shellac polish bonds to your nail in a different way than traditional polish does. Regular nail polish just sits on top of your nail and dries through evaporation. Shellac, on the other hand, hardens under UV or LED light. This chemical bond is what makes shellac last so long—up to two weeks without chipping—but it also means you can’t just peel it off like regular polish.
The shellac formula contains resins, oligomers, and photoinitiators that create a tough, protective layer. That strong bond is actually great for your nails in some ways because it protects them while you wear it. The challenge comes when you want to remove it without causing damage to your natural nail underneath.
Why You Can’t Just Peel Off Shellac Polish
Your natural nails are probably feeling a bit neglected after wearing shellac for two weeks. The temptation to just peel off all that glossy color is strong, but resist it. I know it’s tempting—seriously, I get it—but peeling or picking at shellac polish will cause real damage to your nails.
When you peel shellac off, you’re not just removing polish. You’re actually pulling away layers of your natural nail along with it. Nails are made of keratin, a protein that forms protective layers. Shellac bonds with these outer layers, so rough removal tears them away. This leaves your nails thin, weak, brittle, and sometimes painful for weeks after.
You might notice your nails look white or dull after picking off shellac. That’s because you’ve removed the protective top layer of healthy nail. It takes time for healthy new nail to grow in and cover that damage. Patience during removal is an investment in healthy nails for the future.
Gathering Your Supplies Before You Start
The removal process works best when you have everything ready before you begin. Running around looking for supplies halfway through is frustrating and can interrupt the soaking process. Here’s what you actually need:
The essential items: A bottle of acetone (or pure acetone nail dehydrator) is absolutely crucial. Don’t try to use regular nail polish remover because it won’t work well enough. You need pure acetone or acetone-based remover made specifically for gel and shellac removal.
Get yourself some nail files. You’ll want a regular file for shaping and possibly a more aggressive file or buffer for roughing up the shiny surface of the shellac. A 180-grit file works great for this.
Grab some small bowls or cups. You’ll be soaking your nails, so you need containers that can hold acetone and fit your fingertips comfortably. Small glass bowls or even coffee mugs work fine.
Pick up some cotton pads or balls. You’ll use these to apply acetone and keep moisture on your nails during soaking. Regular cotton works, but foil wraps are even better because they keep the acetone in place more effectively.
Grab some aluminum foil if you’re using the foil-wrap method. This helps trap heat and acetone vapor against your nails, making the process faster.
Find a good cuticle pusher or wooden stick. You’ll use this to gently lift the shellac polish as it softens. Metal tools can be too harsh and scratch your nails.
Look for a good moisturizer or hand cream. Your hands will dry out during this process, and you want to pamper them afterward.
Get some basic cuticle oil or nail oil. This helps restore moisture to your nails after they’ve been soaking in acetone.
Optional but helpful items: A UV or LED lamp can speed up the process, though it’s not required if you’re using the soaking method. Some people like to quickly cure the acetone to help break down the shellac faster.
A nail buffer helps smooth out any rough spots after removal. This isn’t absolutely necessary, but it makes your nails feel nicer.
The Acetone Soak Method
The acetone soak method is the most popular way to remove shellac at home, and it’s pretty simple. This technique uses acetone’s ability to break down the shellac formula. Here’s exactly how to do it:
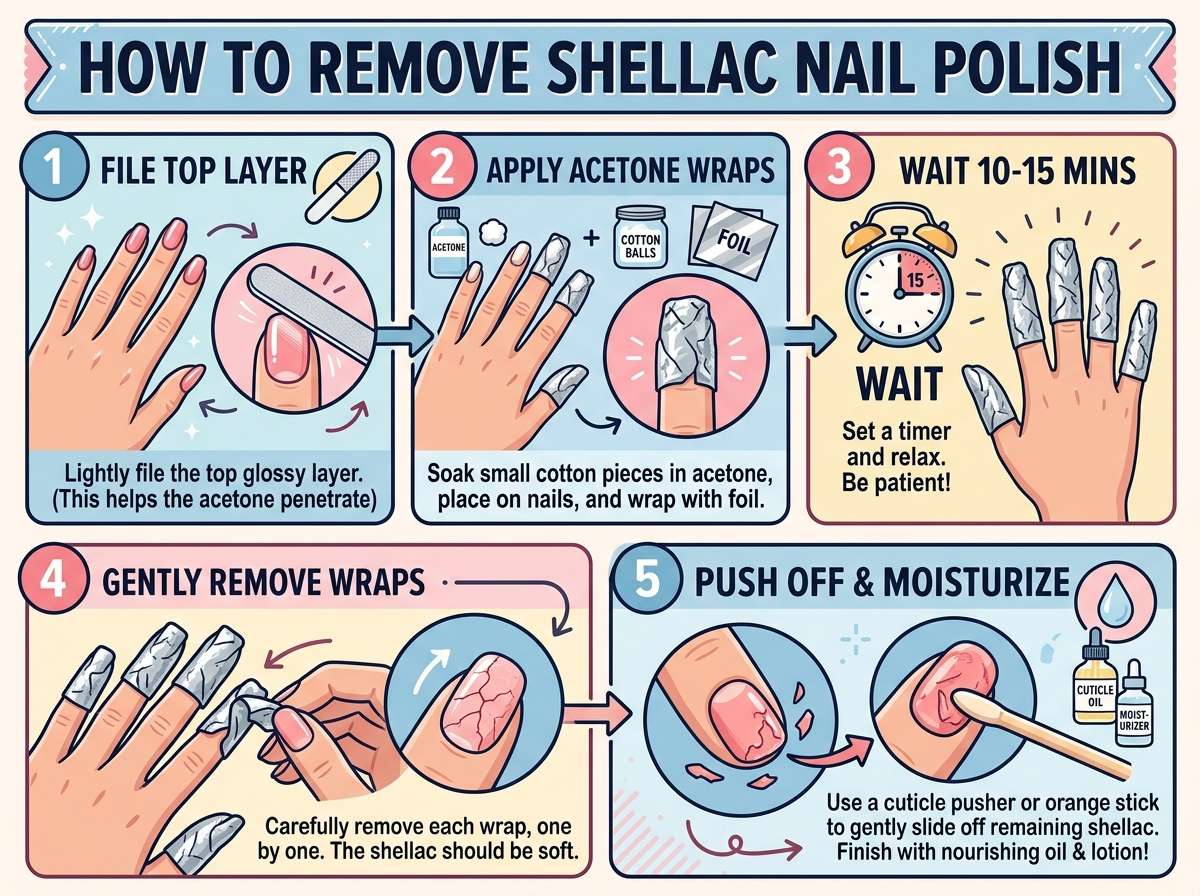
Step one: Prepare your nails Start by filing down the shiny top layer of your shellac polish. Use your file to dull the glossy surface. You don’t need to file off all the color, just enough to break through that sealed top layer. This step is crucial because it lets the acetone penetrate the polish more effectively. The sealed, shiny surface of shellac repels acetone, so breaking through it makes the entire process faster and more successful.
File in one direction across your nail. Avoid sawing back and forth, which can damage your nails. You might see color dust coming off—that’s perfect. Keep filing until the shine is completely gone and the surface looks matte and textured.
Step two: Soak your nails Pour acetone into your small bowls. You want enough acetone to cover your fingertips completely when you put your fingers in. Room temperature acetone works, but slightly warm acetone works faster. You can warm it gently by placing your bowl in a sink of warm water, but don’t make it too hot.
Place your fingertips in the acetone and let them soak. The soaking time usually takes between ten to twenty minutes, depending on how thick your shellac layers are and how well you broke through the top layer. Start checking your nails after about ten minutes. Gently try to scrape a tiny bit of polish with your cuticle pusher. If it’s soft and comes off easily, you’re ready. If it still feels hard, wait a few more minutes.
Step three: Gently remove the softened polish Once the shellac feels soft, take your hands out of the acetone and gently use your cuticle pusher to lift the polish. Work slowly and carefully, taking your time. This is not the moment to get rough with your nails. If you feel resistance, put your fingers back in the acetone for another minute or two.
As you work, small pieces of softened polish will come off. Keep going around each nail, gently scraping away the polish. You’ll see bits of shellac lifting and peeling. This is exactly what should happen. Never force anything. If a section doesn’t want to come off, leave it in the acetone a bit longer.
Step four: Clean up any remaining polish Once you’ve removed most of the shellac, you might notice some stubborn spots still clinging to your nails. That’s normal. Soak your fingertips again briefly, then gently scrape away these last bits. Repeat this soak-and-scrape process as many times as needed until all the color is gone.
The Foil Wrap Method for Faster Results
The foil wrap method is basically a version of the soak method, but it’s designed to be faster and more efficient. This method uses foil to wrap acetone-soaked cotton directly onto your nails, trapping heat and acetone vapor. Many people find this method works quicker than regular soaking.
How to do the foil wrap method: Start the same way by filing down the shiny top layer of your shellac. This step is still important for letting the acetone work better.
Cut your aluminum foil into small squares. You’ll need one square for each finger and thumb. Make the squares large enough to wrap around your nail and part of your finger.
Soak a cotton pad or ball in pure acetone. Make sure it’s completely saturated with acetone—don’t be shy here. Dripping acetone is fine.
Place the soaked cotton pad on your nail. Press the foil square around your finger to hold the cotton pad tightly against your nail. Wrap it snugly so the acetone-soaked cotton stays pressed against the shellac. Do this for all ten nails.
Wait for fifteen to twenty minutes while the foil wraps do their job. The acetone will break down the shellac while the foil traps the heat and vapors. Set a timer so you don’t lose track of time.
After the wait time, remove one foil wrap and check your nails. Gently try to scrape the shellac with your cuticle pusher. If it’s soft and lifting easily, you’re ready to remove all the wraps. If it still feels stubborn, re-wrap and wait another five minutes.
Once you’re ready, unwrap all your fingers and use your cuticle pusher to gently lift and scrape away the softened shellac, just like in the soak method.
Removing Stubborn Shellac That Won’t Come Off
Sometimes shellac doesn’t cooperate, and you end up with bits that just refuse to budge. Don’t panic. There are several tricks that can help with stubborn polish.
Try a second or even third round of soaking. Some shellac brands or application techniques create thicker bonds that need more time. Extra soaking rarely hurts, so just keep at it.
Check that you’re using pure acetone and not regular nail polish remover. Some people accidentally grab the wrong bottle and wonder why their shellac isn’t coming off. Read the label carefully. You need acetone concentration of at least ninety percent.
Try increasing the temperature slightly. Warm acetone works faster than room temperature acetone. Put your bowl in a sink of warm water to gently raise the temperature. Never use boiling water—you don’t want to burn your skin.
Use a nail drill or electric file on the lowest setting if you have access to one. This can help break down that tough top layer faster than hand filing. Be gentle and careful if you try this method.
Make sure you’re breaking through the top layer completely. Sometimes people file gently because they’re worried about damaging their nails, but they don’t break through the seal enough. The top layer really needs to be dull and textured for acetone to penetrate effectively.
Protecting Your Nails During Removal
Your natural nails are delicate, and while you’re removing shellac, they need protection from damage and harsh chemicals.
Never use metal tools aggressively. Your cuticle pusher or file can scratch your nail surface. Use gentle pressure and let the acetone do the work of softening the polish. Metal scratches on your nails create weak spots that can tear or break easily.
Avoid letting acetone sit on your skin too long. Acetone dries out your skin and can cause irritation. If acetone spills on your skin, wash it off quickly and apply moisturizer. Keep your hands away from your face during the removal process.
Don’t soak your entire hands in acetone for extended periods. Just your fingertips need to go in the acetone. Soaking your whole hands can dry them out excessively and cause irritation.
Wear gloves if you have sensitive skin or if the acetone irritates you. You can use regular plastic or latex gloves, though they’ll get wet with acetone. Alternatively, some people use plastic bags secured with rubber bands around each finger during foil wrapping to keep their skin from direct contact.
Stop if you experience significant pain or burning. Some people have acetone sensitivity. If this happens to you, take a break and try again later, or visit a salon professional for removal.
What To Do After Removing Shellac Polish
Your nails have just been through an intensive acetone bath, so they need some serious care afterward.
Wash your hands thoroughly with soap and water. This removes all the acetone residue from your nails and skin. Warm water and gentle soap work perfectly. Wash for at least a minute to make sure all traces of acetone are gone.
Dry your hands and nails completely. Pat them dry with a soft towel rather than rubbing aggressively.
Apply cuticle oil or nail oil generously. Your nails have lost moisture during the acetone soaking, and oil helps restore that moisture. Massage the oil into your nails and cuticles. Do this immediately after removal and then repeat it several times over the next few days.
Use a good hand moisturizer. Your hands got dry during the process, so slather on a thick moisturizer and let it sink in. Your hands will thank you.
Avoid harsh chemicals and excessive water for the next few days if possible. Your nails are in recovery mode. Wear gloves when doing dishes or cleaning to minimize exposure to water and cleaning products.
Don’t paint your nails right away. Give them a break of at least a few days. Your nails need time to recover from the acetone and the bond with shellac. Use this time to let them breathe and get healthy again.
How Often Can You Safely Wear Shellac
Now that you know how to remove shellac, you might be wondering how often it’s safe to wear it. The answer depends on your individual nails and how well you care for them.
Shellac is generally safe to wear regularly, but your nails need breaks in between. Dermatologists and nail experts typically recommend taking a break of at least one to two weeks between shellac applications. This gives your nails time to recover from the acetone exposure and regain moisture.
Some people can wear shellac every two weeks without problems. Others find their nails get weak and brittle with frequent applications. Pay attention to how your nails feel and look. If they’re becoming thin, breaking easily, or showing signs of damage, take a longer break before applying shellac again.
Keep your nails healthy between applications. During your shellac-free weeks, use nail oil regularly, avoid harsh chemicals, keep your nails trimmed, and give them the best care possible.
Professional Removal Versus Home Removal
You have two options for removing shellac: doing it yourself at home or having a professional do it at a salon. Both methods work, but they have different advantages and disadvantages.
Professional removal at a salon guarantees that someone experienced will handle your nails carefully. Nail technicians do this hundreds of times and know exactly how to remove shellac without damage. If you’re worried about damaging your nails or if you have very weak nails already, professional removal might be worth the cost.
Home removal is definitely cheaper and more convenient. You can do it whenever you want without scheduling an appointment or traveling to a salon. It’s also faster if you combine it with other activities like watching TV or listening to a podcast.
The key to successful home removal is taking your time and being gentle. Rushing through the process or using too much force is what causes damage. If you’re patient and careful, home removal works just as well as professional removal.
Common Mistakes People Make When Removing Shellac
Learning from other people’s mistakes can help you avoid the same problems.
The biggest mistake is peeling or picking at the shellac. This causes damage every single time. Acetone soaking is the right way to remove shellac, not picking.
Using regular nail polish remover instead of acetone is another common mistake. Regular remover doesn’t work well enough and leaves you frustrated. Save yourself time and get pure acetone from the start.
Not filing off the top layer before soaking is a mistake that extends the process unnecessarily. Breaking through that shiny seal makes everything faster and easier.
Applying force to stubborn polish is a mistake that damages nails. If polish isn’t coming off easily, it needs more soaking time, not more pressure.
Rushing the process causes problems. Set aside plenty of time, get comfortable, and be patient. Shellac didn’t go on your nails in five minutes, and it shouldn’t come off in five minutes either.
Skipping hand and nail care after removal is a mistake that leads to problems later. Your nails need moisturizing and pampering after acetone exposure.
Tips for Faster Shellac Removal
If you’re looking to speed up the removal process, try these tips:
Use slightly warm acetone instead of room temperature acetone. Warmth helps the acetone break down shellac faster.
Make sure you completely break through the top glossy layer. A thorough filing session at the beginning makes everything else faster.
Use the foil wrap method instead of simple soaking. The foil wrap traps heat and acetone vapor, which speeds up the softening process.
Apply a cuticle oil or hand cream to your cuticles before soaking. This helps protect your skin and sometimes speeds up the process slightly.
Try using an electric nail file on the top layer if you have one available. This is faster than hand filing, though be gentle and careful.
Soak all ten fingers at once in a bowl of acetone rather than doing one or two at a time. Batching your work is more efficient.
Different Shellac Brands and Removal Times
Different shellac brands might have slightly different removal times. CND Shellac, which is the original brand, typically takes the standard fifteen to twenty minutes to remove. Other brands might be slightly faster or slower depending on their formula.
Cheaper generic gel polishes sometimes remove faster than premium shellac because their formulas aren’t as strong. Luxury brands with thick formulas might take a bit longer.
The application technique also matters. Thicker applications take longer to remove than thin, expertly applied shellac. Some salons apply multiple layers, which naturally takes longer to soak and remove.
Don’t stress too much about the brand, though. The removal process is the same regardless: file, soak, and gently scrape. Just give yourself enough time for thorough soaking.
When To See a Professional for Nail Help
Sometimes your nails need professional attention. If you notice any signs of damage after removing shellac, it might be worth a salon visit for professional care.
If your nails are significantly damaged, thin, or weak after removal, a nail professional can assess the damage and recommend treatments. They might suggest nail strengthening treatments or simply advise you to take a longer break before wearing shellac again.
If you find that home removal consistently damages your nails even when you’re being careful, professional removal might be better for you. Some people just have more delicate nails.
If your nails are painful after removal, see a professional or doctor. This could indicate damage that needs professional attention.
If you have fungal infections or other nail health issues, get professional help before wearing shellac again. Shellac over unhealthy nails can make problems worse.
Maintaining Healthy Nails Between Shellac Applications
Taking care of your nails during shellac-free periods helps ensure they stay healthy for your next application.
Use nail oil daily during your break from shellac. Massage it into your nails and cuticles to restore moisture and strength.
Keep your nails at a reasonable length. Long nails are more likely to break and damage. Keeping them trimmed helps them stay strong.
Avoid harsh chemicals and excessive water exposure. Wear gloves when cleaning or doing dishes to protect your nails.
Eat a nutritious diet with plenty of protein, biotin, and minerals. Your nails grow from inside out, and good nutrition supports healthy nail growth.
Stay hydrated by drinking plenty of water. Hydration affects nail health along with everything else.
Avoid using your nails as tools. Using nails to open things or scratch off stickers damages them.
Conclusion: You’ve Got This
Removing shellac nail polish at home is completely doable when you follow the right process. Take your time, use pure acetone, file the top layer first, and soak patiently. Your nails will thank you for being gentle and careful during removal.
Remember that the goal isn’t just to get the polish off—it’s to keep your natural nails healthy and beautiful. Patience during removal protects your nails and keeps them strong for your next shellac application or for going polish-free.
You don’t need fancy equipment or professional skills to remove shellac successfully. A few basic supplies, some patience, and this guide are all you need. Try the method that sounds best to you, take your time, and enjoy having clean, shellac-free nails. Your nails will be back to normal and ready for whatever comes next.

Mary is a fashion enthusiast and lifestyle writer who loves discovering stylish clothing, accessories, and everyday fashion essentials. She enjoys researching the latest trends, reviewing popular products, and sharing practical style tips to help readers dress with confidence. Through FashionSolve.com, Mary provides honest recommendations, fashion guides, and inspiration for building a wardrobe that is both stylish and affordable.