How to Thin Out Hair?
Introduction
If you have thick, heavy hair that feels unmanageable or takes forever to style, you’re not alone. Many people deal with dense hair that weighs them down and makes their head feel bulky. The good news? You can totally fix this problem. Thinning out your hair is one of the easiest ways to make it look better, feel lighter, and become way easier to work with every single day.
This guide walks you through everything you need to know about reducing hair density and creating a more manageable mane. Whether you do it at home or go to a salon, you’ll find solutions that work for your hair type and your wallet.
Why Thin Out Your Hair?
Before we jump into the how, let’s talk about the why. There are tons of good reasons to make your hair thinner and less bulky.
You Want More Control
Thick hair can be a pain to manage. It takes longer to dry. It’s harder to style. And once you finally get it looking good, it falls flat or puffs up depending on the humidity. Removing some of that bulk gives you way more control. Your hair becomes easier to work with, and styling takes less time.
Your Hair Feels Heavy
Dense hair actually pulls on your scalp. This can lead to headaches, especially if you wear your hair up a lot. Thinning reduces that weight and makes your whole head feel lighter and more comfortable.
You Want Better Hair Volume
This might sound backwards, but thinning thick hair actually creates better-looking volume. When all your hair weighs you down, it lies flat. Once you remove some bulk, the remaining hair has more room to move and bounce. The result? Hair that actually looks fuller and more textured.
Your Hair Gets Tangled Easily
Super thick hair tangles up like crazy. Strands get caught in each other, and brushing becomes painful. Thinning out your hair reduces tangles and makes grooming way less frustrating.
You Have Frizz Problems
Dense hair tends to absorb moisture and frizz up, especially in humid weather. Less hair means less surface area for moisture to grab. You get smoother, sleeker results.
Different Hair Types That Benefit From Thinning
Not all thick hair is the same. Different hair types need different approaches to thinning.
Straight Thick Hair
If you have straight hair that’s also thick, you deal with serious weight and volume. Your hair probably falls flat easily or looks blocky and heavy. Thinning works great for straight thick hair because it removes bulk while keeping the natural texture intact.
Curly Thick Hair
Curly hair that’s also dense can look enormous. The curl pattern plus the thickness creates a huge volume situation. Thinning curly hair takes special care because you don’t want to disrupt the curl pattern. The right technique keeps your curls bouncy without making them frizzy.
Wavy Thick Hair
Wavy hair that’s also thick sits somewhere between straight and curly. It can look limp or overly full depending on your styling. Thinning helps wavy hair hold its shape and look more defined.
Coily Thick Hair
Coily hair has a tight pattern and usually includes lots of strands. This combo creates serious density. Thinning coily hair requires patience and skill to maintain the coil pattern while reducing bulk.
Method 1: Using Hair Thinning Shears
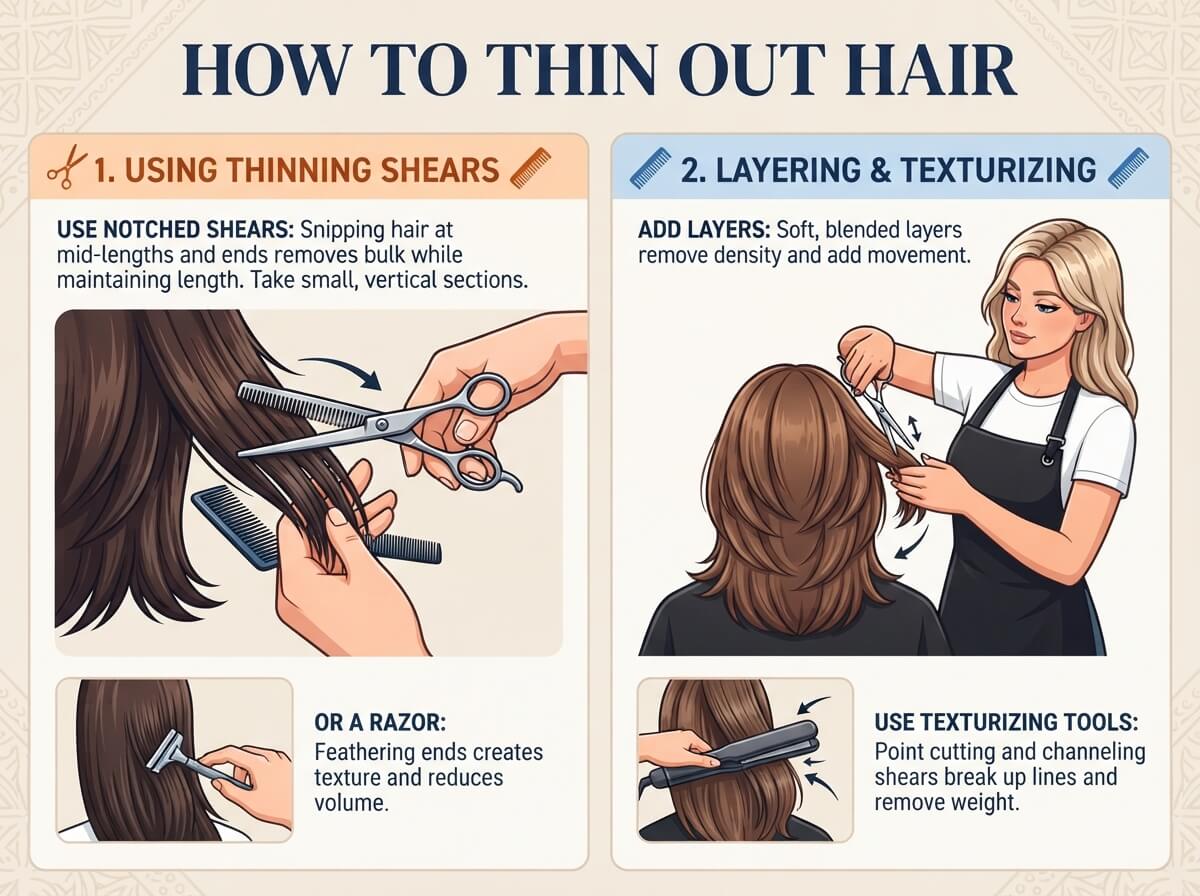
Thinning shears are special scissors with tiny teeth on one blade. They remove hair gradually instead of cutting it all off. This tool is your best friend if you want to thin your hair at home.
How Thinning Shears Work
One blade of a thinning shear has regular edges. The other blade looks like a comb with teeth. When you close the scissors, those teeth grab and cut only some of the hair strands. This removes bulk while leaving layers of hair behind. You get a textured look instead of blunt lines.
Steps to Use Thinning Shears
First, wash and dry your hair completely. Work with dry hair so you can see exactly what you’re doing. Wet hair looks thinner than it really is, and you might remove too much.
Start with small sections. Take a piece of hair about as thick as your thumb. Hold it straight out from your head. Place the thinning shears about halfway down the length of that section. Close the shears using one smooth motion. Don’t saw back and forth. One clean cut removes the right amount of hair.
Repeat this process throughout your head, working in sections. Focus on areas that feel the heaviest. The crown usually needs the most thinning. The hair around your face needs less because it’s already thinner there.
Work slowly and carefully. You can always remove more hair, but you can’t put it back. It’s better to thin less at first and do it again in a few weeks if you need more.
Where to Focus With Thinning Shears
Your crown takes priority. This area has the most density and sits on top where you notice thickness the most. Work all around your crown, making multiple passes to gradually reduce bulk.
The back of your head also gets heavy and bulky. Use the thinning shears throughout the back section, concentrating on the thickest spots.
Your sides need less work. The hair at your sides is naturally thinner, so use light passes here to avoid overdoing it.
Never thin your hair too close to the ends. Keep at least two to three inches from the bottom. Thinning at the ends makes your hair look scraggly and damaged.
Method 2: Layered Haircuts
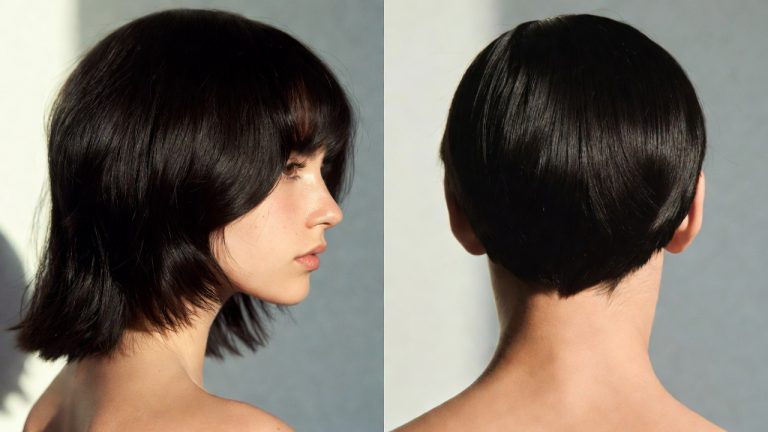
A good layered cut removes bulk by using length differences throughout your hair. Layers work with gravity to reduce density while creating movement and shape.
How Layers Reduce Bulk
Layers are cuts where different sections of hair end at different lengths. Short layers on top and longer layers underneath mean each piece of hair weighs less. The shorter pieces don’t pull down the longer ones. The result is hair that sits fuller and looks less heavy overall.
Types of Layers
Choppy layers are thick, obvious cuts that create textured, dramatic layers. These work great for straight hair and some wavy hair. You see clear lines between different layer lengths. Choppy layers scream attitude and movement.
Subtle layers are small differences in length that you don’t notice right away. They’re perfect if you want to keep most of your length while just reducing some bulk. The changes blend together smoothly.
Shaggy layers are longer layers that start lower on your head. They create a fun, relaxed vibe and work especially well for wavy and curly hair.
Razor layers are made with razors instead of scissors. They create super textured, wispy layers that remove tons of bulk. Razor layers work best on specific hair types and need expert handling.
Getting a Good Layered Haircut
Talk to your stylist about your hair density and thickness. Show them pictures of layered cuts you like. The more specific you are, the better your results.
Ask your stylist about maintenance. Some layered cuts need trims every six weeks. Others last longer. Know what you’re getting into before you commit.
Method 3: Point Cutting and Texturizing
Point cutting is a technique where your stylist holds scissors vertically and makes small cuts into your hair ends. This technique removes bulk while creating texture and definition.
How Point Cutting Works
Instead of cutting straight across, the stylist points the blade at a slight angle into the hair. Multiple small cuts remove volume without creating harsh lines. The hair ends up with texture and movement instead of looking blunt and heavy.
Benefits of Point Cutting
Point cutting works on almost every hair type. It’s especially good for curly and wavy hair because it works with the natural texture. You get definition and bounce without frizz.
Point cutting is gentler than thinning shears for some hair types. It doesn’t grab chunks of hair. Instead, it carefully sculpts your cut to remove just the right amount of density.
The results look intentional and stylish. Point cutting isn’t just about removing hair. It’s about creating a shape and texture that makes your hair look amazing.
Method 4: Undercuts and Shaved Sections
If you want dramatic thinning, undercuts and shaved sections do the job. An undercut means shaving the hair underneath while leaving the top full and thick. This sounds extreme, but it actually works great for heavy hair.
How Undercuts Work for Thick Hair
The hair on top of your undercut sits lighter because it’s not weighed down by all the hair underneath. You get volume and shape on top without the bulk. The undercut stays hidden under your regular hair, so it’s easy to hide if you want.
Shaved Sections
Shaved sections work similarly to undercuts. Your stylist shaves small sections at the base of your hair to remove weight. Common places are behind your ears, at the nape of your neck, or at your temples. These shaved spots reduce overall density without making obvious changes.
Is This Right for You?
Undercuts and shaved sections are bold moves. They work great if you have straight or wavy hair. If you have curly hair and the shaved section is visible, it can look weird against your curls.
Think about your job and lifestyle. If you need a super professional look, undercuts might not work for you.
How Often Should You Thin Your Hair?
This depends on how fast your hair grows and how much thinning you need. Generally, you should thin your hair every six to eight weeks if you’re using thinning shears at home. If you got a layered cut from a stylist, you might need a trim every four to six weeks to keep the shape.
Thick hair grows quickly, and the bulk comes back fast. Don’t space out your thinning appointments too long. Monthly check-ins work best for maintenance if you’re doing it yourself.
Thinning Hair at Home vs. the Salon
Both options work. Both have pros and cons. Here’s what you need to know.
At-Home Thinning
Doing it yourself saves money. You can thin your hair whenever you want. You don’t need to book an appointment or wait for availability.
The downside? It’s easy to mess up. You might remove too much hair or create uneven results. If something goes wrong, you have to wait for your hair to grow back out. A bad home thinning job is really noticeable.
If you’re doing it at home, invest in good thinning shears. Cheap scissors won’t cut properly and create damage. Buy shears that cost at least thirty to fifty dollars.
Salon Thinning
A stylist knows exactly what they’re doing. They see your hair type and density and know the best technique. Professional results look intentional and stylish.
The cost is higher. A thinning appointment runs fifty to one hundred dollars depending on where you live and the salon.
You need to book appointments and plan ahead. You can’t just wake up and decide to thin your hair today.
Tips for Maintaining Thinned Hair
Once you thin your hair, you want it to stay looking good. Here’s how to maintain your new thinner, more manageable mane.
Use the Right Products
Thick hair needs heavy, nourishing products. Once you thin it out, you might need lighter products. Too heavy a product will weigh down your thinner hair and make it look flat.
Look for volumizing shampoos and conditioners made for fine or medium hair. These clean without adding heaviness.
Dry It Right
Blow dry your thinned hair to maximize volume and texture. Air drying can make it look flat and limp.
Use a round brush to lift your roots as you dry. Point the blow dryer downward to smooth your cuticles and reduce frizz.
Don’t over-dry your hair. Dry hair breaks easily, and you’ve already removed some density. Dry until it’s about ninety percent done, then let air dry the rest.
Brush Carefully
Your thinner hair is more delicate now. Brush gently, starting at the ends and working your way up. Don’t rip through tangles.
Use a wide-tooth comb on wet hair and a paddle brush on dry hair. Avoid brushes with lots of tight bristles that pull and break your hair.
Get Regular Trims
Thinned hair needs trims more often than thick hair. Schedule a trim every four to six weeks to keep your shape and remove dead ends.
Dead ends make your hair look scraggly, especially when it’s thin. Regular trims prevent split ends and keep everything looking fresh.
Protect Your Hair
Thinned hair is more vulnerable to damage from heat, sun, and chemicals. Use heat protectant spray before blow drying or using hot tools.
Wear a hat in strong sun to protect your hair color and prevent dryness.
Go easy on heat styling. Limit blow drying and flat ironing to a few times per week.
Common Mistakes When Thinning Hair
Learning what not to do helps you get better results.
Thinning Too Much
The biggest mistake is removing too much hair at once. You can’t put it back. Thin gradually over several sessions. Start with light passes and see how it looks.
Thinning the Ends
Never thin at the very ends of your hair. This makes your hair look damaged and scraggly. Always thin at least two inches from the bottom.
Using Dull Shears
Dull scissors crush your hair instead of cutting it cleanly. This causes damage and breakage. Invest in sharp thinning shears and keep them clean.
Thinning When Wet
Wet hair looks way thinner than dry hair. You’ll think you didn’t remove enough and keep cutting. Then when your hair dries, you’ve removed too much. Always thin dry hair.
Ignoring Your Hair Type
Different hair types need different techniques. Don’t use the same method for curly hair that you use for straight hair. Curly hair needs special care to keep the curl pattern intact.
Not Evening Out Results
If you thin one side of your head more than the other, it shows. Take your time and do both sides equally. Step back and look at your whole head from different angles.
Special Considerations for Different Hair Textures
For Curly Hair
Curly hair needs gentle thinning so you don’t disrupt the curl pattern. Avoid regular thinning shears if possible. Ask your stylist about techniques like cutting curls individually or using razors.
Curly hair looks best with layer cuts that work with your curl pattern, not against it. A good curly-hair specialist makes all the difference.
For Wavy Hair
Wavy hair responds well to both thinning shears and layered cuts. The key is keeping some weight in your hair so the waves have something to hold onto.
Point cutting works great for wavy hair because it creates definition without removing all your volume.
For Straight Hair
Straight thick hair gets the best results from thinning shears and choppy layers. Both techniques remove bulk while creating movement and texture.
Straight hair is forgiving. You can be a bit more aggressive with thinning and still get good results.
For Fine Hair
Don’t thin fine hair too much. Fine hair is already delicate and breaks easily. Light thinning with very selective placement is better than heavy thinning.
If your hair is both fine and thin, skip thinning entirely. Focus on good haircuts and proper care instead.
What to Expect After Thinning
Your hair will immediately look lighter and less bulky. This is great.
It will also look a bit shorter because you removed length with all those bulk-removing cuts.
Your hair will style faster and easier. This is a huge win.
Your hair might feel a bit different at first. You’re used to the weight. After thinning, your head might feel lighter for several days.
Final Thoughts
Thinning out hair is one of the best things you can do if you have thick, heavy strands. It makes your hair easier to manage, reduces damage and breakage, and actually creates better-looking volume.
Whether you do it at home with thinning shears or invest in a professional stylist, the results are worth it. Your hair will feel lighter, look better, and take less time to style every single day.
Start slow and be patient. Don’t try to thin everything at once. Work gradually and see what looks good. Your hair will thank you, and you’ll wonder why you didn’t do this sooner.

Mary is a fashion enthusiast and lifestyle writer who loves discovering stylish clothing, accessories, and everyday fashion essentials. She enjoys researching the latest trends, reviewing popular products, and sharing practical style tips to help readers dress with confidence. Through FashionSolve.com, Mary provides honest recommendations, fashion guides, and inspiration for building a wardrobe that is both stylish and affordable.