How to Put a Scarf on Your Head?
So you’ve got a beautiful scarf sitting in your closet, and you’re wondering what to do with it beyond draping it around your neck. Let me tell you something—your scarf is about to become your new favorite accessory. Wrapping a scarf around your head can instantly transform your look, protect your hair, add style to your outfit, and honestly, make you feel pretty fantastic. If you’ve never tried it before, don’t worry. This guide walks you through everything you need to know about putting a scarf on your head like a pro.
Why Wrap Your Hair With a Scarf?
Before we jump into the how, let’s talk about the why. People wrap scarves around their heads for tons of reasons, and your reason might be completely different from someone else’s. Some folks use scarves to keep their hair in place on windy days. Others wrap them around their heads as a fashion statement that instantly kicks up the style factor. Then there are people who use scarves as a protective layer for their hair when they’re not trying to wash it every single day.
A scarf can also save your hairstyle between washes. If you’ve got curls, waves, or any style that took effort to create, wrapping your head with a scarf keeps everything looking fresh and puts your best face forward. You might also just love the cultural significance of head wrapping, or maybe you’re recovering from a bad hair day and need a quick fix. Whatever your reason, a head wrap works for pretty much everyone.
What Kind of Scarf Should You Use?
Not all scarves work the same way when it comes to wrapping your head. The material, size, and weight of your scarf all play a role in how well your head wrap turns out.
Silk and satin scarves are absolute winners when it comes to head wrapping. These smooth fabrics feel gentle against your skin and your hair. They don’t create frizz like cotton can, and they look elegant and sophisticated. Silk scarves also slip and slide less than rough materials, which helps keep your wrap in place.
Cotton scarves work great too, especially if you want something more casual and breathable. Cotton is super common, affordable, and comes in endless patterns and colors. Just keep in mind that cotton can sometimes be more slippery than other materials, so you might need to adjust your wrap more often.
Linen and linen blends give you that casual, textured look. These materials work well for a more relaxed, boho vibe. They breathe nicely and feel comfy against your head.
Rayon and viscose split the difference between cotton and silk. These fabrics drape beautifully and have a nice, smooth feel without the high price tag of pure silk.
The size of your scarf matters too. A standard rectangular scarf works great for most head wrapping techniques. Larger scarves give you more fabric to work with, making wraps easier and more forgiving. Smaller scarves or infinity scarves can work, but they require a bit more skill and practice.
Basic Head Wrap Method for Beginners
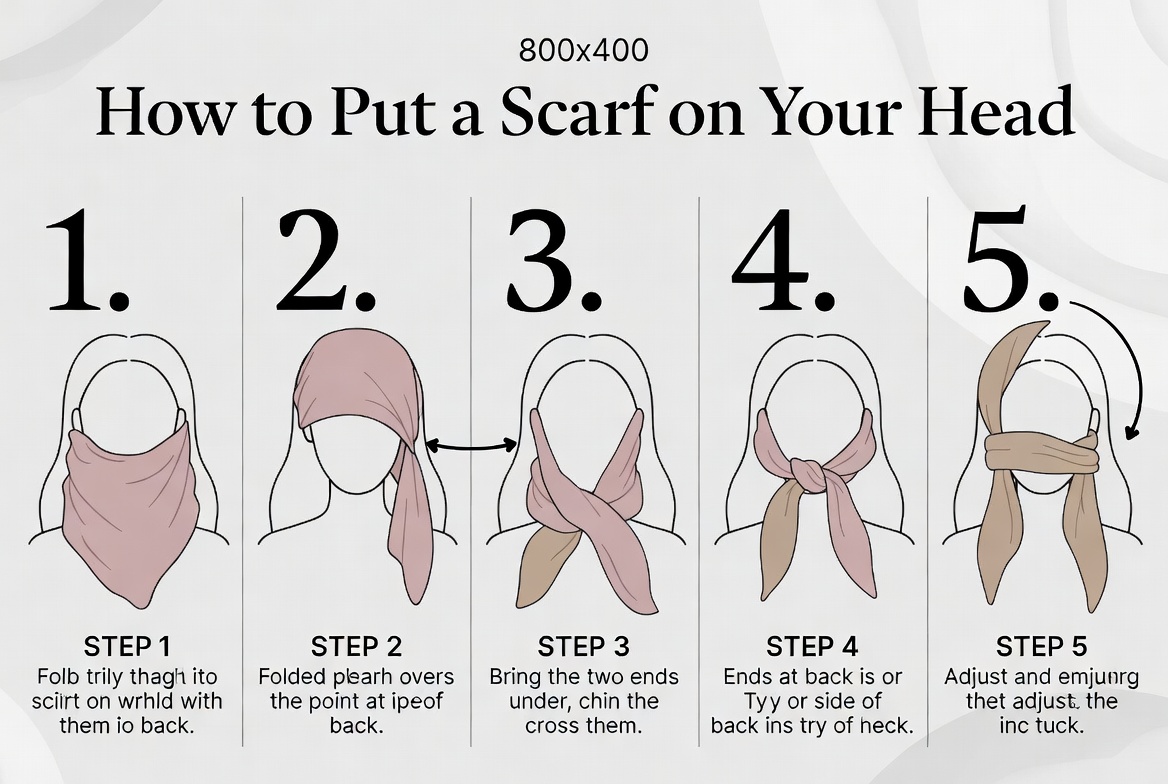
Let’s start with the most straightforward way to wrap a scarf around your head. This method works for almost everyone and requires no special skills.
Step One: Prepare Your Hair
Start by deciding what you want to do with your hair. You can wear it down, pull it into a ponytail, twist it up into a bun, or braid it. All of these work fine. The key is that your hair should be relatively smooth and not sticking out everywhere. If you’ve got hair flying all over the place, give it a quick brush or tame it down with some product.
Step Two: Find Your Scarf’s Center
Lay your scarf out and find the middle point. This is your anchor point for the whole wrap. If you’re using a rectangular scarf, fold it in half longwise to create a triangle shape. This makes the scarf easier to work with and gives you good control over the fabric.
Step Three: Position the Scarf
Hold the scarf up behind your head with the center point or the folded edge at the nape of your neck. The two loose ends should hang down in front of your shoulders. This is your starting position.
Step Four: Bring the Ends Forward
Take both ends of the scarf and bring them up and forward, crossing them over the top of your head. You’re basically bringing them from the back of your head to the front. Let them rest on top of your head for now—don’t tie anything yet.
Step Five: Wrap Around and Tie
Now take one end of the scarf and wrap it around the side of your head toward the back. Then grab the other end and wrap it around the opposite side. Your two ends should meet somewhere in the back or to the side of your head. Cross them over and tie them together in a knot. Make sure the knot is tight enough to hold everything in place but not so tight that it hurts your head.
Step Six: Tuck and Adjust
Tuck any loose ends under the wrap so nothing sticks out awkwardly. Adjust the fabric so it sits smoothly on your head. You want it snug but comfortable. Your hairline should look neat, and the scarf should frame your face nicely.
That’s it! You’ve just created your first head wrap. This basic method takes maybe two minutes once you get the hang of it.
The Turban Wrap Technique
Want to look like you stepped out of a fashion magazine? A turban wrap is your answer. This method creates more volume and a more dramatic look than the basic wrap.
Getting Started With a Turban
Begin with a larger scarf for this method. A long rectangular scarf or a fabric square works best. Start the same way you did with the basic wrap—find your center point and position the scarf at the nape of your neck.
Build the Base
Bring both ends up and forward like before. Cross them over the top of your head, but this time, keep wrapping. As you bring each end around your head, loop it back and cross it over the top again. You’re creating layers of fabric that sit on top of each other.
Create Volume
Here’s where the turban look comes in. As you wrap, loosely gather the fabric so it puffs out instead of lying flat. This creates that signature turban volume that looks so stylish. The more you wrap and the more loosely you gather, the bigger your turban will be.
Secure Everything
When you’ve gone around your head a couple of times and reached the ends of your scarf, tuck them underneath the layers of wrap you’ve created. The weight of the layers should hold everything together. If things feel loose, tie the ends together at the back of your head.
Fluff It Out
Step back and look in the mirror. Now fluff out the fabric and adjust the height and shape to your liking. A turban wrap looks best when it’s got some volume but still looks intentional, not messy.
The Side Wrap Method
This method works great if you want a more asymmetrical, modern look. It also works well if you don’t want to cover the entire top of your head.
Starting Your Side Wrap
Position your scarf at the side of your head rather than at the back. Let’s say you’re starting on your left side. Place the center or folded edge of your scarf there.
Wrap Across
Bring one end of the scarf across the front of your head to the opposite side. You’re creating a diagonal line of fabric across your forehead and the upper part of your head. Then take the other end and wrap it around the back of your head.
Meet at the Back
Bring both ends together at the back of your head and secure them with a knot or tuck. The beauty of this method is that one side of your head is covered while the other side shows off your hair or is completely exposed. It’s a great way to show off a good hair day while still having that wrapped look.
Play With the Angle
You can adjust where you start your wrap to change the look. Start higher on your head for a different vibe, or start lower near your ear. Each angle creates a different effect.
The Half-Wrap Head Tie
This method covers just the top half of your head and works amazingly well if you’ve got longer hair you want to show off.
Position Your Scarf
Fold your scarf into a triangle shape or hold it lengthwise so you have a band of fabric. Position this band across the top of your head, holding it in place with your hands.
Tie at the Back
Bring the two ends of the scarf around to the back of your head and tie them together in a secure knot. The knot should sit at the back of your head, creating a headband effect.
Let Your Hair Flow
Leave your hair down below the wrap. You can tease it out or let it hang naturally. This look combines the elegance of a head wrap with the freedom of wearing your hair down.
Optional: Add More Style
If you want, you can add a second scarf or use the tail ends of your first scarf to create additional wrapping below the initial band. Some people love layering fabrics for a richer, more interesting look.
Scarf Wrapping for Different Hair Types
Different hair textures and styles need slightly different approaches to head wrapping. Here’s how to make it work for you.
Fine or Thin Hair
If you’ve got fine hair, you want to be gentle. Tight wraps can stress your hair and create breakage. Use a silk or satin scarf and keep your wrap snug but not overly tight. You might find that fine hair works better with a lighter scarf material that won’t weigh it down.
Thick or Coily Hair
Thick, curly, or coily hair is perfect for head wrapping. Your hair tends to be more resilient, so you can make wraps a bit tighter and they’ll stay in place longer. Silk scarves are still ideal because they reduce frizz and friction. Your hair will thank you for the protection.
Straight Hair
Straight hair works well with any wrapping method. The main thing to remember is that straight hair can sometimes slip under or out of wraps more easily than other textures. Make sure your wrap is secure and check it occasionally to make sure it hasn’t shifted.
Waves are beautiful and head wraps help protect them between washes. A scarf wrap can actually help define your waves while keeping them in place. Use the same techniques but try to gently position your waves before wrapping so they look their best.
Styling Tips and Tricks
Now that you know how to wrap a scarf on your head, let’s talk about making it look amazing.
Color Coordination
Match your scarf to your outfit for a pulled-together look, or go bold and choose a scarf color that contrasts with what you’re wearing. Jewel tones like emerald, sapphire, and ruby look luxurious. Pastels feel soft and dreamy. Bold prints and patterns make a statement. There’s no wrong choice—just pick what makes you feel good.
Fabric Texture Pairing
A smooth silk scarf feels fancy and refined. A textured cotton scarf feels casual and cool. Mix and match based on what vibe you’re going for. A matte scarf looks different from a shiny one, so consider the finish when choosing your wrap.
The Front Flair
After you’ve wrapped your scarf, you can style the front to frame your face. Some people like a neat, smooth look. Others let a little fabric stand up in the front for more height and drama. Experiment and see what flatters your face shape.
Accessory Layering
You can add earrings, a hat on top of your wrap, or a bandana underneath to add even more style. Gold jewelry looks stunning with most scarf colors. Large hoop earrings create a bold look. A small hat or fascinator on top takes things up a notch.
Scarf Head Wraps for Different Occasions
The way you wrap your scarf can change depending on where you’re going and what you’re doing.
Casual Day Out
For running errands or just hanging out, go for comfort. A simple wrap in a solid color or casual pattern works great. You don’t need to make it perfect or pristine. It’s fine if it looks a little relaxed.
Work or Professional Settings
At work, go for a neat, polished wrap. Choose neutral colors or subtle patterns that won’t distract. Keep everything smooth and tidy. A turban wrap can look very professional and put-together.
Social Events or Parties
This is your chance to get bold. Choose a bright color, an interesting pattern, or a luxurious fabric like silk. Try a more elaborate turban wrap or stack multiple scarves for drama. Make it a statement piece.
Outdoor Activities
If you’re heading to the beach, hiking, or just spending time outside, your head wrap serves a practical purpose. Choose a breathable cotton scarf in a color that won’t show sweat or dirt. A simple wrap that stays put is better than something fancy that might slip.
Bed or Sleep Time
A loose head wrap before bed protects your hair while you sleep. This keeps moisture in your hair and prevents friction against your pillow. Use a silk or satin scarf and wrap it gently and loosely.
Common Mistakes to Avoid
Even experienced head wrap wearers sometimes run into problems. Here’s what to watch out for.
Wrapping Too Tight
A wrap that’s too tight causes headaches and can damage your hair. If your head hurts after wrapping your scarf, it’s too tight. Loosen it up. Your wrap should feel secure but comfortable.
Using the Wrong Fabric
A rough cotton or synthetic fabric can create frizz and snags. If possible, spring for a silk or satin scarf. It’s worth the investment and will last longer. Your hair will look better too.
Not Securing the Ends Properly
If your wrap keeps slipping throughout the day, you’re not securing the ends well enough. Make sure your knot is tight or that your ends are tucked under enough layers. You might need to practice to find the right tension.
Neglecting Your Hairline
Your hairline should look neat when you wrap. Smooth any flyaways before wrapping and position your scarf so it frames your face nicely. A messy hairline can make even a beautiful wrap look sloppy.
Forgetting About Comfort
Style is great, but not if you’re miserable all day. If your wrap causes headaches, makes you itch, or drives you crazy, it’s not the right method for you. Try a different technique or adjust the one you’re using.
Caring for Your Scarves
Your scarves will last longer and look better if you take care of them properly.
Washing Your Scarves
Most scarves do best with hand washing. Use cool water and gentle soap. Avoid hot water and harsh detergents that can damage the fabric. Rinse thoroughly until the water runs clear. Gently squeeze out excess water—don’t wring your scarf.
Drying Your Scarves
Lay your clean scarf flat on a towel to dry, or hang it loosely if you have somewhere to do that. Avoid direct sunlight if your scarf is a dark color, as it can fade. Never put scarves in the dryer.
Storing Your Scarves
Keep your scarves in a cool, dry place. A scarf drawer or box works great. Fold them neatly so they don’t wrinkle too badly. If you have space, you can roll them instead of folding for a different look.
Protecting from Damage
Keep your scarves away from sharp objects, rough surfaces, and anything that might snag the fabric. If you notice a loose thread, trim it carefully instead of pulling on it.
Practice Makes Perfect
Honestly, the first few times you wrap a scarf on your head, it might feel awkward or take a while. That’s completely normal. Your fingers aren’t used to working with fabric like this, and your brain needs to learn the motions. By the fifth or sixth time, you’ll find your rhythm. By the tenth time, you’ll be able to wrap your scarf without even thinking about it.
Give yourself grace as you learn. Take a few selfies so you can see what the wrap looks like from different angles. Ask friends or family if it looks good. Watch videos online of other people doing head wraps. The more you expose yourself to different techniques and styles, the better you’ll get at creating your own.
Experiment and Have Fun
The best part about wrapping scarves on your head is that there’s no wrong way to do it. Sure, some methods are more secure and look more polished than others, but that’s not the point. The point is that you’re creating a look that makes you feel good.
Try different scarves. Try different methods. Mix and match techniques. Combine two scarves for a double-wrap look. Throw a scarf on just to run to the mailbox, or style an elaborate turban for a night out. Wear head wraps because they’re practical, or wear them purely for fun.
Your scarf isn’t just a piece of fabric. It’s a tool for transformation. It can protect your hair, elevate your style, express your personality, and make you feel more confident. Learning how to put a scarf on your head opens up endless possibilities for self-expression and creativity.
Final Thoughts
Whether you’re wrapping a scarf on your head for the first time or the hundredth time, remember that this is about you and what makes you feel good. There’s no pressure to be perfect. There’s no rule saying your wrap has to look a certain way. You get to decide what your head wrap looks like, how tight it is, which method you use, and when you wear it.
Start with the basic method if you’re a complete beginner. Graduate to a turban wrap when you feel ready. Try the side wrap for a different vibe. Keep experimenting until you find the methods that work best for your hair, your style, and your lifestyle.
Your scarf is waiting. Go wrap that head and rock that look. You’ve got this.
Mary is a fashion enthusiast and lifestyle writer who loves discovering stylish clothing, accessories, and everyday fashion essentials. She enjoys researching the latest trends, reviewing popular products, and sharing practical style tips to help readers dress with confidence. Through FashionSolve.com, Mary provides honest recommendations, fashion guides, and inspiration for building a wardrobe that is both stylish and affordable.