How to Apply Eyeliner?
You’ve probably looked at someone with a flawless eyeliner look and wondered how they did it. The good news? It’s easier than you think. Whether you’re new to makeup or just looking to improve your eyeliner skills, this guide will walk you through everything you need to know about applying eyeliner like a pro.
Why Eyeliner Matters for Your Makeup Look?
Eyeliner is one of the most powerful tools in your makeup kit. A good eyeliner can change your entire face. It makes your eyes pop. It adds definition. It can make you look more awake, even on those mornings when you didn’t sleep well. The right eyeliner application brings out your eye color and makes your eyes seem bigger or more intense.
Lots of people skip eyeliner because they think it’s too hard. They worry about messing it up or looking too dramatic. Here’s the truth: eyeliner is not as scary as it seems. Once you learn the basics, you’ll be able to do it every single day without much effort.
Types of Eyeliner You Should Know About
Before you start applying eyeliner, you need to pick the right type for your needs. There are several options, and each one works differently.
Pencil Eyeliner
Pencil eyeliners are the most popular choice for beginners. They look like regular pencils but are made just for eyes. They’re easy to control and forgiving if you make a mistake. You can smudge them to create a softer look or keep them sharp for a bold line.
One great thing about pencil eyeliners is that they come in tons of colors. You can find black, brown, blue, purple, and even metallic shades. They also stay on pretty well throughout the day, though you might need to touch them up.
Liquid Eyeliner
Liquid eyeliner comes in a small bottle with a thin brush or felt tip. This type creates the sharpest, most dramatic lines. Many people find liquid eyeliner harder to apply at first because it requires a steady hand. Once you get used to it, though, liquid eyeliner gives you the most control for precise lines.
Liquid eyeliner stays put all day long. It doesn’t smudge easily. If you love a bold, dramatic look, liquid eyeliner is your best friend. The only downside is that it’s harder to fix mistakes once the ink dries.
Gel Eyeliner
Gel eyeliners sit somewhere between pencil and liquid. They come in small pots and you apply them with a brush. Gel eyeliner is super pigmented, which means the color shows up dark and rich. You can create thick lines or thin lines depending on the brush you use. Gel eyeliner lasts all day and doesn’t flake off.
Kohl Eyeliner
Kohl is a dark powder that comes in pencil form. It’s been used for thousands of years. Kohl pencils are soft and creamy. They’re perfect if you like a smudgy, smoky eye look. Kohl goes on easily but can smudge throughout the day, so it works best if you like that lived-in style.
Getting Your Supplies Ready
Before you start, gather everything you need. Having your supplies ready makes the whole process easier and faster.
You’ll need:
- Your chosen eyeliner (pencil, liquid, or gel)
- A sharpener (if using pencil eyeliner)
- A small brush or applicator
- Makeup remover
- A mirror with good lighting
- Optional: eyeliner primer
The mirror and lighting are super important. You need to see what you’re doing. Natural light near a window works great. If that’s not possible, use a bright lamp. Bad lighting leads to crooked lines, so don’t skip this step.
A sharp pencil eyeliner is easier to apply than a dull one. Take time to sharpen your pencil eyeliner before you start. A dull pencil will tug on your delicate eye area and will not give you crisp lines.
Prep Your Eyelids for Success
Your eyelids need to be ready before you apply eyeliner. This simple step makes everything easier and helps your eyeliner stay put all day.
Start by washing your face with a gentle cleanser. Pat your face dry. Your eyelids should be clean and dry.
Next, apply your regular eye makeup primer or a tiny bit of concealer. This creates a smooth base for your eyeliner. It also helps the eyeliner stay on longer. If you have oily eyelids, primer is your secret weapon. It prevents your eyeliner from sliding around.
Let the primer dry for a few seconds. Now you’re ready to draw.
How to Apply Pencil Eyeliner: Step by Step
Most beginners start with pencil eyeliner, and that’s a smart choice. Here’s how to do it right.
Step 1: Find Your Comfort Position
Sit somewhere comfortable where you can rest your arm. You need stability. Some people tilt their head back slightly. Others lean forward toward the mirror. Find what feels natural to you.
Step 2: Steady Your Hand
This is key. You need to keep your hand steady while applying eyeliner. Rest your elbow on a table or desk. You can also rest the side of your hand on your cheek near your eye. This gives you support and helps prevent shaky lines.
Step 3: Start Small
Don’t apply your eyeliner to your whole eye at once. Start with a small section. Begin at the inner corner of your eye, closer to your nose. Apply a tiny line about a quarter inch long.
Use light pressure. You don’t need to push hard. A light hand gives you more control. Press the pencil gently to your lash line and draw a small line. Light pressure also means you can build up the line gradually.
Step 4: Work in Sections
Move to the middle of your upper lash line. Apply a small section of eyeliner here. Then move to the outer corner. Working in sections prevents you from accidentally poking yourself and keeps your line even.
Step 5: Connect Your Dots
Now that you’ve done small sections, it’s time to blend them together. Go back over your line with light pressure, connecting all the sections. This creates one smooth line instead of dotted sections.
Step 6: Make It Bolder
If you want a thicker line, go over it again. Add more pressure this time. You can build up your eyeliner line to be as bold or subtle as you want.
Step 7: Fix the Edges
Use a cotton swab or a clean brush to clean up any mess. You might have some extra color on your eyelid above the line or below it. Gently wipe these away for a clean look.
How to Apply Liquid Eyeliner: Step by Step
Liquid eyeliner takes a little more practice, but once you get it, you’ll love the results. Here’s how to apply it.
Step 1: Prepare the Same Way
Just like with pencil eyeliner, prepare your eyelids with primer and find good lighting.
Step 2: Get Your Brush Ready
Dip the brush or felt tip into the liquid. You don’t need a lot. A small amount of liquid eyeliner goes a long way. Too much product will drip and run. Wipe off any excess on the edge of the bottle.
Step 3: Rest Your Hand
Stabilize your hand the same way as you would with pencil eyeliner. Rest your elbow and use your cheek for support.
Step 4: Draw a Thin Line First
Start at the inner corner and draw a super thin line. The goal is to stay right on your lash line. If you mess up with liquid, it’s harder to fix, so take your time. Many people find it helpful to look straight ahead into the mirror rather than tilting their eye.
Step 5: Build Up Gradually
You can always make your line thicker. Start thin and add more product if needed. This method prevents you from making mistakes and having to remove everything and start over.
Step 6: Create Your Flick (Optional)
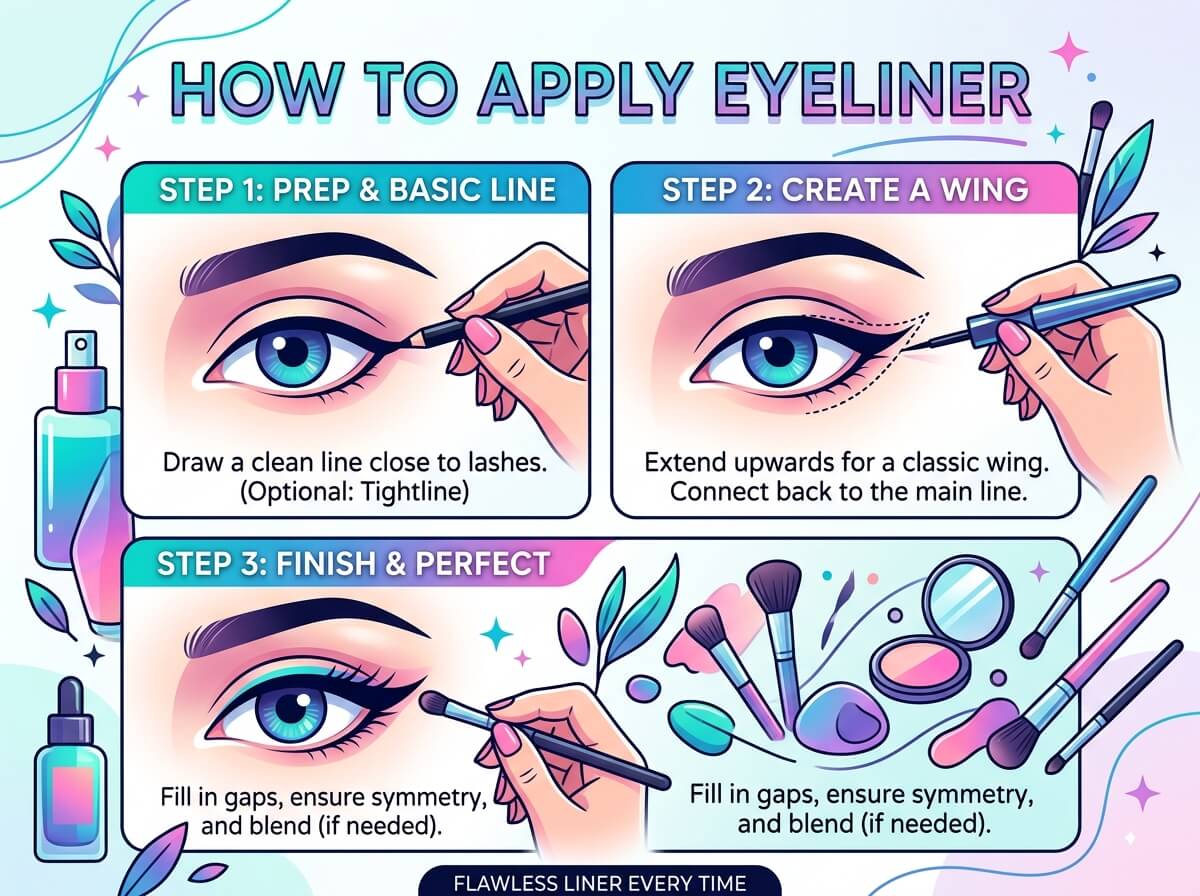
If you want a dramatic winged eyeliner look, now’s the time. At the outer corner of your eye, angle your brush upward and outward. Draw a small flick that goes up and away from your eye. This creates that cool cat-eye effect. The flick should go toward your temple.
Step 7: Let It Dry
Don’t touch your eye or close your eye right away. Let the liquid dry completely. This usually takes about thirty seconds. Once it’s dry, it won’t smudge, but before that, it will.
How to Apply Eyeliner to Your Lower Lash Line
Your lower lash line needs eyeliner too. This part of your eye is sensitive, so be extra gentle.
Use pencil eyeliner for your lower lash line. Liquid can feel uncomfortable down there, and it’s harder to control.
Here’s how:
- Use a sharpened pencil
- Gently pull your lower eyelid down slightly
- Apply the pencil to your lower lash line, right where your lashes start
- Work from the outer corner toward the inner corner
- Use light pressure and short strokes
- You can leave the inner corner light or skip it for a softer look
Many people skip the lower lash line on their inner corner because putting eyeliner right in the corner can feel uncomfortable. If you do use eyeliner on your entire lower lash line, you’ll get a more defined look.
Eyeliner Looks You Can Try
Once you master basic eyeliner application, you can try different styles. Here are some popular looks.
Natural Everyday Eyeliner
For a natural look, apply a thin line to just your upper lash line. Keep the line close to your lashes. You can make it a little thicker at the outer corner to add subtle definition. Skip the lower lash line or use a very light touch.
Smoky Eye Eyeliner
For a smoky eye, use a pencil or kohl eyeliner on both your upper and lower lash lines. Smudge the eyeliner with a small brush or your finger. This creates a soft, blended look that feels edgy but not too intense.
Graphic Eyeliner
This bold look uses sharp, clean lines. Use liquid eyeliner for this. Apply a crisp line on your upper lash line. You can extend it past the corner of your eye for extra drama. Keep the lines sharp and defined for a graphic look.
Winged Eyeliner
Winged eyeliner, also called cat-eye eyeliner, is super popular. Apply eyeliner to your upper lash line, then extend it at the outer corner. The line angles upward and away from your eye, creating a “wing.” This look makes your eyes appear larger and more awake.
Tight Line Eyeliner
A tight line means applying eyeliner to the waterline, which is the space right at the base of your upper lashes. This makes your lashes appear thicker and fuller. It’s subtle but effective. Use a pencil eyeliner for this because it’s easier to control.
Common Eyeliner Mistakes to Avoid
Even beginners can create great eyeliner. Just avoid these common mistakes.
Applying Eyeliner on a Dirty Eyelid
Always prep your eyelids. Dirt, oil, and old makeup prevent new eyeliner from sticking. It will slide around and look messy.
Using a Dull Pencil
A dull pencil tugs on your skin and creates thick, uneven lines. Always sharpen your pencil before you apply it.
Pressing Too Hard
Your eyelid skin is delicate. Pressing hard can hurt and cause unevenness. Use light pressure instead.
Applying Too Much Product
A little eyeliner goes a long way. If you use too much liquid or apply too many layers of pencil, your eyeliner will look heavy and overwhelming.
Ignoring Your Eye Shape
Everyone’s eyes are different. What looks good on someone else might not suit your eye shape. Experiment and find what works for you.
Not Letting Liquid Eyeliner Dry
Liquid eyeliner needs to dry before you blink or close your eyes. Give it time. If you don’t, it will smudge everywhere.
Making Your Lines Uneven
One side of your face is usually slightly different from the other. That’s normal. But try to make your eyeliner lines as even as possible. Look at both eyes as you apply eyeliner.
How to Make Eyeliner Last All Day
You want your eyeliner to look perfect from morning to night. These tips will help.
Use an Eyeliner Primer
Eyeliner primer is a game changer. It creates a smooth, sticky base that helps eyeliner stay put. Apply a thin layer to your eyelids and let it dry before adding eyeliner.
Choose Waterproof Formulas
Waterproof eyeliner lasts longer. It won’t smudge if you cry, sweat, or get caught in the rain. Waterproof formulas work great for all-day wear.
Seal It with Powder
After your eyeliner dries, press a tiny bit of eyeshadow powder over it. This seals the eyeliner and helps it last longer.
Keep Eyeliner Touch-Up Supplies Handy
Even the best eyeliner can smudge. Keep a pencil eyeliner and a cotton swab in your bag. You can touch up quickly if needed.
Avoid Touching Your Eyes
Your fingers add oil to your eyelids. This makes eyeliner slide off. Try not to touch your eyes during the day.
Eyeliner Colors Beyond Black
Black eyeliner is classic, but you have so many color options. Here are some great choices for different looks and skin tones.
Brown Eyeliner
Brown eyeliner is softer than black. It works great for everyday makeup. Brown eyeliner makes your eyes look defined but not too dramatic. It pairs well with warm-toned eyeshadow.
Navy or Dark Blue Eyeliner
Navy eyeliner is surprisingly flattering on lots of people. It’s defined but feels less harsh than black. Dark blue looks especially pretty on lighter eye colors. It can make green, blue, and gray eyes pop.
Burgundy or Wine Eyeliner
Burgundy eyeliner adds sophistication. It works great for evening looks or if you love warm tones. This color suits most skin tones.
Green or Emerald Eyeliner
Green eyeliner brings out brown eyes beautifully. It adds a fun, creative touch. Green eyeliner works best if you like bold, unique looks.
White or Nude Eyeliner
These colors make your eyes look bigger. They’re often applied to the waterline. White or nude eyeliner opens up your eyes and gives you an awake, fresh look.
Troubleshooting Eyeliner Problems
Even with practice, you might run into problems. Here’s how to fix them.
Shaky Lines
Shaky lines happen when your hand isn’t stable. Rest your arm and use your cheek for support. Take your time and don’t rush.
Smudging Throughout the Day
Use waterproof eyeliner and an eyeliner primer. Avoid touching your eyes. If you have very oily eyelids, set your eyeliner with eyeshadow powder.
Eyeliner Won’t Go On Smoothly
Your eyelids might have old product buildup. Cleanse them thoroughly. Make sure your eyeliner pencil is sharp or your liquid eyeliner hasn’t dried out.
Uneven Eyeliner on Both Eyes
Everyone’s face is slightly asymmetrical. The best fix is to step back and look at your whole face, not just one eye. Make small adjustments to balance both sides.
Eyeliner Flaking Off
Flaking usually means your eyeliner is old or dry. Replace old eyeliners. Use fresh products. Make sure you’ve prepped your eyelids with primer.
Eyeliner in Your Eyes
This happens to everyone. Be gentle when applying eyeliner near your inner eye. If it gets in your eye, blink several times or use a clean tissue to gently wipe it away.
Eyeliner Application Tips for Different Eye Shapes
Your eye shape affects how you should apply eyeliner. Here’s advice for different eye types.
For Round Eyes
Round eyes benefit from eyeliner that adds length. Extend your eyeliner past the outer corner slightly. This elongates your eyes and makes them look more almond-shaped.
For Almond-Shaped Eyes
Almond-shaped eyes can pull off almost any eyeliner look. You’re lucky! Winged eyeliner, graphic eyeliner, and tight lines all work beautifully on almond eyes.
For Hooded Eyes
Hooded eyes have less visible eyelid. Apply your eyeliner slightly above your lash line so it shows. You can make the line a bit thicker than you would on other eye shapes. Avoid tight lining your waterline as it won’t show as much.
For Monolid Eyes
Monolid eyes are beautiful and benefit from eyeliner that adds definition. A sharp, clean line on your upper lash line looks striking. Winged eyeliner works great too.
For Deep-Set Eyes
Deep-set eyes sit back in your skull more. Eyeliner helps bring them forward. Use bright or metallic eyeliner shades to create that effect. A thin line works better than a thick one.
For Wide-Set Eyes
If your eyes are far apart, eyeliner closer to your inner corner helps them appear closer together. Don’t extend your eyeliner past your outer corner too far.
For Close-Set Eyes
Close-set eyes look wider apart when you keep eyeliner away from the inner corner. Focus on the outer two-thirds of your lash line.
Eyeliner Hacks for Beginners
Try these tricks to make eyeliner application easier.
Use Tape as a Guide
Stick a piece of clear tape at an angle from your outer eye corner toward your temple. This creates a guide for your winged eyeliner. The tape prevents mistakes and helps you make both sides even.
Apply Eyeliner Before Eyeshadow
Apply your eyeliner first, then add eyeshadow. This prevents eyeshadow from smudging your eyeliner. It also makes fixing mistakes easier.
Warm Up Your Pencil
If your pencil eyeliner is too hard to apply smoothly, warm it up. Run it under warm water or hold it under a lamp for a few seconds. Warm eyeliner glides on more smoothly.
Use a Cotton Swab for Clean Lines
Dip a cotton swab in makeup remover. Use it to clean up any wobbly lines. Cotton swabs are way better than trying to fix lines with eyeliner itself.
Practice One Eye at a Time
Don’t feel like you need to apply both eyes at once. Do one eye, step back, and check it. Then do the other eye. This helps you keep them even.
Take Your Time
Rushing leads to mistakes. Give yourself extra time when you’re learning. As you practice, you’ll get faster naturally.
How to Remove Eyeliner Safely
Taking care of your eyes means removing eyeliner properly. Never rub your eyes hard.
Use a gentle makeup remover made for the eye area. Apply it to a cotton pad and press it against your closed eye for a few seconds. Gently wipe away the eyeliner. Do this several times if needed.
An oil-based remover works really well on waterproof eyeliner. Coconut oil or olive oil work in a pinch if you don’t have makeup remover.
Never go to bed with eyeliner on. Your eyes need to breathe at night. Sleeping in eyeliner can cause irritation and infections.
Building Your Eyeliner Routine
Once you learn to apply eyeliner, it becomes part of your daily routine. Here’s how to build a routine that works for you.
Start with one type of eyeliner. Master pencil eyeliner before moving to liquid. Once you feel confident, experiment with different looks and colors.
Set aside time to practice. You don’t need hours. Even five minutes a day helps you improve. Each day you apply eyeliner, you’re building muscle memory.
Take photos of your eyeliner looks. This helps you see what works and what doesn’t. It also shows your progress over time.
Watch tutorials online. Seeing real people apply eyeliner can help more than reading instructions. Look for tutorials that feature people with your eye shape.
Don’t get discouraged if your first attempts aren’t perfect. Even professional makeup artists didn’t get it right at first. Everyone starts as a beginner.
Final Thoughts on Eyeliner Application
Eyeliner is a skill. Like any skill, it improves with practice. You won’t be perfect on day one, and that’s okay. Each time you apply eyeliner, you get a little better.
Start simple. Use pencil eyeliner on your upper lash line. Once you feel comfortable, add eyeliner to your lower lash line. Then try different colors and looks.
Remember that makeup should be fun. Eyeliner is a tool for self-expression. Use it to feel confident and beautiful. There’s no one right way to apply eyeliner. Your way is the right way if it makes you happy.
Take your time. Be patient with yourself. Celebrate small wins, like the day you finally create an even winged eyeliner or nail that perfect smoky eye. These wins add up.
You’ve got this. Now grab your eyeliner and get started. Your beautiful eyes are waiting to shine.

Mary is a fashion enthusiast and lifestyle writer who loves discovering stylish clothing, accessories, and everyday fashion essentials. She enjoys researching the latest trends, reviewing popular products, and sharing practical style tips to help readers dress with confidence. Through FashionSolve.com, Mary provides honest recommendations, fashion guides, and inspiration for building a wardrobe that is both stylish and affordable.