How to Remove Flat Back Earrings?
So you’ve got a beautiful flat back earring stuck in your ear, and you’re not sure how to get it out without yanking on it like a madman. Don’t worry. You’re definitely not alone in this struggle. Flat back studs, also called threadless or press-fit earrings, look sleek and sit flush against your skin. But when it comes time to take them off, they can feel a bit tricky if you don’t know the right technique.
The good news? Removing flat back earrings is actually pretty simple once you understand the mechanics. This guide will walk you through everything you need to know to safely remove your earrings without causing pain or damage to your piercing.
What Exactly Are Flat Back Earrings?
Let’s start with the basics. Flat back earrings, also known as flat back studs or threadless earrings, have a flat disc or backing on the back and a decorative piece on the front. The design hugs your earlobe close to your skin, which makes them super comfortable for all-day wear. They’re popular for piercings in many areas, including ear lobes, cartilage, nose, and other body piercings.
Unlike traditional post-and-butterfly earrings or screw-on earrings, flat back ear jewelry stays in place through tension rather than threading or clasping. The backing disc sits flush against the back of your piercing, creating a clean look. This design became super trendy because they’re discrete, comfortable, and look more modern than older styles.
Understanding Flat Back Earring Backings
Flat back earrings come with different types of backing mechanisms. Each one requires a slightly different removal technique. Knowing which type you have makes the whole process much easier.
Press-Fit Backings
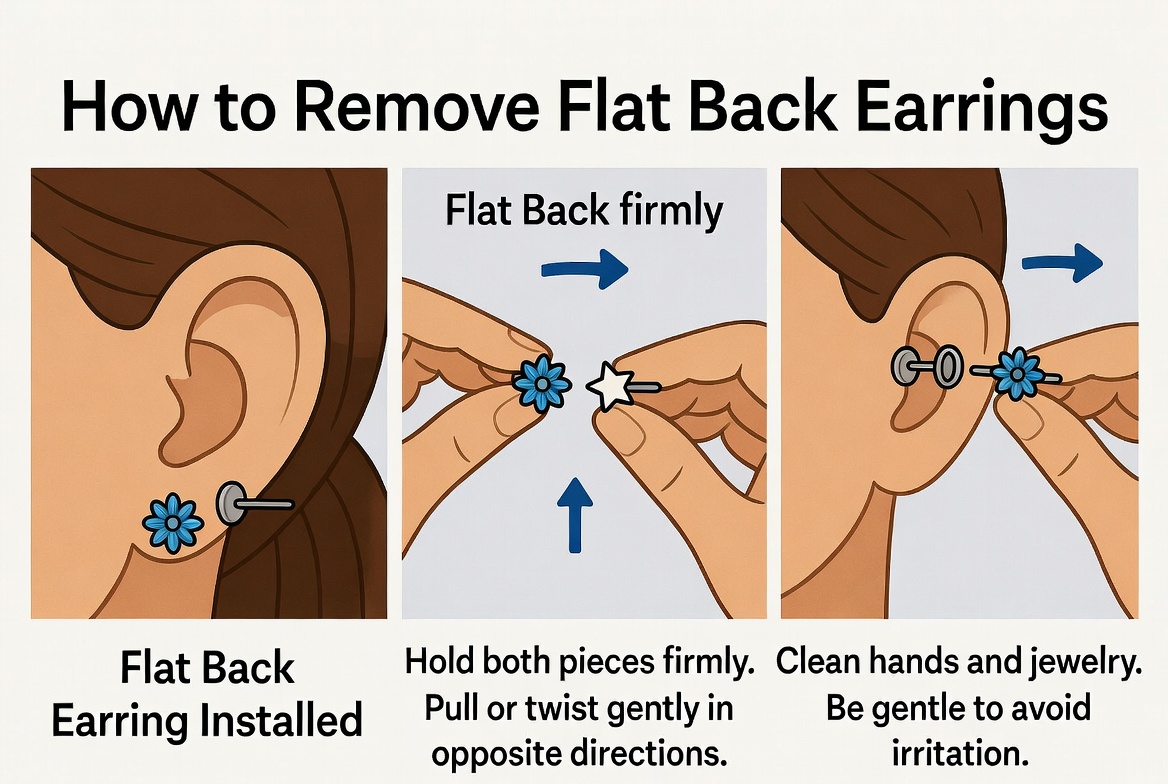
Press-fit backings are the most common. The decorative top part presses into a hollow backing piece. Think of it like pushing a stud into a socket. You can pop them on and off with a bit of pressure and leverage. These are easy to work with because you don’t need any tools or special techniques.
Threaded Backings
Some flat back earrings have tiny screw threads on the back. The front piece twists into the backing, similar to how you’d screw two things together. If you have threaded flat backs, you’ll need to twist them to remove them. These give you a super secure hold, which is great for active people or those who tend to bump their earrings.
Hybrid Backings
A hybrid backing works two ways. It can sit flush like a press-fit, but it also has threading. This gives you the best of both worlds. You get security and the sleek look. Removal is easy because you can usually pop it off or twist it, depending on what works better.
How to Remove Flat Back Earrings: Step-by-Step
Let’s get into the actual removal process. Follow these steps to safely take out your flat back stud earrings without pain or frustration.
Get Your Hands Clean First
Before you touch your earring, wash your hands with soap and water. This keeps bacteria away from your piercing. Your hands should be dry too, as wet hands make everything slippery and harder to grip. If you’ve got long nails, be extra careful not to scratch your ear.
Look in the Mirror
Stand in front of a mirror with good lighting. You need to see what you’re doing clearly. Bad lighting leads to fumbling around and accidentally pulling on your earring. A mirror lets you see exactly how the backing sits and where you need to apply pressure or twist.
Locate the Front and Back
Hold your earlobe gently and feel both the front and back of your earring. The front piece is the decorative part you see. The back is the flat disc against your skin. Knowing exactly where each piece is helps you apply pressure in the right spots.
For Press-Fit Backings
Here’s how to remove a press-fit flat back earring:
Use Your Fingers: Place your index finger or thumb on the decorative front piece. Using your other hand, gently push the flat backing away from your ear using your thumb or index finger. Think of it like you’re squeezing the two pieces apart. Don’t yank or pull hard. Gentle, steady pressure is what works.
The Pop Sound: You might hear or feel a tiny pop as the backing releases. That’s normal and means the press-fit is coming loose. Keep applying steady pressure until the backing slides free from the front piece.
Grab and Remove: Once the backing is loose, carefully slide the front piece out of your piercing. Move slowly to avoid irritating the hole.
Alternative Method: If your fingers aren’t working, try using a pencil eraser. The eraser gives you a better grip without being too harsh. Push the eraser against the back backing while holding the front piece still, then apply pressure to separate them.
For Threaded Backings
Removing threaded earrings takes a slightly different approach:
Hold the Front Piece: Keep one hand on the decorative front part of the earring. Hold it steady so it doesn’t spin around in your ear.
Twist the Back: Using your other hand, gently turn the backing counter-clockwise. You’re basically unscrewing it, like you would with a jar lid. Go slow and feel for any resistance.
Stop When It’s Loose: Once you feel the backing turning freely, stop twisting. The threads should be fully disengaged now.
Slide Out the Front: Now you can gently remove the front piece from your piercing. The backing will come off with it since they’re loosely connected.
Tip for Sticky Threads: If the threading feels stuck or you can’t turn it easily, apply a tiny bit of rubbing alcohol around the backing. This helps loosen stuck threads. Let it soak for a minute, then try again.
For Hybrid Backings
Hybrid backings give you options:
Try Popping First: Start with the press-fit method. Hold the front piece and push the backing away. This often works and is faster.
Switch to Twisting: If popping doesn’t work after a few tries, switch to the twisting method. Turn the backing counter-clockwise just like you would with a full threaded backing.
Be Patient: Don’t force it. Your body doesn’t enjoy having metal jammed around your piercing. Take a break if you’re getting frustrated, then try again.
Troubleshooting Common Problems
Sometimes flat back earring removal doesn’t go smoothly. Here’s how to handle common issues.
The Earring Won’t Budge
If your backing refuses to move, you might be applying pressure in the wrong direction or spot. Stop and reassess. Feel around the backing carefully to find where it connects to the front piece. That’s where you need to apply leverage.
Try these tricks:
Use Ice: Apply ice wrapped in a clean cloth to your earlobe for a minute. This reduces any swelling in your piercing that might be making removal hard. Wait a few minutes, then try again.
Gentle Wiggling: While holding the front piece still, wiggle the backing slightly from side to side. This can help break the seal and make it easier to pop off.
Wait a Few Hours: Sometimes your body reacts to pressure by swelling slightly. Remove the earring, wait, and come back to it later when any inflammation has gone down.
Call a Professional: If nothing works after several gentle attempts, visit a piercer or a dermatologist. They have tools and experience to help without causing damage.
Your Ear Hurts
Pain means you’re either pulling too hard or the earring is actually stuck in your piercing. Stop immediately if you feel sharp pain.
Back off and try a different approach. Never push through pain hoping it will get easier. That’s how you end up with torn earlobes or infected piercings.
Apply a Warm Compress: Use a clean cloth soaked in warm (not hot) water. Hold it against your ear for a few minutes. Warmth relaxes tissues and might help the earring come out more easily.
Use Lubricant: A tiny bit of saline solution or even coconut oil can help. Dab it around the backing and let it soak for a minute. This reduces friction and makes the backing slide out more smoothly.
Stop and Rest: If you’ve been trying for more than five minutes without success, stop. Your ear needs a break. Try again tomorrow.
The Backing Splits or Breaks
Sometimes the backing material cracks during removal. This happens most often with low-quality earrings or if you apply too much force.
If the backing breaks and pieces stay in your piercing, you have a problem. Don’t leave broken material in your ear. See a professional who can safely remove the pieces. Broken backing material can trap bacteria and lead to infection.
You Can’t Get a Good Grip
Sweaty fingers or a rounded backing can make gripping difficult. Try these solutions:
Use a Tissue or Cloth: A small piece of cloth gives your fingers better traction. Wrap it around your thumb and press against the backing.
Try Tweezers: Flat-tipped tweezers (the kind used for jewelry or eyebrows) can grip round backings better than your fingers. Be gentle and don’t pinch too hard.
Get Help: Ask someone with steady hands to help you. They can hold your ear or provide pressure while you manage the other part.
How to Prevent Removal Problems in the Future
Smart habits now save you headaches later. Follow these tips to make future flat back earring removal easier.
Buy Quality Earrings
Cheap earrings often have poorly fitted backings that get stuck easily. Spend a bit more on earrings from reputable makers. Quality matters for both comfort and ease of removal.
Keep Your Backings Clean
Dried skin, lotion, or discharge can build up on the backing and make it hard to remove. Once a week, gently clean the backing and your piercing with saline solution. This keeps everything clean and slippery.
Don’t Leave Earrings In Too Long
If you want to wear your earrings all the time, that’s fine. But periodically take them out and clean both the jewelry and your piercing. Leaving the same earrings in for months without a break can cause build-up and inflammation.
Apply Lubricant Before Removal
Before you ever need to remove a stubborn earring, do this. While wearing flat back earrings, occasionally apply a drop of saline solution or vitamin E oil around the backing. This keeps things lubricated and makes removal easier when the time comes.
Mark Your Backing Type
If you have multiple pairs of flat back earrings, you might forget which ones are threaded and which are press-fit. Use a tiny permanent marker to make a little dot on threaded backings. This reminds you to twist instead of push.
Practice Removal Regularly
Don’t wait until you’re panicked to figure out how to remove your earrings. Once a week or every few weeks, remove your earrings and put them back in. This keeps you familiar with the process and helps identify problems early.
When to Seek Professional Help
Knowing when to call a pro is important. Don’t tough it out if any of these apply to you:
Pain: If removal causes sharp pain, stop. Reach out to a professional. Pain signals something is wrong.
Bleeding or Discharge: If you see blood or pus around your piercing during removal, you need medical attention. This might indicate infection or a torn piercing.
Swelling That Won’t Go Down: A little swelling is normal after earring removal. But if your ear stays swollen for hours or gets worse, see a doctor.
Signs of Infection: Warmth, redness that spreads, or foul-smelling discharge means infection. Get help right away.
Broken Jewelry Inside: If part of the earring or backing stays stuck in your piercing, don’t dig at it yourself. A professional has sterile tools and can remove it safely.
Your Piercing Feels Closed or Tight: If your piercing feels like it’s healing shut around the earring, stop and see your piercer. They might need to stretch the opening gently.
Tips for Different Piercing Locations
Earring removal techniques work best for earlobe piercings because you have easy access. But flat back earrings go in lots of places. Here are location-specific tips.
Cartilage Piercings
Your cartilage doesn’t have as much give as your earlobe. Be extra gentle. The backing might feel more stuck because cartilage has less flex. Try the warm compress trick and give yourself extra time.
Nose Piercings
Nostril piercings are small and tender. Work slowly and carefully. The septum has even less room to work with. Use your tiniest tools and finest touch.
Rook, Daith, and Other Inner Ear Piercings
These areas are hard to see and reach. Use a good mirror and plenty of light. Consider asking a friend to help guide you. The curvature of the inner ear makes removal trickier than other locations.
Proper Care After Removal
Once you get your earring out, take care of your piercing.
Rinse with Saline: Flush the area with saline solution to remove any debris or dried material.
Let It Breathe: If you’re not putting in new earrings immediately, leave your piercing empty for a bit. This lets any irritation settle down.
Avoid Infection: Don’t touch the piercing with dirty fingers. Wash your hands before handling the area.
Know Your Swelling Timeline: Mild swelling for a few hours after removal is totally normal. This goes away on its own.
Stay Hydrated: Drink water and keep your body healthy. This helps your piercing heal if there’s any minor irritation.
Plan Your Next Earring: If you’re going back to earrings, clean them thoroughly before inserting them. Use saline solution to rinse off any dust or debris.
The Bottom Line
Removing flat back earrings doesn’t have to be stressful. Knowing which type of backing you have and using the right technique makes all the difference. Press-fit backings respond to gentle pressure, while threaded backings need a twist. Hybrid backings let you choose your method.
Most people figure out their earrings within seconds using the proper technique. If you run into trouble, pause, reassess, and try a different approach. Your body will thank you for being patient and gentle.
Keep your earrings clean, practice regular removal, and don’t ignore warning signs like pain or swelling. When in doubt, visit a professional. They’re trained to handle tricky situations without damaging your piercing.
Your flat back earrings are an investment in your style. Take care of them and yourself by removing them carefully and properly. Soon, taking them out will feel as natural as putting them in.
Remember, if you’re new to flat back earring stud removal or have trouble getting the hang of it, that’s completely normal. Everyone starts somewhere. With practice and patience, you’ll become a pro in no time. Now go rock those beautiful earrings with confidence!

Mary is a fashion enthusiast and lifestyle writer who loves discovering stylish clothing, accessories, and everyday fashion essentials. She enjoys researching the latest trends, reviewing popular products, and sharing practical style tips to help readers dress with confidence. Through FashionSolve.com, Mary provides honest recommendations, fashion guides, and inspiration for building a wardrobe that is both stylish and affordable.